-

- Forums
- Chatrooms
- Gallery
- Gameplay Videos
- Upload
- Articles
- Mod Reviews
- Shop SP: Games, Movies, Books
|
|
| Pillars of Eternity 2 Video-Based Walkthrough by David Milward |
Return to Queen's Berth
A Sinking Feeling
I replace Konstanten with Ydwin. I click on the exit and travel directly to the Bardatto Estate through the map of Neketaka.
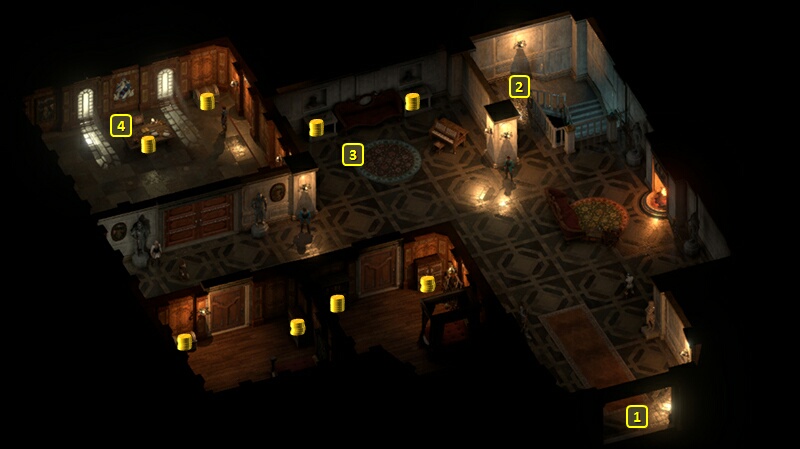
Now I am at #1 on the map of the Bardatto Estate. I speak to Ezzali Bardatto at #4. Giving her information about the Valera plot to rob her vault results in rewards of 1,500cp, the Bardatto Hull, and 4,200+ xp as rewards for completing the Quest called A Sinking Feeling.
Ezzali wants an alliance against the Valeras. Alliria chooses the Diplomatic option. It is the one dialogue option that leaves open the possibility of finishing the Family Pride Quest in a way that tries to have the rival families settle their differences peacefully.
*Evil* Zarathos agrees to the alliance with the Aggressive option, and freely does so as Pallegina is not in the evil party. I also avoid the Diplomatic option as I want to pursue a path that involves rescuing a member of the Valera family during a bungled heist. That path would be closed were I to give the information on the heist ahead of time to Ezzali. I suppose I could have done things in a similar manner to the good party, but I'm also taking this opportunity to show the reader a different pathway. It also seems much more in character for Zarathos to choose an Aggressive option over a Diplomatic one whenever possible.
I leave back out the door at #1.
A Bigger Fish
That brings me to #17 on the map of Queen's Berth. I go through one of the doors marked #13 lead to the Valera Estate.
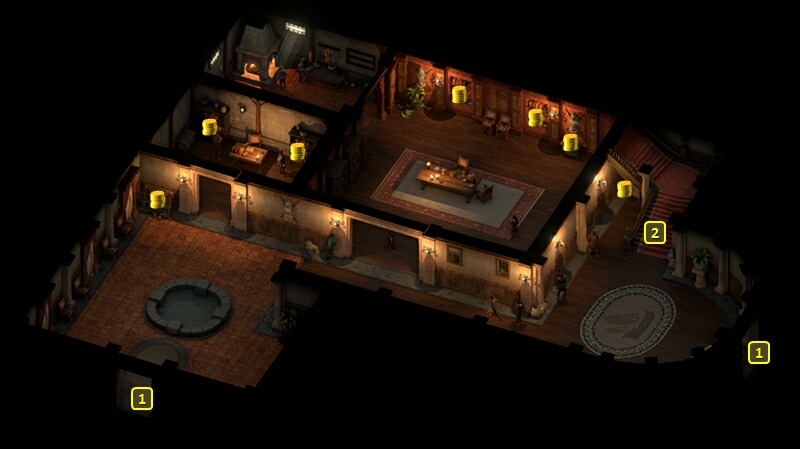
That brings me to a door marked #1 on the map of the main floor of the Valera Estate. I go up the stairs at #2.
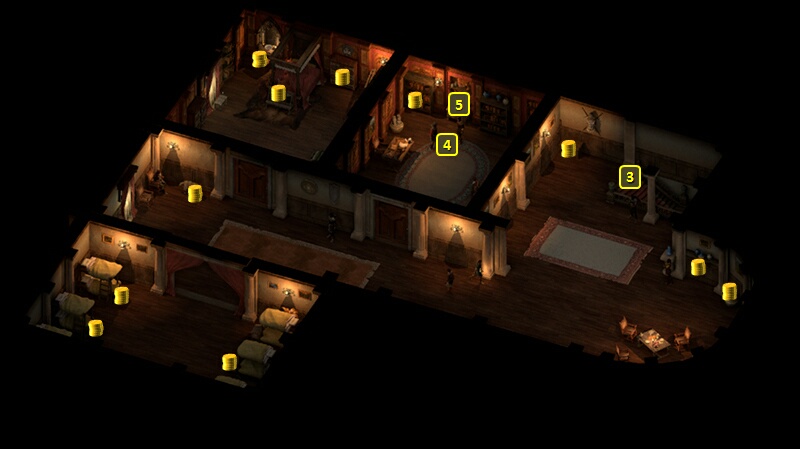
Now I am at #3 on the map of the second floor of the Valera Estate. I speak to Martino Valera at #4. Informing him of driving out Shrimp and his crew results in rewards of 1,000cp, the Valera Sails, and 4,000+ xp as rewards for completing the Quest called A Bigger Fish.
Martino of course will want an alliance against the Bardattos, but I hold off for now.
I speak to Atello Valera. I am actually pursuing a course of trying but failing to bring the rival families together to a truce, for reasons that will become clear. Possibilities for making Atello Valera open to a truce include:
*Evil* A Bigger Fish
The evil party likewise collects the 1,000gp, and the Valera Sails.
Zarathos obtains two abilities on his 13th level-up. One of them is Interrupting Blows. A Critical Hit from his melee attacks will now have a 50% chance of causing an Interrupt. For a character build that's predicated on scoring Critical Hits as frequently as possible, it's only natural to pack as many additional effects into those Critical Hits as you can. And that theme continues with ...
Taking Enervating Blows as the other ability. Critical Hits in melee will cause Weakened (-5 Constitution, Healing Received reduced by -50%) to targets for at least 6 seconds. It will also synergize with Spirit Frenzy and Brute Force for making attacks against lowered Fortitude instead of Deflection.
I leave the Valera Estate and "Wait" for five full days. The evil party is going to act on Martino's suggestion that a new job will become available in a few days. That is to say that the evil party, unlike the good party, is going to commit to an exclusive alliance with the Valeras to wipe out the Bardattos. And they can do so since Pallegina is not in the evil party.
Family Pride
I am back at #13 on the map of Queen's Berth. I go through the door at #17 to return to the Bardatto Estate.
I am now at #1 on the map of the Bardatto Estate. I speak again to Ezalli at #4. If I had started with her instead of Valera, options to get the ball rolling would have included:
Everyone is now gathered in the large room west of #2 on the map of the first floor of the Valera Estate. Negotiations will start off tense. Alliria makes a point of calling on Pallegina to offer her wisdom and earns reputation with her. The negotiation itself is a complex network of dialogue branches. But one key to a successful negotiation is to avoid dialogue options that insult either family, or place the blame for the feud squarely on one family over the other. It begins with asking Ezzali why she's shutting the Valeras out of trade, and pointing out that she hasn't provided them with an opportunity to prove their trustworthiness. The key is to grab any one of the following possibilities when they come:
Exceptional Modwyr
That brings me to #3 on the map of the second floor of the Valera Estate. A few more Valera guards attack. I have Alliria kill all of them herself, one by one.
She thereby scores the 1,500 points of damage on Kith that she needs for the next upgrade for Modwyr. That upgrade is to elevate its enhancement from Fine to Exceptional. She speaks with the weapon afterwards. The next upgrade will require landing killing blows on 25 Kith with Modwyr.
I thereafter leave the Valera Estate and return to Queen's Berth.
*Evil* Bardatto Vault
The evil party goes back inside after the five days and speaks to Martino again at #4 on the map of the second floor of the Valera Estate. His cousin, Belda, is about to break into the Bardatto vault. And Atello is unhappy about it, because Belda is likely to get caught and the Huana authorities of Neketaka may learn about it. I agree to bail Belda out, while avoiding the Benevolent dialogue option.
I leave the Valera Estate and return to one of the doors at #13 on the map of Queen's Berth. I go to the north exit at #18, and then temporarily switch out Tekehu for Rekke. I enter the Bardatto Estate through the door at #17.
That brings me to the door at #1 on the map of the main floor of the Bardatto Estate. I go down the stairs at #2.
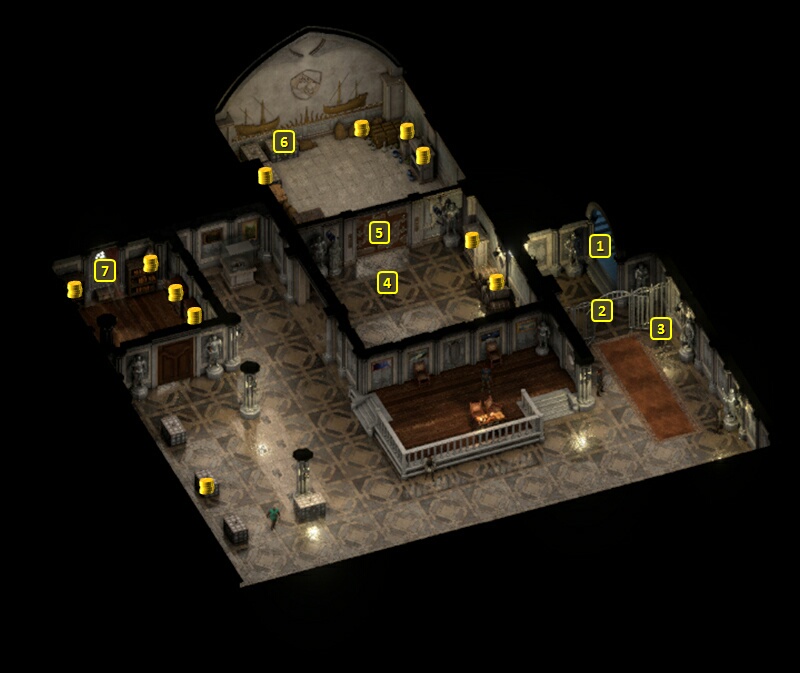
Now I'm at the door at #1 on the map of the Bardatto Vault. I go west and defeat a few Guards. I continue to #4 where Captain Valimi and his Guards have Belda cornered. I wipe them out, and Belda urges me to escape through a nearby window. But I insist that I want to score as much treasure as I can first. The door at #5 has to be unlocked four times.
A lot of the chests in the vault have gems and potions and those sorts of things. The chest at #6 has two unique items. One is a War Hammer called Resounding Call, but it doesn't fit into any of my plans so I'll just sell it.
The other is a Rapier called Rannig's Wrath, which becomes Mirke's weapon for the rest of the game. I activate the Needle Strike modal for being proficient with Rapiers. That grants a +20 boost to Accuracy, and that increases the probability of landing Critical Strikes. And Critical Strikes will mean more extra attacks through abilities like Swift Flurry and Heartbeat Drumming. But the modal itself imposes a +50% Recovery Time penalty. Mirke will eventually wear a Plate that provides the best Armor Rating in the game, but again with another Recovery Time penalty. All of that together can be concerning. And sometimes more Recovery Time can get in the way of other things like drinking a healing potion. So I enchant the Rapier with the Insistence power, which provides a 10% chance to Recover instantly when the wielder is Missed by a Melee Attack. Taking advantage of that Insistence power means pumping up Deflection as much as I can. The weapon is perfect for a tank that wants to maximize both her Armor Rating and her Deflection. I also add the Retreat power, which raises Deflection by +10 should she get Critically Hit. I am not banking on that happening frequently. But when it does, it can be extended endlessly when Xoti gets Salvation of Time. I also add the Superb enchantment to it.
Now I escape through the window at #7, and end up near #10 on the map of Queen's Berth.
*Evil* Family Pride
I go through one of the doors at #1 to enter the Valera Estate.
That brings me to a door marked #1 on the map of the main floor of the Valera Estate. I go up the stairs at #2.
That brings me to #3 on the map of the second floor. I speak to Atello and Martino Valera at #4. My job becomes to wipe out the Bardattos completely. I leave the Valera Estate.
Now I go from #13 on the map of Queen's Berth to the Bardatto Estate at #17.
I go to Ezzali's office at #4. I tuck Ydwin into a corner while the rest of the party makes a wall around her to let her do her thing. I then provoke Ezzali into a fight with the Aggressive option. I manage to wipe them all out.
Ezzali leaves behind two items, and Rekke gets both of them. One of them is a Plate armor called Deltro's Cage. Its key benefit is +2 Electricity Power Levels. And that means greater Shocking Damage build up with Static Discharges from Lord Darryn's Voulge, and more Shocking Damage from the Mantle of the Seven Bolts should he get knocked unconscious during a ship battle.
The other is Deltro's Cage Helm. The wearer can add extra Shocking Damage to his attacks when he himself receives Shocking Damage. It won't happen very often, but when it does it will be enhanced by the bonus Electricity Power Levels that come with wearing Deltro's Cage.
I leave through the door at #1 to return to #17 on the map of Queen's Berth.
I go to the exit at #18 on the map of Queen's Berth, and switch in some characters who are due up for level advancements.
Serafen takes Leap on his 12th level-up. It basically involves a Barbarian jumping up and landing, causing damage to all enemies in a 2.5m radius around the landing point. It also Dazes (-5 Might, -4 Penetration, cannot Engage) its targets, so it becomes a way for Serafen to inflict a Might Affliction in addition to a Constitution Affliction that he'll be able to inflict through a Sword he finds later in the game. And both together will allow him to make use of Brute Force if both Afflictions reduce a target's Fortitude by -20 and below its Deflection.
Aloth takes Bear's Fortitude, rounding out his accumulation of passives that improve his Defenses.
Eder takes Snake's Reflexes. The +10 bonus to Reflexes will improve his use of his Adept Evasion ability.
After that, Xoti stays, but I switch in Maia, Rekke and Konstanten as the characters with the least amount of xp.
I return to the Valeras in their estate (through one of the doors at #13) and report the annihilation of the Bardattos to Atello Valera. I get rewarded with 1,200xp and a Sword called Duskfall. I'll soon have Serafen use it as an interim weapon, but that comes a bit later.
Maia now has enough experience to advance to her 12th level. She takes Concussive Shot. It forces an Interrupt upon Grazing its target for the cost of 1 Bond. But the real point is that it's a prerequisite for Concussive Tranquilizer.
Bardatto Vault
The good party is now at a door marked #13 on the map of Queen's Berth. I go through the door at #17 to enter the Bardatto Estate.
I start off at #1 on the map of the Bardatto Estate. I immediately get attacked by several Bardatto Guards. I allow only Alliria to kill enemies. The objective is to accumulate as quickly as possible the 25 killing blows with Modwyr for its next upgrade. It's a little tough at the beginning with more enemies attacking the party, but it gets easier as I gradually start to whittle them down. And using healing resources (i.e., potions, Second Wind, Lay on Hands, etc.) makes the early parts survivable. Alliria improves her own survivability by constantly keeping Arcane Veil active, recouped always by Blood Sacrifice of course. Also, Ydwin is a threat to steal kills from Alliria when her Riposte starts scoring damage on the enemies, so I move Ydwin away from the action. I go down the stairs at #2 on the map of the Bardatto Estate.
That brings me to #1 on the map of the Bardatto Estate. Alliria sets up her own bottleneck at #2. Only two of the remaining Bardatto guards can attack her at a time. And she constantly keeps herself protected with Arcane Veil. She eventually manages to kill all of them herself, including Captain Valimi. She now has 16 out of 25 killing blows on Kith needed for her Modwyr upgrade.
I likewise raid the Vault for any treasure and items I can find, although the good party doesn't make use of any of the items they find. I leave the Vault and then the Estate altogether to return to Queen's Berth.
And from there it is now time to Return to The Gullet.