I show this expansion mostly from the perspective of the evil party. Zarathos goes below deck on his ship, and speaks to The Steward. She informs him of a strange crate brought aboard.
I click on the crate just a little left of The Steward. There's no danger to opening it during the scripted interaction. Zarathos has a long conversation with the spirit of Muatu to start the Quest called The Proving.
He also gets Muatu's Head, a Trinket that can summon the spirit of Muatu once per Rest. He tends to focus mostly on healing allies.
The Gods Are Fighting
The good party sails west, and Alliria gets pulled into an argument among the Gods. And again, many of the replies can be grouped into Aggressive, Sassy or Diplomatic. And they affect what kind of Death's Herald power you receive at the end of the conversation.
Woedica screws her mouth into a sneer. "You fool! If only we had attacked him when I first proposed it-!" Accusations drip bitter as bile from her tongue.
"Shut up!" (Passionate disposition) Aggressive, negative with Woedica and positive with Ondra.
"I'll just... wait until you're done." Sassy, negative with Woedica.
"Eothas could be destroying the Wheel right now, and you're arguing?" Aggressive, negative with Woedica.
"What's going on here?" Diplomatic, positive with Berath.
"We can no longer count on the gods for guidance. Kith will have to figure this out on our own." Diplomatic, positive with Magran, negative with Ondra.
Wael's many eyes alight on each god in turn. "We make little enough progress on our own."
[Roll your eyes.] "That's obvious." (Clever Disposition) Sassy, negative with Hylea.
"Progress? Are you planning something new?" Diplomatic, positive with Ondra.
...The Pallid Knight speaks with the chilly temperance possessed only by the god of death.:
"That's horrible!" (Passionate disposition) Aggressive, negative with Berath.
"Whose 'good?' Yours?" (Honest disposition) Sassy, negative with Berath.
"A grim but honorable sacrifice." (Diplomatic disposition) Diplomatic, positive with Berath.
"But we get ahead of ourselves. First, the Watcher must get to Ukaizo, and that will be a trial all its own.":
"Good. I could use a challenge." Aggressive, positive with Magran.
"Another? Aren't you bored yet?" Sassy, positive with Magran.
"Right, because I haven't had one of those lately." Sassy, positive with Magran.
"And the Watcher will be forced to reckon with it if he wishes to confront Eothas."
The birds at last linger too long, and Magran slaps them away. They burst into a cloud of essence, then reform, and fly in a screeching chorus back to Hylea:
"Guardian of Ukaizo?" Diplomatic, positive with Magran.
"This 'guardian' is but one more thing that will fall before me." Aggressive, positive with Magran.
"Go prepared, Watcher. The guardian will not stand aside, not even for the Herald of Berath." -OR-
"And Eothas will not fight the creature - it would prove little more than a distraction for him, especially as my tsunami and Magran's volcano couldn't stop him.":
"Won't Eothas take care of it?" Diplomatic, positive with Ondra.
"Why can't you just... get rid of it?" Sassy, negative with Galawain and Magran.
"So I have to fight the Guardian of Ukaizo. Any suggestions?" Aggressive, positive with Magran.
"What do you think of Eothas' scheme to destroy the Wheel?":
"It's a long time coming. Kith will finally know what a bunch of frauds you all are." (Aggressive disposition) Sassy, positive with Rymrgand, negative with Wael and Woedica.
"With the gods' guidance we might survive what Eothas plans." Diplomatic, positive with Hylea and Ondra and Woedica.
"This doesn't feel like the act of a caring god to me." Aggressive, negative with Magran, positive with Hylea and Ondra.
"Without sustenance, we starve as any mortal might. We die and leave a great silence behind - an eternal emptiness from which nothing is born.":
"I prefer to think of it as a very long vacation." Sassy.
[Nod.] Diplomatic.
"Why do you waste time arguing, then?" Aggressive.
"He believes kith will rise to his challenge. I am not so sure, but I look forward to watching them try.":
"How did Eothas fool you all? You're the most powerful beings in Eora." (Passionate disposition). Positive with Wael, negative with Berath and Hylea and Ondra and Woedica.
"What if Eothas is right, and kith succeed in rebuilding the Wheel? What then?":
"We'll learn and grow, as Eothas intends." Diplomatic, positive with Hylea and Abydon.
"Don't worry - there will always be a place for the gods in Eora." Diplomatic, positive with Magran and Woedica.
"I don't know, but aren't you curious to find out?" (Clever disposition) Sassy, positive with Magran and Wael.
The Pallid Knight's eyes bore into yours. "An impassioned plea from the Hound of Eothas may still temper his actions. Confront him at Ukaizo.":
"I'll try." Diplomatic, positive with Berath.
"I will make him heed my words." (Aggressive disposition) Aggressive, positive with Skaen and Woedica.
"He's not going to listen to me, I'm just a kith." Diplomatic, positive with Hylea, negative with Rymrgand.
"I don't owe you anything anymore." (Aggressive disposition) Aggressive, positive with Berath and Wael.
"I can't defy Eothas' will." Diplomatic, negative with Berath and Woedica.
"Does that not frighten you? You, kith, who are most vulnerable?":
"Oh, I'm terrified!" Sassy, positive with Hylea and Ondra, negative with Magran and Woedica.
"It does. But I will not let fear rule me." (Passionate disposition) Diplomatic, positive with Abydon and Berath and Galawain and Magran.
"I trust Eothas. There is nothing to fear." Diplomatic, positive with Hylea.
"Fatalism helps no one and solves nothing." Aggressive, positive with Berath and Magran and Ondra and Wael.
"Only the weak know fear." (Cruel disposition) Aggressive, positive with Rymrgand and Woedica.
What Death's Herald power you get after this conversation depends on the one you had at the conclusion of the Quest called A Distant Light, and your dialogue choices during this conversation. More specifically, the upgrade depends on whether you made 4 Aggressive replies, 4 Sassy replies or 4 Diplomatic replies. 4 Aggressive replies takes priority over 4 Sassy replies, and 4 Sassy replies takes priority over 4 Diplomatic replies.
If you had at least 4 Aggressive replies:
Raiment of Death's Herald gets replaced with Majesty of Death's Herald - Insightful (+5 Perception), Smart (+5 Intellect) and Strong (+5 Might) for 30 sec.
Awe of Death's Herald has its Might Inspiration upgraded by one tier.
Cruelty of Death's Herald has its Might Inspiration upgraded by one tier.
Mien of Death's Herald gets replaced with Awe of Death's Herald - Strong (+5 Might) is added to the Perception Inspiration (Insightful or Aware) that was provided by Mien of Death's Herald.
Wit of Death's Herald gets replaced with Cruelty of Death's Herald - Strong (+5 Might) is added to the Intellect Inspiration (Smart or Acute) that was provided by Wit of Death's Herald.
Ire of Death's Herald has its Might Inspiration upgraded by one tier.
Visage of Death's Herald gets replaced by Ire of Death's Herald, which adds the Strong (+5 Might) Inspiration.
If you chose at least 4 Sassy replies AND less than 4 Aggressive replies:
Raiment of Death's Herald has its Intellect Inspiration upgraded by one tier.
Awe of Death's Herald gets replaced with Majesty of Death's Herald - Insightful (+5 Perception), Smart (+5 Intellect) and Strong (+5 Might) for 30 sec.
Cruelty of Death's Herald has its Intellect Inspiration upgraded by one tier.
Mien of Death's Herald gets replaced with Raiment of Death's Herald - Smart (+5 Intellect) is added to the Perception Inspiration (Insightful or Aware) that was provided by Mien of Death's Herald.
Wit of Death's Herald has its Intellect Inspiration upgraded by one tier.
Ire of Death's Herald gets replaced with Cruelty of Death's Herald - Smart (+5 Intellect) is added to the Might Inspiration (Strong or Tenacious) that was provided by Ire of Death's Herald.
Visage of Death's Herald gets replaced by Wit of Death's Herald, which adds the Smart (+5 Intellect) Inspiration.
If you chose at least 4 Diplomatic replies AND less than 4 Aggressive replies AND less than 4 Sassy replies:
Raiment of Death's Herald has its Perception Inspiration upgraded by one tier.
Awe of Death's Herald has its Perception Inspiration upgraded by one tier.
Cruelty of Death's Herald gets replaced with Majesty of Death's Herald - Insightful (+5 Perception), Smart (+5 Intellect) and Strong (+5 Might) for 30 sec.
Mien of Death's Herald has its Perception Inspiration upgraded by one tier.
Wit of Death's Herald gets replaced with Raiment of Death's Herald - Insightful (+5 Perception) is added to the Intellect Inspiration (Smart of Acute) that was provided by Mien of Death's Herald.
Ire of Death's Herald gets replaced with Awe of Death's Herald - Insightful (+5 Perception) is added to the Might Inspiration (Strong or Tenacious) that was provided by Ire of Death's Herald.
Visage of Death's Herald gets replaced by Mien of Death's Herald, which adds the Insightful (+5 Perception) Inspiration.
Alliria makes at least 4 Aggressive replies. That means her Awe of Death's Herald power gets upgraded so that it provides Tenacious (+5 Might, +2 Penetration) instead of Strong (+5 Might) in addition to Insightful (+5 Perception).
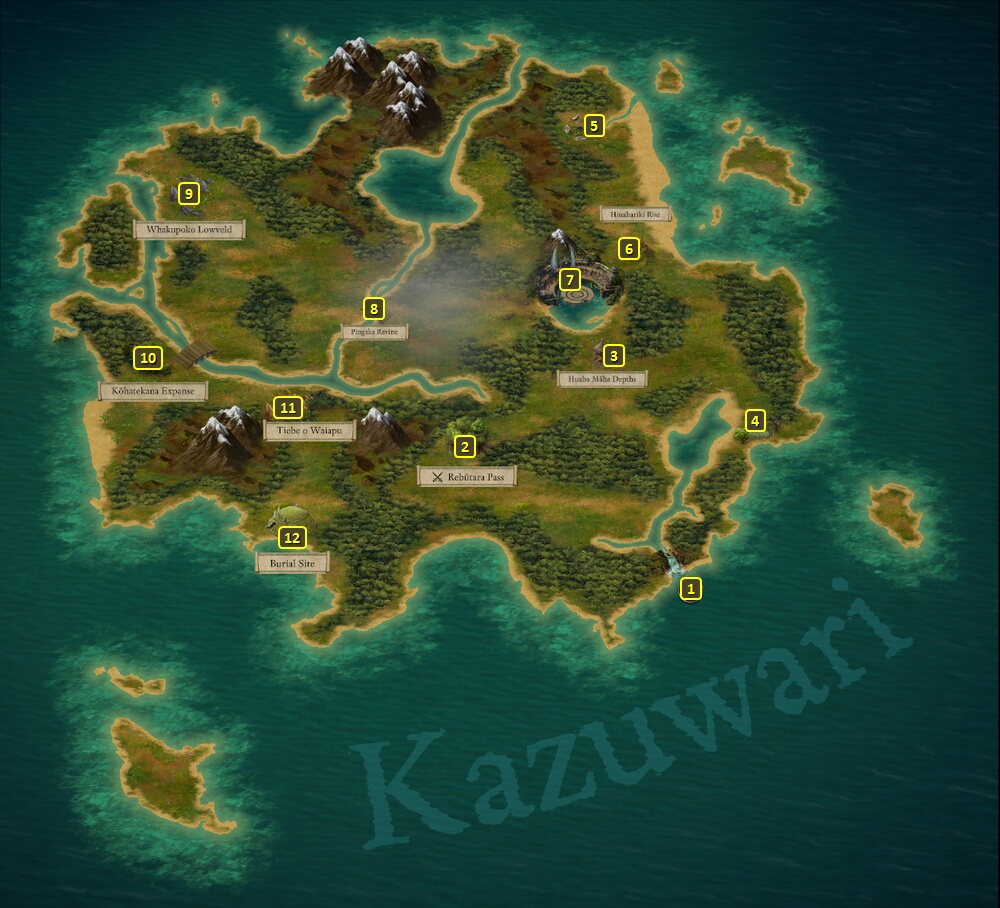
I approach the island of Kazuwari at #49 on the World Map. An enormous Crocodile swims underneath the ship, and Galawain warns Alliria to stay away from the island. But Alliria docks her ship at the island anyway. I showed this particular part from the perspective of the good party because Galawain has some choice words for Alliria for destroying the machines at Cignath Mor.
Rebutara Pass
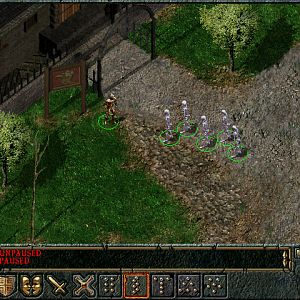
The good party is now at #1 on the map of Kazuwari. They go to the Rebutara Pass at #2. There will be large skeletons within immediate view. Mirke makes a Survival check of 13 to reveal that they come from unusually large quadrupedal lizards. She also makes a Stealth check of 10 to sneak up on them unnoticed, and discover that decorations are placed inside the skulls.
Several more options become available now that I approached the skeletons with Stealth:
A Survival check of 10 from Mirke reveals footprints of both boars and Kith.
A Religion check of 12 from Alliria reveals that a human sacrifice has been performed here.
A History check of 10 from Aloth reveals the place to be a Huana cultural site.
A Streetwise check of 8 from Mirke reveals coffins, leading in turn to the acquisition of a Rope and Grappling Hook, and quite a bit of money.
A Stealth check of 18 could get me through the Pass without alerting the nearby Huana party, but I don't bother.
I encounter a group of Huana led by Hateno, including an Orlan named Scibeal as well as several Razorback Boars. Two of those Boars are very large. You can choose the Aggressive option to attack them. They won't leave any special loot though.
There are multiple ways to convince them to let you pass without a fight:
An Intimidate check of 16 right away will convince them to let you pass.
Tell them you either killed the Druid of Maje Island or show them the Wise Teeth Necklace, followed by an Intimidate check of 14.
Indicate you don't want to fight, and then select the Diplomacy option. It only works if the Watcher can make an unassisted Survival check of 14.
A Watcher who is either a Ranger or has the Hunter background can talk them down.
Alliria demands to be let through. She then tells Hateno that she healed the Green Lady of Motare O Kozi, which works because she completed The Last Sanctuary Quest in a way that healed the Rotting Lady into the Green Lady.
Hateno then lets her pass without incident.
*Evil* Rebutara Pass
And of course Zarathos prefers to just straight up slaughter them.
Hiuahariki Rise
Here is Hiuahariki Rise. There is a Proving Stone at the bottom of the hill. Muatu will explain its significance to you, while a History check of 6 confirms what he says.
You can simply take the Proving Stone and leave if you want to keep your options open. That will result in a Large Engraved Stone in your inventory, which you can use here later if you want.
You have some options for getting it up the hill:
Having two characters push it uphill. It works, but with both characters getting the Fatigued (-5 Accuracy, -10 all Defenses, -15% Maximum Health) Injury.
Using a Rope and Grappling Hook. One character will need to make a Might check of 16. A second character will have to help the first character. And then both characters need to make Might checks of 14 to get the Stone up the hill. This also results in Fatigued for both characters.
A Chanter can use the "If Their Bones Slept Under That Hill" invocation, and the skeletons will get the Stone up the hill.
Any character that has a spell that summons a Might-based creature, like the Chanter's "Oh but Knock not on the Door" Ogre-summons, the summons can get the Stone up the hill. This is what Pallegina does.
There will be a pedestal at the top of the hill. A Religion check of 10 and / or a Mechanics check of 12 can provide additional information about it. Place the Proving Stone on the pedestal to open the entrance to the Temple of Toamowhai.
The Proving
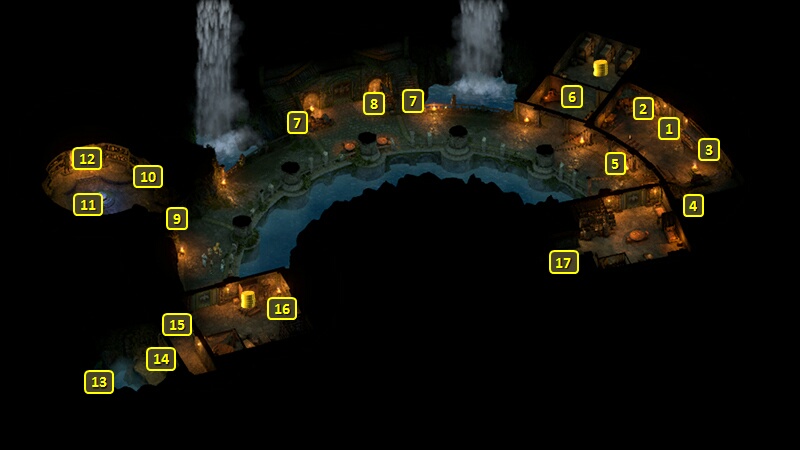
The good party emerges at the door at #1 on the map of the Temple of Toamowhai. I speak briefly with a Huana guard, who bids me to speak with Humaire.
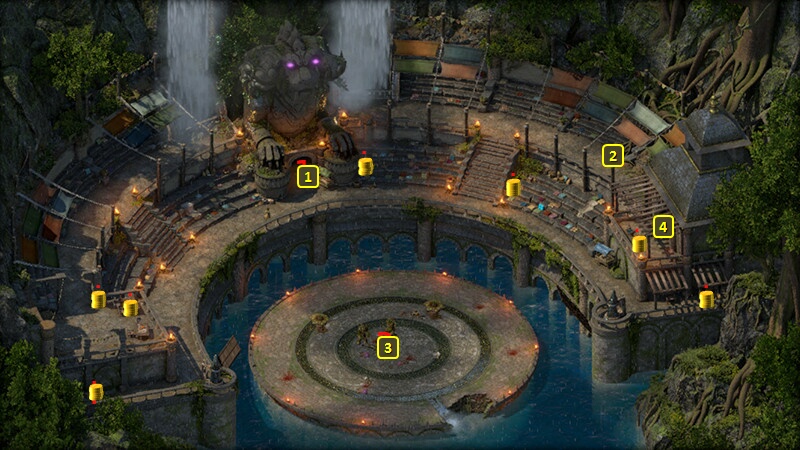
I go west and up the stairs at #8. They take me to an arena called The Crucible. I catch the end of a battle in the arena. Humaire comes to speak to me, and suggests that I might complete The Rite of Passage. The conversation ends which means a 7,000xp reward and completion of the Quest called The Proving. The The Rite of Passage Quest begins.
I go back down the stairs to return to #8 on the map of the Temple of Toamowhai.
*Evil* Huaba Maha Depths
The evil party goes to the Huaba Maha Depths at #3 on the map of Kazuwari. A History check of 12 from Tekehu reveals the jaguar statues as being of Huana origin. A Mechanics check of 14 from Ydwin reveals harmless traps that are no longer functional.
I use a Rope and Grappling Hook from the side of the well (or one of the jaguar statues) to get the party safely to the bottom. An Athletics check of 10 by everyone in the party would work as well. The evil party is now inside the Temple of Toamowhai, but at #13.
A vine-covered wall will be at #14. There's a few ways to get through:
Make a Might check of 14 to strike the wall down with a melee weapon.
Use a Fire-based spell to burn the vines away.
Make an Alchemy check of 14 with a Rune Powder, Rahi Pods and a Solution in your inventory. The concoction you create will reduce the vines to ash.
Zarathos uses the Alchemical concoction to burn the vines down.
*Evil* Agony of the Elements
I open the door at #15 with a lever. The Arena Warden obliges me to enter The Crucible through the door at #16.
I am forced into a battle that overlaps with the first part of The Rite of Passage Quest. It is against a void-sphere type monster called The Tyrant. An obelisk on the north side periodically summons Storm Blights. Another on the east side will summon Flame Blights, and the one on the south side will summon Earth Blights. I cannot kill The Tyrant until I've destroyed all of the obelisks first. The Tyrant can hit for a LOT of damage with an enhanced Dancing Bolts power. I set up the Salvation of Time-Ancestor's Memory Loop. And I gradually make my way around to destroy the Obelisks one at a time. But I also have Xoti gradually put up Barring Death's Door on everyone one at a time, and renew those Barring Death's Doors, with endless castings of Salvation of Time as I make my way around. I eventually wear down The Tyrant once the Obelisks are gone.
The three Faces of the Hunt congratulate me before I return to the Temple. I loot The Tyrant's body, and get several crafting ingredients and gems, including a Sapphire.
Sorcerer's
Place is a project run entirely by fans and for fans. Maintaining
Sorcerer's Place and a stable environment for all our hosted sites requires a substantial amount of our time and funds on a regular basis, so please consider supporting us to keep the site up & running smoothly. Thank you!
Supporting Sorcerer's Place
Has Sorcerer's Place been useful? If you'd like to show your appreciation
for our hard work on the site, and help us pay the bills the site generates
every month, please consider helping support SP.
Thank you!