-

- Forums
- Chatrooms
- Gallery
- Gameplay Videos
- Upload
- Articles
- Mod Reviews
- Shop SP: Games, Movies, Books
|
|
| Pillars of Eternity 2 Video-Based Walkthrough by David Milward |
The Slaying Face
*Evil* Pingaka Ravine
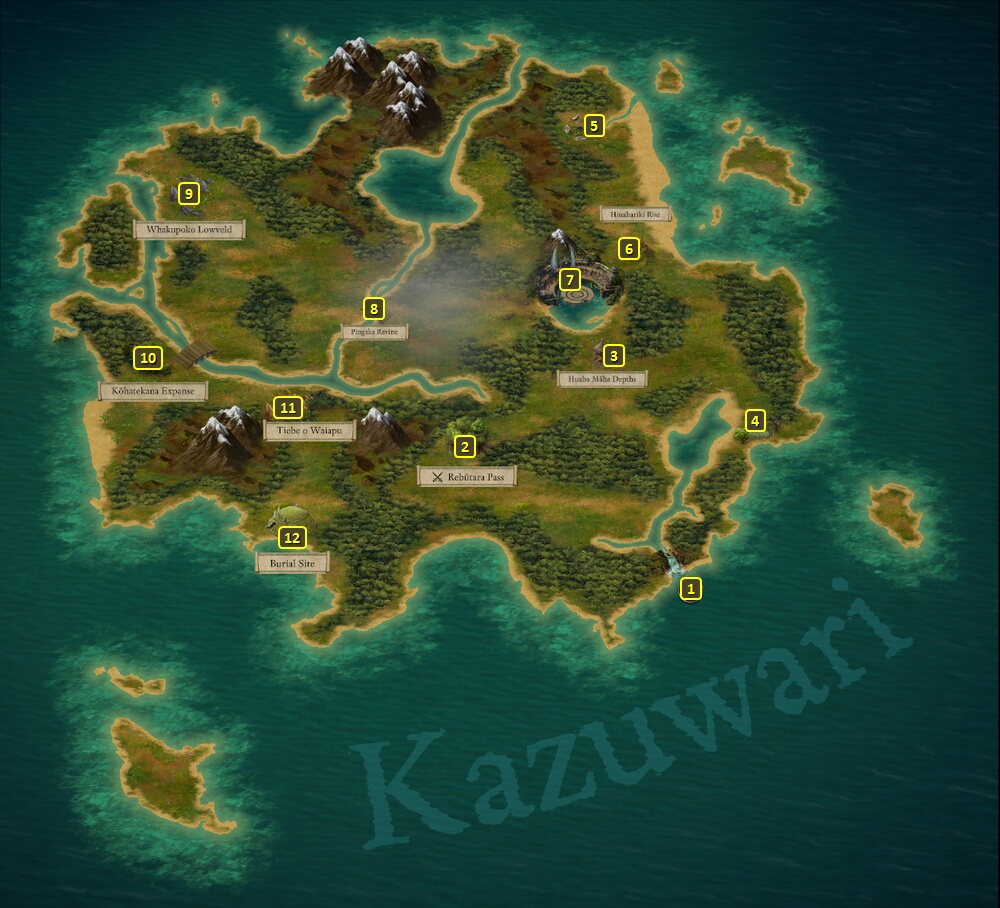
I travel west to Pingaka Ravine, at #8 on the map of Kazuwari. It is basically an unstable bridge that I'll need to cross in order to reach my destination.
You can safely cross it without checking on the condition of the bridge itself as long as the Watcher can make a Resolve check of 12 and a Dexterity check of 14, and then everyone in the party can make an assisted Athletics check of 8.
Examining the bridge offers multiple opportunities to gauge its condition through skill checks. A Survival check of 13 from Tekehu indicates that the rope of the bridge can't hold up much weight. A Stealth check of 15 from Ydwin indicates that the wood is not of the sort that a scout would want to quietly cross over. A Mechanics check of 12 from Ydwin suggests that the bridge can be reinforced.
Searching for an alternative pathway, after making either a Mechanics check of 14 or a Survival check of 14, would have indicated that there's no way forward but over the bridge.
If you attempt to cross without reinforcing the bridge, and after making any skill checks that determine the bridge's condition, you can cross forward but with the only difference being that you only need to make the Dexterity and Athletics checks. You won't need to make the Resolve check.
You can attempt to reinforce the bridge through your own labor. It takes two days, and your party members will end up Fatigued. But you can cross without any more skill checks.
The bridge can be reinforced with certain spells. Tekehu does it with a Tanglefoot spell. The evil party then crosses without any more skill checks. *Good* Aloth does it in the good party with Binding Web from his Grimoire of Vaporous Wizardry.
Cindershard
The good party now enters Whakupoko Lowveld at #9. It starts off as a scene of several Kith lying dead and partially devoured. An initial Survival check of 10 by Mirke reveals both Kith and Beast tracks. She also makes a Survival check of 13 that reveals that the beast tracks were made by a Stelgaer. She makes another Survival check of 12 to reveal the Kith tracks as including an Orlan.
You can follow the beast tracks if you made the Survival check of 13. Making another Survival check of 15 after following the beast tracks leads to discovering Stelgaer droppings. The party member who made the discovery may suggest patting the droppings on yourself in an effort to disguise your scent. You can vehemently reject the suggestion to earn Passionate disposition, or use the droppings on yourself and earn Rational and Stoic disposition. I'm not sure if that leads to any tangible benefit. From there you can look for whatever made the tracks, which leads to the inevitable encounter with the Stelgaers.
Making a Survival check of 13 after following the Kith tracks leads to finding another scene of carnage, and two trails branching off. Examining the scene obtains 92cp, an Exceptional Dagger, an Exceptional Crossbow, and a Potion of Moderate Healing. An Explosives check of 9 from Aloth reveals that somebody tried to use Sparkcrackers as a distraction. Alliria using her Watcher powers to detect spirits doesn't lead to anything.
Following the trail of the unwounded Kith reveals a body at the bottom of the cliff. An Intellect check of 9 from Alliria reveals that he fell off the cliff. Searching his corpse obtains an Exceptional Arquebus, 49cp, a few Sparkcrackers and some Candied Nuts. I backtrack and follow the trail of the Wounded Kith.
Following the trail of the wounded Kith leads to finding a mortally wounded Dwarf. Discovering him means from that point onwards you'll always have the option to search for the creatures that wounded him, which leads to the direct encounter with the Stelgaers as described below.
Examining his wounds leads to a few more options. Using a Priest spell to try and heal him won't do him any good. You can use the Cruel option to force him to scream and draw the creatures out, which leads to the Stelgaers encounter but may also earn disapproval from at least some of your companions. Alliria gave him a quick mercy kill instead.
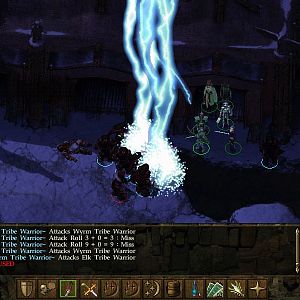
You can also have a character make a Mechanics check of 13 to construct a Burn Trap. Lie in wait and let the cats get themselves caught. From there you can attack them, but it just starts combat against them without any apparent advantage. You can also sneak up on them with a Stealth check of 9 to attack them from Stealth mode. You can also use an offensive damaging spell to kill them outright while they're in the trap. Any of these options will get you the Cindershard. Using the Druid's Charm Beasts or the Cipher's Domination powers won't accomplish anything.
Mirke makes a Survival check of 15 to use a Rope and Grappling Hook to construct a snare. She also makes a Stealth check of 9 so that the party can lie in wait. If you let the animals come to the snare, it will trap the Great Stelgaer and cause the other cats to flee. Trying to calm and soothe it won't accomplish anything. I could kill it with weapons while trapped, or use an offensive damaging spell to kill it outright, in order to get the Cindershard. But I have Eder make an Athletics check of 11 to get the Cindershard out of its back without fighting it. I again have the chance to kill it, but I instead release the snare and let it run away.
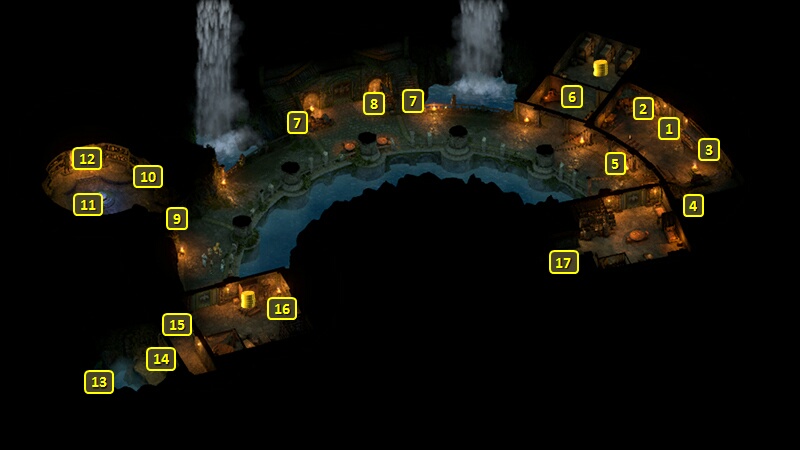
Alliria thereafter speaks with the spirit of the Slayer, Whehami. She thereafter returns to the Temple of Toamowhai at #7 on the map of Kazuwari.
The good party is then at the door at #12 on the map of the Temple of Toamowhai. Alliria gives the Cindershard to the Pool of Memories at #11.
*Evil* Cindershard
The evil party moves into the field from the outset without following any of the tracks. An Insight check of 13 will suggest that the party is being tracked by predatory animals.
Approaching them openly will lead to a fight against a Great Stelgaer along with a few Savage Panthers and Savage Tigers. Alternatively you could make a Stealth check of 9 to hide from them. From there, you can either attack them from Stealth mode or make a Sleight of Hand check of 15 to steal the Cindershard and leave without a fight.
I instead made an Athletics check of 11 to run for the line of trees. That doesn't put me in Stealth mode, but I now have the choice of either attacking them openly or making the Sleight of Hand check of 15 to steal the Cindershard. I went with defeating them in open combat by outlasting them with the Salvation of Time-Ancestor's Memory loop. I thereafter loot the Cindershard from the dead bodies.
Zarathos thereafter speaks to Whahemi, and then brings the Cindershard to the Pool of Memories.
*Evil* Changeling's Dance
The Slayer demands that I win three battles to earn his favor. I keep Tekehu, but bring in Eder, Serafen and Rekke in anticipation of the first battle. The reason for the latter three characters being that they're the characters with the most Health. The reason Tekehu stays in is because he needs to collect soul energy for his Less Unstable Coil.
That battle is the Changeling's Dance. I face off against a Mercenary Fighter, a Mercenary Cipher, a Mercenary Monk, a Mercenary Rogue, and a Mercenary Ranger and his Wolf Companion.
The catch is that Zarathos gets turned into an Ironclad Construct, Tekehu gets turned into a Lagufaeth, Eder gets turned into an Imp, Serafen gets turned into an Engwithan Saint, and Rekke gets turned into an Adra Ooze. My characters can't use activated abilities, but they keep their passives and their stats. That was the point of bringing in those characters with the highest health.
The Lagufaeth form can Paralyze targets with ranged darts attacks, which makes it very valuable. But it has poor defenses and is very squishy, so I keep Tekehu away from everything else when I can and have him shoot Paralyzing darts from a distance.
The Mercenary Fighter is a tank, so I leave him for last. I Flank and gang up on the Cipher first. I then take out the Rogue (who hits hard but is himself a squishy glass cannon), and then the Monk. Then it's the Wolf Companion followed by the Ranger. It is only when nobody else is left that I now gang up on and wear down the Fighter.
The party returns to the Temple. Zarathos has a trash-talking session with the Dragonstalkers led by a Dwarf named Dekebar Drakesdoom.
*Evil* A Trial by Fangs and Fur
I reassemble my core party and accept the next challenge, A Trial by Fangs and Fur. It's a fight against a lot of savage felines, led by a pair of large Stelgaers. I huddle Tekehu and Ydwin into a corner, and let the others form a half-ring around them. I otherwise win by the usual methods.
Zarathos speaks again with the spirit of Whahemi after returning to the Temple of Toamowhai.
*Evil* Cult of the Naga Shaman
The next battle is against numerous Poison Naga. One Obelisk on the north side and another on the east side can each summon Bog Oozes periodically. The Naga Shaman leader can also once in a while summon more Poison Naga. I go into Stealth mode, ring the southern edge, and then sneak up to the east Obelisk to destroy it right away. I otherwise outlast them with the usual methods.
They leave behind a Pet snake named Drago, but I have no use for it.
Zarathos speaks with Dekebar Drakesdoom a second time after returning to the Temple of Toamowhai.
*Evil* Least Unstable Coil
I head over to #5 to speak to Neale. The Less Unstable Coil has now absorbed enough soul energy from the fights in The Crucible, so Neale now takes it and turns it into the Least Unstable Coil.
He also rewards me with the Bubbling Chalice. It's a Potion that can reproduce a Flame Shield effect once per Rest from a quick-item slot.
Tekehu wears the Least Unstable Coil. The key benefit from the newest rendition of the Coil is that it can bestow a random third-tier Inspiration (e.g., Brilliant or Energized) on its wearer when the wearer uses an Empowered Attack. However, if a Chanter uses Her Tears Fell Like Rain / Seven Nights She Waited as an Empowered Attack, each individual bolt that connects becomes an individual Empowered Attack. That means aiming the Invocation right so that its cold bolts hit multiple enemies as they close in and surround the party can mean unleashing multiple Empowered Attacks in one go. And that means the wearer can gain more than one third-tier Inspiration. And that means a carefully aimed Her Tears Fell Like Rain / Seven Nights She Waited can get its wearer some or even all of Brilliant and Courageous and Energized and Intuitive and Robust and Swift. And all of them can get extended by the Salvation of Time-Ancestor's Memory loop. And with Refreshing Finale from Sasha's Singing Scimitar, that makes it a once per Encounter power. The electrical bolts from Thrice She Was Wronged / Her Revenge Swept Across the Land also count as multiple Empowered attacks for purposes of the setup. But their range is far too short for my liking.
*Evil* The Contest of the Slayer
I click on the Pool of Memories again and start The Contest of the Slayer, which becomes available only after winning the previous three battles. This battle is against the Dragonstalkers led by Dekebar Drakesdoom. I go into Stealth mode and sneak up as close as I can. And the Salvation of Time-Ancestor's Memory loop assures victory. There was a potential danger in that their Wizard had Arcane Dampener, but it was not a factor this time around.
Now I have same choices as last time for what to do with the ambient soul energy:
The Contest of the Slayer
The good party likewise sneaks around. In fact, I have them go one at a time at the eastern edge because I want to get as close to their Wizard as I can. As I go for it, Eder and Aloth are the closet so they dash for Wise Aerlif the Wizard. Eder in fact uses Knockdown on her repeatedly to keep her off her feet and prevent her from using her spells. Mirke has her secondary gun set ready, and uses Escape to teleport within firing range so that she can help bring Aerlif down as quickly as possible.
Alliria and Pallegina keep the other enemies occupied. Alliria keeps her Arcane Veil up at all times. Pallegina summons her Ogres as meat shields.
Alliria finishes off Wise Aerlif with a well-timed Death Ring once I notice she's "near death". I therefore reduce one by one their Monk, their Rogue, their Ranger and their Wolf Companion. Drekebar Drakesdoom is the enemy tank, so I keep him occupied with Ogres and Dichotomous Souls.
Their Chanter is their other tank. Alliria tags both of them with Brand Enemy. I gang up on the Bard, and then finally Drekebar.
Alliria gathers the essence into herself for another Culmination Stone. She uses it to raise Xera's Empirical Explication from Superb to Legendary.
*Evil* The Slaying Face
I speak to Humaire again, and get 8,700+ xp to complete The Slaying Face Quest. The Quest called The Champion of the Hunt now begins.
Engari now gives me a Soulbound Axe called the Slayer's Claw. I go over to Domenga at #6, and switch out Mirke for Serafen. I bind Slayer's Claw to him for what's left of the game.
A key benefit of the weapon is that any Might-based Inspiration in effect for the wielder gets upgraded by one Tier. In the case of Serafen, that means his Blood Frenzy will provide the Tenacious (+5 Might, +2 Penetration) Inspiration instead of Strong (+5 Might). In fact, it's not hard to imagine Berserker builds where Tenacious (+5 Might, +2 Penetration) from Frenzy gets upgraded to Energized (+5 Might, +2 Penetration, Interrupt on Critical Hit), although I had different ideas in mind for Zarathos. Its second upgrade for Barbarians will provide a 10% chance for +1 increase to Penetration that stacks 3 times when the wielder is Hit by a Melee Weapon. That further fits in with the theme of Hits and Critical Hits against Serafen either enhancing his power or making the attacker pay for it. The third upgrade will restore some of the wielder's Health on scoring a killing blow, and score Raw Damage to nearby enemies. And that's certainly helpful for a Barbarian build that's based on the Barbarian himself getting struck for Damage multiple times.
I return to the Pool of Memories at #11.
*Evil* Stelgaer's Lunge
The first upgrade for Slayer's Claw requires that the wielder kill 20 enemies. It doesn't matter how, and it doesn't require that the killing blow be delivered by Slayer's Claw itself. Only that the Damage that reduces the enemy to 0 Health comes from the wielder.
The nature of The Crucible is such that I can do previous battles as many times as I like. So that provides a perfect opportunity to get the first upgrade with a minimum of time and hassle. I select A Trial by Fangs and Fur. I huddle everyone in the corner. I also have everyone's AI turned off. Tekehu and Ydwin stay huddled behind the protective wall.
Ydwin hits the oncoming felines with her Rod Blast to get some Focus. She then puts Ancestor's Memory on Xoti, and then Tactical Meld on Serafen. Xoti puts Barring Death's Door on Zarathos, and follows up with Salvation of Time to get the loop started. She then puts Barring Death's Door on Serafen and herself in between castings of Salvation of Time.
Serafen activates Blood Storm. Serafen, and only Serafen, ever attacks anything during the fight. Everyone else is a protected spectator.
He either lands a killing blow on the cats with his weapons, or they impale themselves on him as though he's a porcupine by scoring Critical Hits and provoking damage from both Barbaric Retaliation and his Ragged Cloak. Either way scores a kill for purposes of the upgrade. And he has nothing to worry about on account of an endless Barring Death's Door.
There is a potential inconvenience in that one of the Stelgaers may decide to "destroy" a "near death" cat. I therefore have Tekehu keep Many Lives Pass By activated so that the endless skeletons always give the cats, the Stelgaers included, distractions and something to attack and meat shields that get in the way.
I turn off Many Lives Pass By once I'm down to the last surviving Tiger. Serafen got 11 kills out of that battle.
I repeat the fight, and get 10 for a total of 19. I'm one away.
I repeat the fight a third time. And once I'm assured I've got that 20th kill, I have everyone go on the attack to end the fight sooner.
The first upgrade power for Slayer's Claw is Stelgaer's Lunge. It's a once per Encounter power whereby the wielder lunges at a single enemy for hefty damage and knocks that enemy Prone. It isn't that big of a deal, but it is a stepping stone to the other upgrades.
I go back to Domenga and switch Serafen out for Mirke.
I return to the Pool of Memories in order to become The Champion of the Hunt.