-

- Forums
- Chatrooms
- Gallery
- Gameplay Videos
- Upload
- Articles
- Mod Reviews
- Shop SP: Games, Movies, Books
|
|
| Pillars of Eternity 2 Online Walkthrough by David Milward |
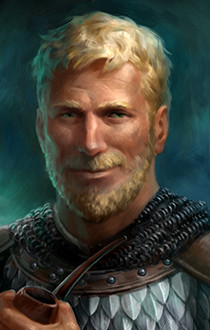
EDER, M HUMAN SWASHBUCKLER (FIGHTER / ROGUE)
Stats
Abilities
1st Level - Knockdown: A starting ability by default.
Crippling Strike: A starting ability by default.
2nd Level - Disciplined Barrage: Just the +5 bonus to Perception is enough by itself to make it a staple for a lot of Fighter builds. It's also a prerequisite for Disciplined Strikes.
3rd Level - Escape: Eder takes the first ability that will allow him to make Backstab Attacks.
4th Level - Fighter Stances: Taken with a view to upgrading it to Mob Stance.
Two-Handed Style: Will add +20% Damage once Eder begins using a two-handed axe.
5th Level - Dirty Fighting: The 15% chance of converting Hits to Critical Hits is pretty much obligatory for any build that includes Rogue.
6th Level - Confident Aim: It's a passive that will turn 30% of Grazes into Hits.
7th Level - Disciplined Strikes: It upgrades Disciplined Barrage so that it adds +1 Concentration, and provides the Intuitive Inspiration instead of Awareness. The Intuitive Inspiration provides a 30% chance of converting Hits to Critical Hits. And that will mean a greater chance to trigger the area-of-effect attack of Amra.
Debilitating Strikes: It upgrades Crippling Strike so that it also applies the Distracted Affliction to targets in addition to the Hobbled Affliction. It's a good upgrade to take if the Rogue also doesn't have Persistent Distraction (which would mean redundancy). It's a very cost-effective way to apply two Afflictions on enemy strikes, as using the ability will still only use one Guile. And it will also help set up the damage bonuses that will be provided by Deathblows.
8th Level - Rapid Recovery: Increasing the regeneration provided by Constant Recovery is sensible for a character who is himself frequently going to take damage.
9th Level - Backstab: It allows him to score double-damage when he's Invisible. And he can go Invisible often either through the use of his own Escape / Shadow Step abilities, or once per Encounter through the Slippers of the Assassin after landing a killing blow.
10th Level - Weapon Specialization: It increases his Damage with Amra by 10%.
Shadow Step: It enhances Escape so that his next attack will cause Paralysis. Shadow Step itself confers temporary Invisibility, as a setup to Backstab. The Paralysis can also act as a set up for either a Critical Hit since the Paralysis Affliction will convert some Hits to Critical Hits, or for Deathblows if the target is suffering from more than one Affliction.
11th Level - Adept Evasion: It reduces any Graze on an attack against his Reflexes to a Miss.
12th Level - Snake's Reflexes: The +10 bonus to Reflexes will improve his use of his Adept Evasion ability.
13th Level - Mob Stance: I had been keeping Cleaving Stance active for him this whole time, with the key point that he'll make a Full Attack on all enemies surrounding him whenever he scores a killing blow. Mob Stance upgrades Cleaving Stance so that his Recovery Time is reduced by 5% for each enemy that is within his Melee Attack range.
Deep Wounds: A passive that causes 20% of the initial damage from a weapon attack to be added as extra Raw Damage over time. It's the easy choice whenever any Rogue character reaches this stage in his or her development.
14th Level - Armored Grace: The 25% reduction to Recovery Time will stack with the other reductions provided by the Devil of Caroc Breastplate and Mob Stance, which means he'll be making highly damaging attacks with his two-handed Amra with considerable frequency and speed.
15th Level - Unbending: This is an activated ability that takes 25% of Damage from each attack made against the character, and converts it to healing over time for the character. Might will not affect the amount of healing. But Intellect and Power Levels can prolong the duration of the healing, which means that the healing over time can actually result in greater net healing than the damage caused by the original attack. That can make the ability really powerful in certain circumstances. One circumstance is where the character hits hard from the side, takes the odd blow or two, but is not himself the main object of enemy attacks like the tank. That will give him time to catch his breath and let the healing occur over time. The other is where the character does get pounded hard and lots of times, but is able to weather the storm (e.g. like with the help of Barring Death's Door). If the character can survive the onslaught, that will mean multiple healing ticks doing their thing over time. And yes, it can get prolonged by Salvation of Time from Xoti during ship battles.
16th Level - Reaping the Whirlwind: It adds an extra +1 Discipline, which helps as he makes frequent use of activated Fighter abilities like Unbending and Disciplined Strikes.
Improved Critical - This build is partially based on trying to score Critical Hits as often as possible through abilities like Disciplined Strikes and Dirty Fighting. It therefore makes sense to take a passive that increases Critical Hit Damage by 10%.
17th Level - Spell Resistance: A passive that provides a 10% chance of avoiding the effects of any spell outright.
18th Level - Tough: More Health is always a good thing, especially for a warrior with a two-handed weapon who is himself going to get hit a lot.
19th Level - Unbending Trunk: It upgrades Unbending so that 33% of Damage taken with each blow is healed over time.
Deathblows: His attacks will now enjoy a 50% bonus to Damage when they connect against targets that have two or more Afflictions. His Debilitating Strikes and Shadow Step abilities allow him to put at least two Afflictions on his targets directly if he has to, although the other ship combatants will themselves have methods of putting Afflictions on multiple targets too.
20th Level - Weapon Mastery: Adds another 5% Damage with Amra.
Inventory
Helm of the Falcon: Purchased from the Merchant at #3 in Crookspur. The key point is that it reduces Recovery Time with two-handed weapons by -15%.
Precognition: Looted from Dhwrgas the Ascetic while pursuing a Bounty against him on Crookspur Island. It feeds into his fighting style. The Damage of the first two Critical Hits he receives will be reduced by -75%. The first two Critical Hits he dishes out will have their Damage increased by 25%.
Ajaamut's Stalking Cloak: In an urn at #6 in the Lair of the Ancient. Its bonuses will apply to attacks he makes after using Shadow Step, or after the Invisibility from his Slippers of the Assassin triggers.
Devil of Caroc Breastplate: Stolen from a chest in Marihi's Metalworks, the entrance to which is #13 in Periki's Overlook. The -10% Recovery Time is certainly a welcome benefit, and it will stack with other reductions to Recovery Time that Eder will enjoy through his class abilities like Mob Stance and Armored Grace. The distinctive benefit of the armor is that it adds +2 Power Pool Points for classes that do not cast spells and do not have infinite resources like a Chanter or Cipher. The kind of character that derives the most benefit from the armor is a multi-class character where neither class is a spellcaster and whose activated abilities rely on finite Power Pool Points. The armor will add +2 Power Pool points to both classes of the multi-class character. And for Eder that means more Guile to use powers like Debilitating Strikes and Shadow Step, and more Discipline to use Disciplined Strikes and Unbending.
Gauntlets of Ogre Might: Purchased from the Orlan Peddler at #9 in the Brass Citadel. Getting these gloves for him puts him that much closer to his targeted Might score of 25, whereupon he can use Amra at its full power from the very start of ship battles.
Chameleon's Touch: Obtained by defeating Nomu the Marauder at #7 on Neketaka Island. His Fighter class means the Ring gives him +1 Might, bringing him that much closer to the 25 Might needed to use Amra to its full power from the very start of every ship battle.
Ring of Regeneration: Purchased from the Spindle Man at #13 in Delver's Row. It's a given that a warrior using a two-handed weapon will himself get hit plenty, so any bit of regeneration will help.
The Maker's Own Power: Obtained by defeating Torkar at #7 in Lifter's Refuge in Dunnage. It provides the last +1 Might bonus he needs to get his Might to 25, and that means he can use Amra to its full power (i.e. causing area-of-effect damage on Critical Hits) from the very start of battles.
Slippers of the Assassin: Purchased from Captain Thaenic aboard the Deck of Many Things.His build is about maximizing his opportunities for double-damage from Backstab (which he will soon get). And he'll do plenty of that through his Escape / Shadow Step tree of abilities. The boots provide another opportunity, turning him Invisible for 5 sec after killing an enemy.
Hati: Found at #4 in Fort Deadlight. The key reason for having this Pet for Eder is that its +1 Might bonus for its owner helps Eder reach the 25 Might that will be needed to wield Amra at its full power from the very start of combat. The +5 to Reflexes for allies is sugar on top.