-

- Forums
- Chatrooms
- Gallery
- Gameplay Videos
- Upload
- Articles
- Mod Reviews
- Shop SP: Games, Movies, Books

|
|
| Pillars of Eternity 2 Online Walkthrough by David Milward |
MIRKE, F ORLAN BRAWLER (FIGHTER / MONK)

Stats
Abilities
1st Level - Knockdown: A starting ability by default.
Force of Anguish: A starting ability by default.
2nd Level - Swift Strikes: Adds +5 Dexterity and +15% Action Speed for 10 sec. Sometimes even tanks should be given some offensive ability, and this one will be upgraded to Swift Flurry.
3rd Level - Disciplined Barrage: The +5 Perception bonus is definitely worth it. It will also be upgraded to Disciplined Strikes.
4th Level - Weapon and Shield Style: Obligatory for a tank.
Dance of Death: It will later on be a good way to passively recoup Wounds as long as she avoids getting Hit to the maximum extent possible.
5th Level - Determination: Adds +20 to all Defenses vs. attacks that inflict Constitution, Intellect or Perception Afflictions. It's a good 2nd-tier passive to add.
6th Level - Confident Aim: It's a passive that will turn 30% of Grazes into Hits.
7th Level - Disciplined Strikes: It upgrades Disciplined Barrage so that it adds +1 Concentration, and provides the Intuitive Inspiration instead of Awareness. The Intuitive Inspiration provides a 30% chance of converting Hits to Critical Hits, which in turn enhances other abilities of this build, such as ...
... Swift Flurry: Upgrades Swift Strikes so that Melee Critical Hits have a 33% chance of triggering another instant Melee Attack during its duration. It is the preferable choice over Lightning Strikes if you can design the character build in a way that maximizes the probability of Critical Hits, including the aforementioned Disciplined Strikes.
8th - Rapid Recovery: Increases the regeneration of Constant Recovery from +5 Health every 3 sec to +7 Health every 3 sec. And it will get prolonged endlessly by Salvation of Time at later levels.
9th Level - Soul Mirror: It reflects half of any missiles that Miss her back to damage her shooters. It's a natural passive for a Monk-tank build that prioritizes Deflection.
10th Level - Vigorous Defense: It increases all Defenses by +20 for 15 sec. It will be one of those staple buffs she uses every battle, and will get extended endlessly by Salvation of Time.
Enduring Dance: Dance of Death by itself ends the moment the character takes any damage. This upgrade means the character has to take damage three times to force the Dance to end. It is after taking this ability that the Dance of Death becomes a reliable way for a high-Defenses character to bring her Wounds up to 10.
11th Level - Duality of Mortal Presence: She uses the Body mode, which gives her +1 Constitution per Wound. She'll also upgrade it to Iron Wheel when she gets a chance, so that it will also boost her Armor. It's the natural choice for a Monk build that emphasizes tanking.
12th Level - Weapon Specialization: It will increase her damage with her Rapier by 10%.
13th Level - Superior Deflection: Boosting Deflection is always a natural choice for a tank, but in this instance also maximizes her chances of instant Recovery when using the Rannig's Wrath Rapier.
Enervating Blows: It will place the Weakened (-5 Constitution, -50% Healing Received) Affliction on the target on a Critical Hit. And Critical Hits are more likely when using the Needle Strike modal of a rapier.
14th Level - Armored Grace: The -25% reduction in Recovery Time can take a little of the edge off the otherwise slow Recovery Time, at least in those times where she doesn't get extra attacks through her Monk abilities or gain Instant Recovery through her Rannig's Wrath Rapier.
15th Level - Uncanny Luck: The 5% chance to completely avoid any attack enhances her tank role, and the 5% chance of converting a Hit to a Critical Hit will help her make the odd extra attack in conjunction with her Monk abilities.
16th Level - Refreshing Defense: It adds a few seconds duration to her Vigorous Defense each time she takes any amount of Damage from an enemy.
Iron Wheel: It upgrades her use of Duality of Mortal Presence so that she'll have a +3 bonus to Armor Rating upon reaching 10 Wounds.
17th Level - Spell Resistance: It provides a 10% chance to avoid the effects of any spell outright, which can be a good thing for a tank.
18th Level - Tough: More Health is always a good thing for a dedicated tank.
19th Level - Weapon Mastery: Adds another 5% Damage with her Rannig's Wrath Rapier. The Rapier is inherently a Critical Hit weapon, especially in conjunction with Monk abilities like Swift Flurry, so honing her hitting abilities is still a good thing even if she's first and foremost a dedicated tank.
Heartbeat Drumming: It's a passive whereby any Melee Critical Hit has a 25% chance to instantly trigger an extra Melee Attack. The ability to trigger extra attacks through both this and Swift Flurry is the incentive to maximize her ability to land Critical Hits. And using the Rannig's Wrath Rapier, with its own inherent bonuses to Accuracy, plus the Needle Strike modal, means that Critical Hits will come frequently.
20th Level - The Dichotomous Soul: Now she can call on unlimited summons, especially in conjunction with the Enduring Dance ability.
Inventory

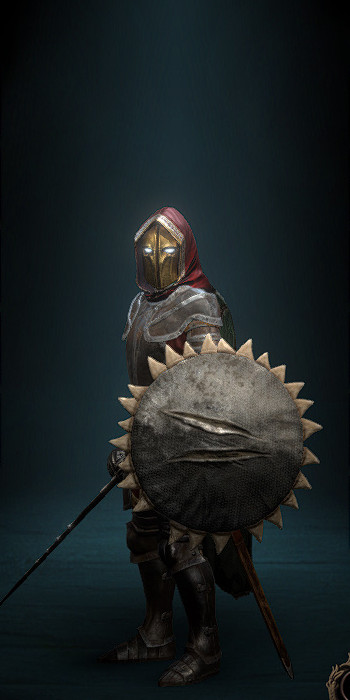
Akola's Apex Ward: Obtained by defeating Whenena Eel's Kiss aboard his ship, The Servant of Rikihu, while sailing to the Desert Island. Whenena Eel's Kiss leaves behind a Large Shield named Akola's Apex Ward. Mirke uses it for the rest of the game. A Large Shield with a high Deflection bonus is enough reason to take it. I enchant it with Hide and Tooth (+5% Damage with Melee Weapon Attacks, +3 Deflection vs. Melee Weapon Attacks) as an easy choice over Shark Frenzy, which is a per Rest power. I also enchant it with Hunter's Vigor, which adds +1 Armor Rating. The stackable bonus to Armor, combined with its high boost to Deflection, are the key reasons I choose this shield for her.
The Mask of the Weyc: Looted from Fyonlecg's dead body at #6 in The Heart of the Mystery. It will trigger +50 Deflection and +1 Concentration once per Encounter upon the wearer being attacked for the first time in combat, and it can be prolonged indefinitely by Salvation of Time. It also helps maximize the potential for instant recovery through the Insistence power of the Rannig's Wrath Rapier.
Dragon Pendant: Obtained as a random item from an Abandoned Village on the way to Fort Deadlight. It's not for the per Rest abilities, but for the bonuses to Burning and Slashing Armor Rating which fits the theme of her Armor to the max tank build.
Cloak of Greater Deflection: Obtained as a reward from the Lone Survivor at Port Maje on the way to the Desert Island. Maximizing Deflection is always a good thing for any tank build. But there's the additional point in this instance in that it maximizes the chances of triggering instant Recovery through her Rannig's Wrath Rapier.
Patinated Plate: Purchased from the Merchant at #3 in Crookspur. It starts off as a Legendary Plate Armor with an additional +1 Armor Rating, but with the downside of +15% Recovery Time. I add the Bronze Juggernaut enchantment so that the Armor Rating bonus increases to +2, and the penalty to Recovery Time increases to +20%. It's all consistent with the theme of maximizing Mirke's Armor Rating to the utmost. The Recovery Time Penalty from wearing the armor will stack with the Recovery Time Penalty for using the Needle Strike modal for Rapiers. But the Rannig's Wrath Rapier often allows me to have my cake and eat it too. A Miss against Deflection has a 10% chance of triggering an Instant Recovery that ignores all penalties.
Bracers of Greater Deflection: Purchased from Engari at #10 in the Temple of Toamowhai. The +7 bonus to Deflection is always good for a tank character. But in Mirke's instance there's the additional point that it maximizes the chances of triggering Instant Recovery through the Insistence power of her Rannig's Wrath Rapier.
Entonia Signet Ring: Looted from the shrine of Skaen at #9 in the Court of Fort Deadlight. She's in the thick of it every battle, so it can be beneficial to wear a ring that will raise all of her Defenses for each enemy that Engages her.
Ring of Minor Deflection: Purchased from Dimessa in The Treasure Trove, the entrance to which is at #10 in Radiant Court. Increasing Deflection is always a good thing for a tank. In this instance there's the additional reason that adding as much Deflection as I can increases the chances of triggering the Insistence power of Rannig's Wrath.
Blunting Belt: Purchased from Sabormi at #4 in the main floor of the Imperial Compound. It adds +1 to both Piercing and Slashing Armor Rating. Mirke's build is based on maximizing armor, so I go all in on any item that provides Armor bonuses.
Boots of the White: Found in an Abandoned Village at #3 on the Cleft Island. The +1 to Resolve raises her Deflection. The +2 bonus to Freezing Armor will stack with her other Armor Rating bonuses. The Resistance to Dexterity Afflictions is a welcome defensive bonus as well.
An Alternative: You could of course emphasize a two-handed or dual-wielding Fighter / Monk, since many Monk abilities involve extra attacks like Swift Flurry and Heartbeat Drumming. I'll describe one that I found effective, although in the end I went with other builds during the playthroughs that I based this guide on. It's a Forbidden Fist / Tactician build.
A Forbidden Fist is actually a natural choice for a Monk tank build since you have to get your Wounds through a method other than taking damage. That method is through the expiration of negative effects suffered by the Monk. It sounds awfully situational on the surface, but there is a reliable way to bring it about. The Forbidden Fist can at will make an attack that causes Crushing Damage and the Enfeebled Affliction to its target. It also causes an Interrupt should its target be in the middle of using an activated ability. That Interrupt would restore Discipline for the Tactician's activated abilities.
The drawback is that you get Forbidden Curse, which causes little bits of Raw Damage to the Forbidden Fist over time. But Forbidden Curse counts as an expired negative effect for purposes of gaining Wounds for the Forbidden Fist. So the key is to frequently use the Forbidden Fist attack, while ending the Forbidden Curse as quickly as possible, as a reliable way to gain Wounds.
An ability that costs 2 Wounds that you'll want to keep active whenever possible is Clarity of Agony and then Enlightened Agony. The former ability and then its upgrade will drastically reduce the duration of Forbidden Curse. You can also of course accumulate as many bonuses to Resolve as you can, which both increases the tankiness of the build by increasing Deflection, but also reduces even further the duration of Forbidden Curse.
A passive Monk ability that you'll want is Rooting Pain, which causes a small amount of damage in a small radius around the Monk. It also causes Interrupts in that same radius, which will of course benefit the Tactician side of the build.
Renew your Agony whenever you max out at 10 Wounds, so you can keep the Wounds and Interrupts going.
Another ability you may want is Thunderous Blows, which provides the Tenacious (+5 Might, +2 Penetration) Inspiration. If you get the Slayer's Claw Axe, the Tenacious Inspiration provided by Thunderous Blows will get upgraded to Energized (+5 Might, +2 Penetration, Interrupt on Critical Hit). Critical Hits will now restore Discipline for Tactician abilities. The shield to go along with it will be Tuotilo's Palm, a bashing shield that will scale its Accuracy and Damage to the Monk's Power Levels.
Like I said, multi-classes work best when you can harmonize features from both classes together.


