-

- Forums
- Chatrooms
- Gallery
- Gameplay Videos
- Upload
- Articles
- Mod Reviews
- Shop SP: Games, Movies, Books
|
|
| Pillars of Eternity 2 Video-Based Walkthrough by David Milward |
Crookspur | Ori O Koiki | Fampyr Island |
Crookspur (Evil)
*Evil* Seafol
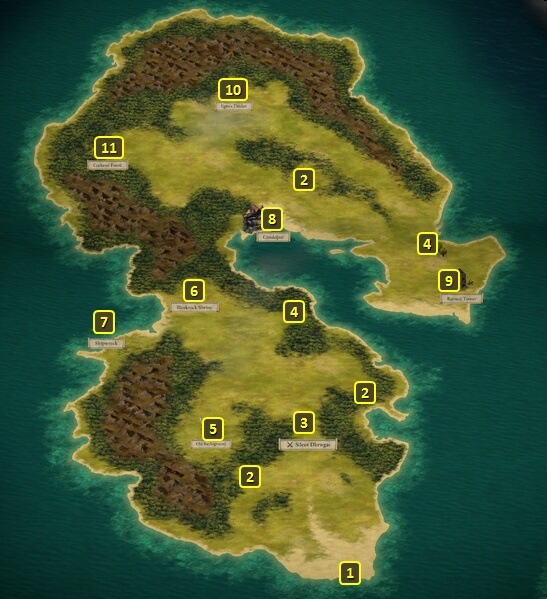
I sail northwest from Neketaka, boarding several ships along the way until I reach Crookspur Island at #9 on the World Map.
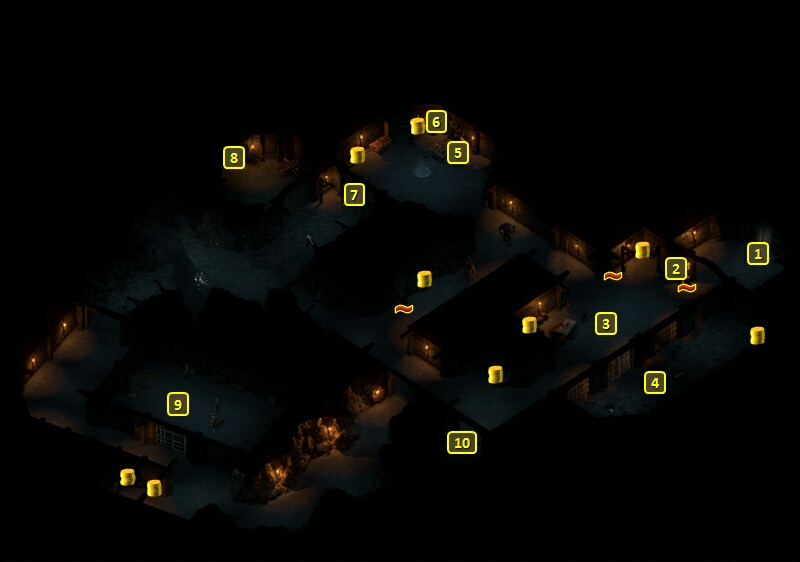
I approach the port of Crookspur itself, which is at #8 on the map of Crookspur Island. I switch out Tekehu for Eder before I dock.
Seafol, who is Aeldys' contact for purposes of the Cruel Cargo Quest, is at #2 on the map of Crookspur. But Zarathos just blows her off.
*Evil* Crookspur Merchant
I buy two items from the Merchant at #3. One of them is the Helm of the Falcon for Eder. The key point is that it reduces Recovery Time with two-handed weapons by -15%.
The other is the Patinated Plate for Mirke. It starts off as a Legendary Plate Armor with an additional +1 Armor Rating, but with the downside of +15% Recovery Time. I add the Bronze Juggernaut enchantment so that the Armor Rating bonus increases to +2, and the penalty to Recovery Time increases to +20%. It's all consistent with the theme of maximizing Mirke's Armor Rating to the utmost. The Recovery Time Penalty from wearing the armor will stack with the Recovery Time Penalty for using the Needle Strike modal for Rapiers. But the Rannig's Wrath Rapier often allows me to have my cake and eat it too. A Miss against Deflection has a 10% chance of triggering an Instant Recovery that ignores all penalties.
I also chose Constant Rebound over Heavy Rebound, the reason largely being that I have plenty of Rubies but few Ambers.
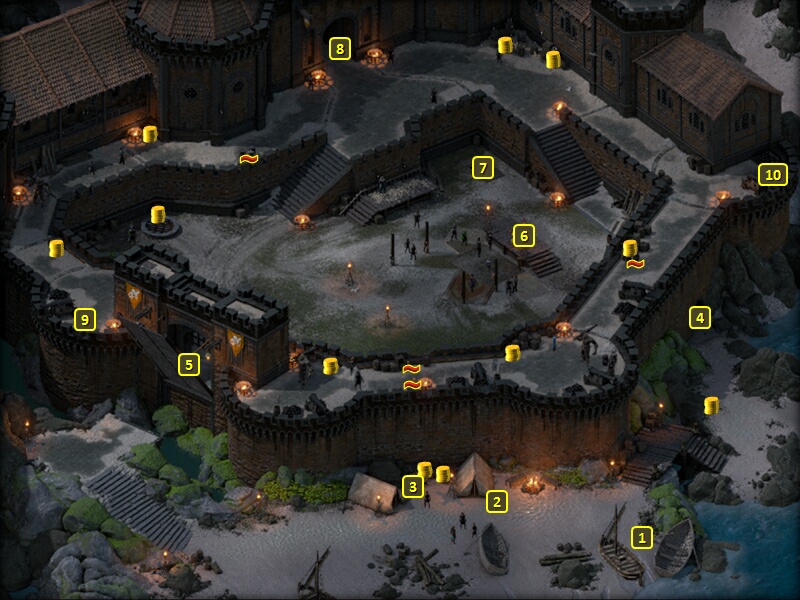
*Evil* Slave Auction
I go to the drawbridge at #5, where the Ogre Guard lets me through.
A slave auction of Handsome Eliam takes place at #8.
I could purchase him, and a bid of 2,000cp would pretty much guarantee winning the auction. Auctioneer Marcca will afterwards recommend seeing Master Kua to finalize the purchase. You can speak to Eliam after finalizing the deal. The Cruel dialogue option sends him straight away to join your ship as a Crew Member. The Benevolent dialogue allows choices between letting him join your crew, or sending him free to the Temple of Berath in Neketaka. These options will still be available if you slaughtered all the Slavers as part of the Cruel Cargo and Clearing Out Crookspur Quests.
Questioning the legality of the auction, particularly with either a Bluff check of 10 or a Streetwise check of 10, is likely to get you expelled outside the courtyard and the gate closed on you. Making your way back in will mean the local slavers attacking you on sight.
Zarathos lets the auction proceed without putting in a bid, with the implication that Handsome Eliam will be killed by his master for no reason other than to become a trophy. He afterwards pays Auctioneer Marcca 2,000cp for the privilege of seeing Master Kua. He didn't have the 10 ranks in Bluff needed to avoid that.
The evil party then heads through the door at #8.
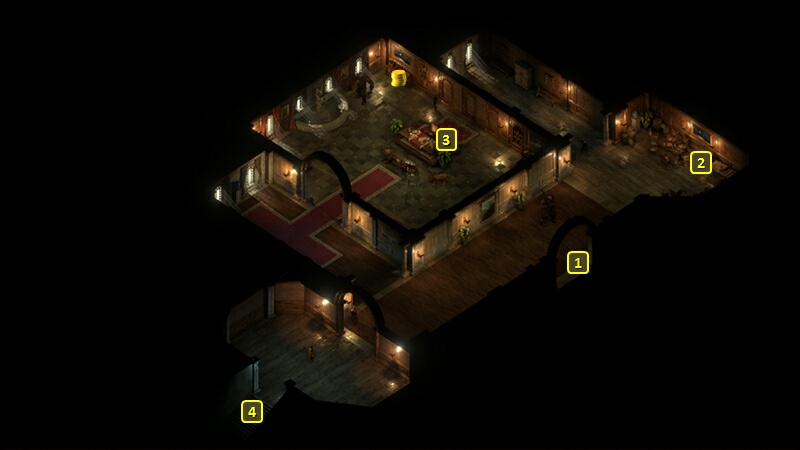
*Evil* Master Kua
I start off at #1 on the map of the Crookspur Fort. I go speak to Master Kua at #3, and agree to his request to take out the leaders of the Wahaki tribe. That starts the Tip of the Spear Quest.
I leave and have the whole evil party go into Stealth mode. I bypass the guard in the southwest corner room, and go down the stairs at #4. It's a more direct way to get into the Dungeon. Sneaking past the guard in Stealth mode was necessary to avoid all of Crookspur going hostile.
*Evil* Crookspur Dungeon
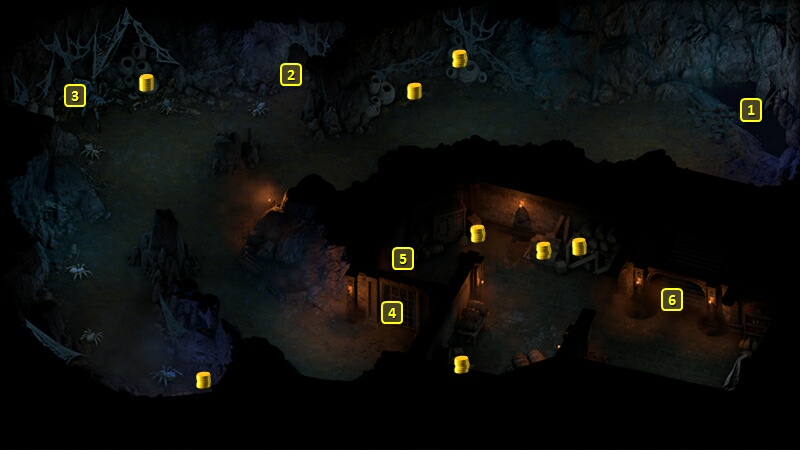
I can wipe out everyone in the Dungeon without ruining any prospective alliance with the Crookspur Slavers, as long as I didn't oblige the guard of the stairs I just came down through to set off an alarm. Also, I need to avoid freeing any slaves, either at #4 or #9, to avoid setting off the alarm.
I go south and meet Bahua, the leader of the Wahaki prisoners. Zarathos Cruelly turns down her request for aid in escaping.
I proceed to slaughter the Ogres and Mercenaries on the north side of the Dungeon. They leave behind the Crane-Crested Key and Large Iron Key, which are useful for opening the chests and doors in the Dungeon. I also happened to find a Sapphire among the loot.
I find a Morning Star called The Willbreaker in a chest at #6. I don't have any character equip it on an ongoing basis, but Zarathos keeps it in his private inventory in case I need it against any enemies where I really want to lower the Fortitude defense through the Body Blows modal.
I also find another Blackwood Log in the chest at #2. It is one more piece that I need for the Blackwood Hull.
I leave through the door at #10.
*Evil* Crookspur Sea Cave
I start off at #6 on the map of the Crookspur Sea Cave. One of the nearby containers has an Adra Ban as a random item.
I use the the switch at #5 to open the door at #4. I slaughter some Crystal Spiders and a Crystal Spider Queen at #3, and then go out the tunnel at #2.
*Evil* Cockerell Forest
I am now a little north of Crookspur. I grab random items from the tower at #9, and Egno's Thicket at #10.
Cockerell Forest is at #11, which is the hiding place of a trio of escaped slaves named Cathwenna, Camoc and Hadongo. They'll initially be hostile, and signal as much by firing arrows at your feet.
You can choose to approach cautiously for purposes of starting a fight with them, but on more favorable terms. Doing so requires every party member to make an Athletics check of 13 to avoid the Gaping Wound (-25% Healing received, -15% Maximum Health) Injury. Combat will start however the checks play out.
You can have a character make a Perception check of 16 to determine their location. Maia can make the check automatically for you since Ishiza will do the scouting ahead. Ydwin uses her Cipher powers to ascertain their precise location. She then makes a Stealth check of 13 to start combat with the party in Stealth mode, enabling them to get closer before combat begins. Failing that Stealth check would have meant party members getting both the Gaping Wound (-25% Healing received, -15% Maximum Health) and Bruised Ribs (-20 Fortitude) Injuries. A successful Stealth check also provides the option of sneaking past them altogether and permanently ending the availability of the Forest on the Island map, although I obviously didn't go for that.
I slaughter the escaped slaves and their minions (including Tigers). Cathwenna leaves behind a Flail called Ball and Chain.
For options on how to handle this encounter without killing the escaped slaves, see how the good party handles things.
Xoti takes Heartbeat Drumming on her 20th level-up. It provides a 25% chance of an extra attack upon scoring a Critical Hit. Xoti by this point has everything she needs to be effective in what I need her for, so this amounts to sugar on top.
I return to Crookspur. I end up near my own ship, and promptly dock it.
The evil party now sails to Ori O Koiki, with the intention of destroying the Wahaki tribe.