-

- Forums
- Chatrooms
- Gallery
- Gameplay Videos
- Upload
- Articles
- Mod Reviews
- Shop SP: Games, Movies, Books
|
|
| Pillars of Eternity 2 Video-Based Walkthrough by David Milward |
Queen's Berth
The Floating Hangman
I sail east, and attack a couple of Crookspur Captains along the way.
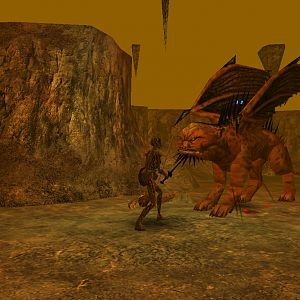
I have an encounter with The Floating Hangman as I approach Neketaka at #17 on the World Map. But Lucia Rivan does not attack me out of respect for the Watcher also being the Herald of Berath.
The Early Muster
I continue east and board a Deadfire Merchant Ship.
I bend around the east side of Neketaka Island, and run down the Rauataian Voyager called the Early Muster, captained by Chornu. I outlast his crew with the usual methods.
I then go east and board a Huana Master Captain before returning to Neketaka.
Sanza's Map Emporium
I switch in the four characters with the least experience, Serafen, Ydwin, Rekke and Fassina.
I also remove Aledh and Irrena. They were stand ins bound to be replaced sooner or later.
Now I remember to have Alliria equip Sun and Moon, and Ydwin equip her Ring of Minor Deflection.
I go east and buy Spices and Pelts. The latter is needed for an enchantment that I want for Aloth's Pale Hide armor.
I continue east and enter Sanza's Door Emporium through the door at #20.
I then speak to Sanza, and agree to be an explorer on his behalf. The conversation begins the Quest called Mapping the Archipelago: Port Maje.
I also purchase what will be Fassina's Grimoire for the rest of the game, the Snakeskin Grimoire. It includes a couple of spells that will benefit from the bonus Poison Power Levels that Fassina will acquire, Noxious Burst and Malignant Cloud. These spells can hurt party members too, and I am normally hesitant to confer abilities to ship combatants that can hurt the party as well. But I reason that the good party will have enough healing and regenerative capabilities so that I can live with that, especially as Fassina will provide a lot of that healing herself as a counter balance. It also has the unique weapon summoning spell, Nannasin's Cobra Strike. It turns the caster's arms into a pair of snakes that inflict Piercing Damage, amount to two weapons for purposes of Full Attack and Two Weapon Style, and attack from an extended range similar to a Pike or Quarterstaff. It also inflicts poisoning that causes Raw Damage over time. The bonus Poison Power Levels that Fassina will acquire will not increase the Piercing Damage of the initial strike, but they will increase the Raw Damage caused by the poisoning.
Now I also enchant her Cabalist's Gambeson to add Arcane Extension, which extends the duration of her buffs by 10%.
*Evil* Sanza's Map Emporium
And now I remember to give the Ring of Minor Deflection to Mirke. I switch her, Xoti and Tekehu out for Aloth, Serafen and Rekke so that they can get some xp. I keep Ydwin in the party because I can use her thieving skills.
Aloth takes Combat Focus. Concentration is always good for a spell caster with lengthy casting times, and that includes Wizards when they cast their offensive spells.
I likewise enter Sanza's Map Emporium at #20, and start the Quest called Mapping the Archipelago: Port Maje.
Bounty on Veen
I go south and speak to Aenia at #27. I get a moderate increase in reputation with the Vailian Trading Company, 2,300cp and 5,000+xp to collect on the Bounty on Veen.
I also accept the Bounty on Desiwa the Shark. Now I go through the door at #24.
Abocco
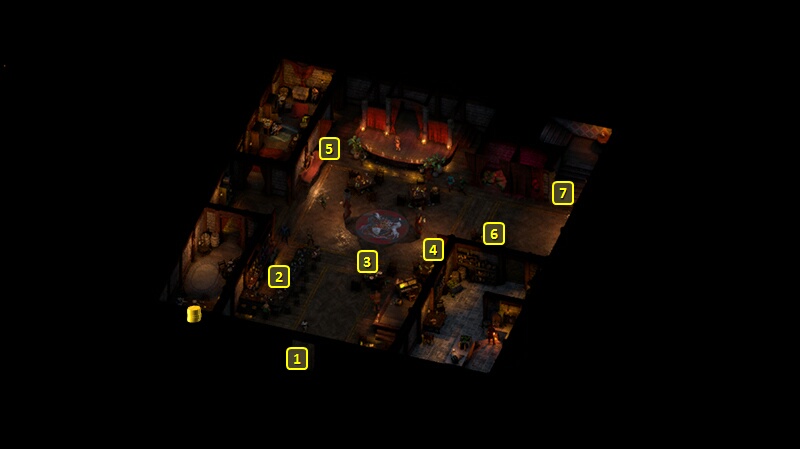
That brings me to #1 on the map of the main floor of the Wild Mare. I speak to Abocco at #4, and I accept the Bounty on Meryel the Mad.
I go up the stairs at #7.
Konstanten Joins
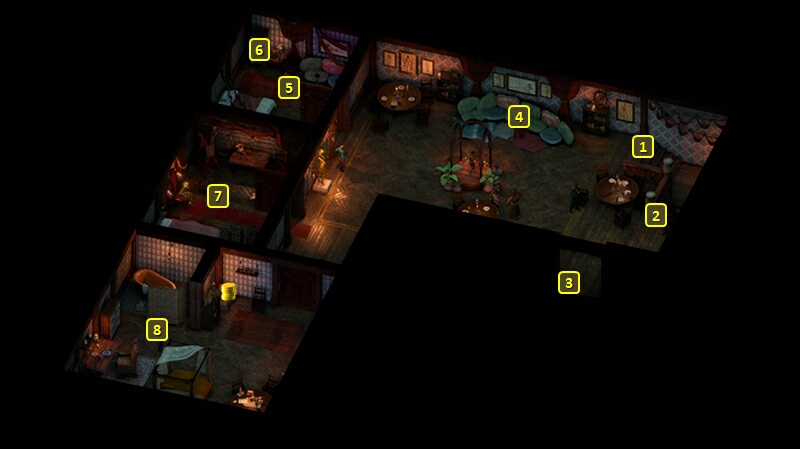
I am now at #1 on the map of the second floor of the Wild Mare. There is a Huana Charm Belt hidden at #4.
I go southwest and speak to Konstanten at #8. I accept his offer of a massage for 250cp, and that gets me a Brothel until rest bonus called Konstanten's Boon. It provides +2 Constitution, +1 Perception and +1 Intellect. It's the best Brothel boon in my opinion, at least for the Watcher builds that I use, which both place a premium on Constitution and Intellect.
Note that I make a point of getting Konstanten's Boon before I recruit him into the party. The option to get a massage and get the Boon will no longer be available once I start the dialogue branch that invites him to join the party. That means he won't get a Food bonus, but that's a drawback that I can live with. Especially as he'll mostly be a ship combatant, and the Boon is a really helpful one for my Watcher protagonist.
He takes Rekke's place for the moment so I can level him up. I equip him with the Exceptional Breastplate and the Saru-Sichr Morning Star.
Barbaric Yell is one of his starting abilities. It will be upgraded in ways that take advantage of other abilities in the build.
He also starts with The Thunder Rolled Like Black Waves on the Seas. It's an Offensive Invocation that both inflicts Crushing Damage and Stuns in a cone. It also has an upgrade.
He also starts with Come, Come Soft Winds of Death. It does a little bit of Raw Damage every 3 sec, and also heals the Chanter himself a little bit at the same time.
He takes Frenzy on his 2nd level-up. Adding +5 Might and +5 Constitution and +15% Action Speed is often good and thematic for a Barbarian. I have a specific upgrade in mind that will play to other abilities and strengths of this build.
He takes Blooded on his 3rd level-up. He'll inflict +25% Damage if he himself is at 25% or less Health. It's often an obligatory passive for a Barbarian who's packing a two-handed weapon.
He gains two abilities on his 4th level-up. One of them is Thick-Skinned, which adds +1 to Engagement and +1 to Armor Rating. It's a typical passive for many Barbarians.
He also adds Two-Handed Style, which adds +20% Damage when using a two-handed weapon. And it's the natural choice, since a Morning Star is going to be his weapon of choice.
He also adds the Morning Star weapon proficiency. He has to accept a penalty to Damage for using the Body Blows (-25 Fortitude for target) modal. But it ties in with his fighting style of reducing his target's Fortitude to the maximum degree possible to take advantage of the Brute Force passive he will acquire in the future. And that ties in with maximizing his potential for landing Critical Hits, which will give him the Phrases he needs to activate his Offensive Invocations.
He also adds Accurate Carnage on his 5th level-up. The bonus Accuracy to Carnage makes it a staple passive for Barbarians.
He adds Barbaric Blow on his 6th level-up. It's a Full Attack with +20% Damage, +50% Damage on Critical Hit, a 30% chance of converting a Hit to a Critical Hit, and a +50% area of effect for Carnage. And it will be upgraded.
He gains two abilities on his 7th level-up. One of them is One Stands Alone. It adds +20% Damage when he's within melee range of more than one enemy, and it will take at least three enemies to put the Flanked status on him. It's pretty much a staple passive for Barbarians.
He also adds Combat Focus. It adds +1 Concentration at the start of each fight. And it's a good passive to have for a Chanter, as some of his Offensive Invocations will have significant casting times.
He adds Bloodlust on his 8th level-up. It provides a bonus +20% Action Speed for 10 seconds after landing a killing blow. Also a standard choice for many Barbarians.
*Evil* Konstanten Joins
Serafen reaches his 8th-level upon coming up to the Upper Floor. He takes Barbaric Blow. It's a Full Attack with +20% Damage, +50% Damage on Critical Hit, a 30% chance of converting a Hit to a Critical Hit, and a +50% area of effect for Carnage. Any concerns about expending Rage points can be mitigated when it gets upgraded to Barbaric Smash.
Zarathos, like Alliria, also gets Konstanten's Boon as a Brothel bonus before recruiting his last Ship combatant.
The evil party takes on Konstanten as a single-class Skald. He has The Thunder Rolled like Waves on Black Seas and Come, Come Soft Winds of Death as his starting abilities.
He takes Hel-Hyraf Crashed Upon the Shield during his 2nd level-up. It's an Offensive Invocation that lowers enemies' Armor Rating by 2. It also has a significant upgrade that is worth targeting.
He gets two abilities during his 3rd level-up. One of them is White Worms Writhed in the Bellies of the Dead. It's an Offensive Invocation that causes quite a bit of Crushing Damage as long as the dead body of an enemy is within its cone upon casting.
The other one is Two Weapon Style. A key theme of this build is for him to attack often with two weapons, both of which will have significant Accuracy bonuses. And that means maximizing the chances of building up Phrases through Critical Hits as a Skald, and in turn allowing him to use his Offensive Invocations with greater frequency.
He takes At the Sound of His Voice, the Killers Froze Stiff on his 4th level-up. An Offensive Invocation that Paralyzes enemies within its cone.
He gets two abilities during his 5th level-up. One of them is Ancient Memory. The idea is that any other ship Companions or Sidekicks who happen to be near him (which is often) will receive passive healing and keep them fighting longer.
He also takes Combat Focus. Offensive Invocations cast quickly, but I still like taking this for him as a "just in case" an Interrupt blow lands on him while attempting an Invocation.
He takes The Shield Cracks on his 6th level-up. It upgrades Hel-Hyraf Crashed so that successful Hits on the victim prolong the duration of the Armor Rating penalty so that it can conceivably make that penalty last for the whole of the fight. Players often find it worth taking Hel-Hyraf Crashed just for this reason alone.
He gets two abilities during his 7th level-up. One of them is And Their Fear Followed Them Into the Hills. It upgrades At the Sound of His Voice so that enemy targets become Frightened after the Paralysis wears off. The upgrade means that enemies can't do anything at all during the first phase, and can auto-attack during the second phase but can't use any activated abilities. The cumulative effects can be quite crippling for enemies.
The other is Their Putrid Stench Wafts Across. It upgrades White Worms so that it causes the Sickened Affliction in addition to the Crushing Damage.
He takes Its Crash Could Not Be Denied on his 8th level-up, which provides an Accuracy bonus to The Thunder Rolled Like Waves.
I then equip him with an Exceptional Breastplate, a pair of Exceptional Rapiers, and the Cloak of Greater Protection that I had found in Arkemyr's Vault.
I leave out the door at #3, which brings me to #25 on the map of Queen's Berth. And from there I go to the exit at #22, and travel to Periki's Overlook.