-

- Forums
- Chatrooms
- Gallery
- Gameplay Videos
- Upload
- Articles
- Mod Reviews
- Shop SP: Games, Movies, Books
|
|
| Pillars of Eternity 2 Video-Based Walkthrough by David Milward |
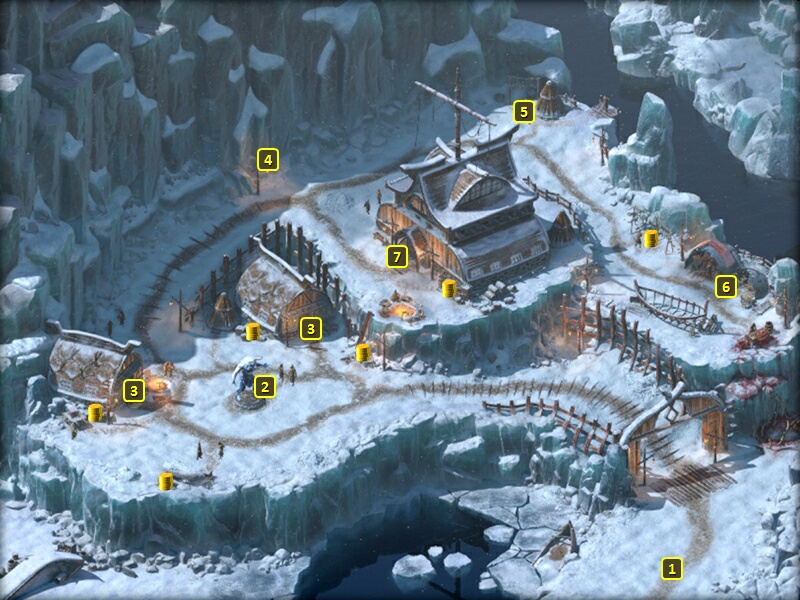
Harbinger's Watch
Harbinger Brythe
I start off at #1 on the map of Harbinger's Watch. I go on ahead a little, and am promptly greeted as the foretold Duskspeaker.
I enter a home at #3, and speak to Harbinger Brythe. She wants me to get rid of some fanatics who reside further inland, a request that starts The Higher-Ups Task.
Aloth takes Tough on his 17th level-up. More Health is always good for a Battlemage who spends time on the front-lines.
*Evil* Harbinger Nyvardir
I go east and speak to Harbinger Karlodh, who sells seafood. Ydwin expresses disgust at the peculiar religious beliefs held by her fellow Pale Elves.
I continue east and speak to Harbinger Nyvardir at #6. He sells alcoholic drinks. In fact, he's on the lookout for fluid found in constructs that he hopes will be the missing ingredient for the perfect beer that he seeks to craft. That conversation starts the Toasting the Dead Task.
I then go through the door at #7.
*Evil* Harbinger Valbrendhun
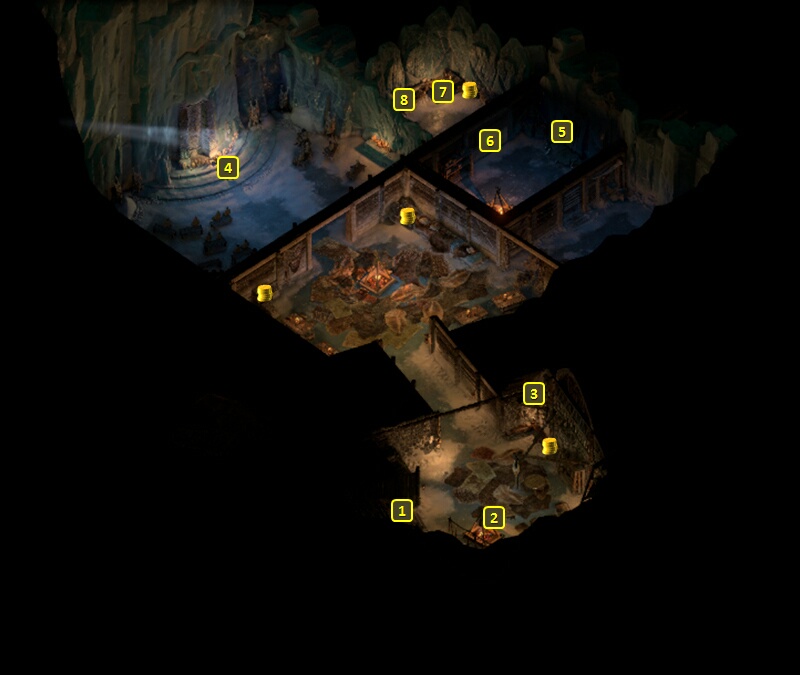
I arrive at #1 on the map of Harbinger's Retreat. I speak to Harbinger Valbrendhun, who runs an inn. I take the opportunity to advance levels for my ship companions, all of whom gain two abilities on their 16th level-ups.
Konstanten gains Eld Nary's Curse Spread Through Their Midst. It upgrades So Singt Biting Winds so that the tornado bounces to more enemies.
He also takes His Laughter Rang Through the Halls. It's another offensive invocation, a cone attack that both Dazes (-5 Strength, cannot Engage, -4 Penetration) and knocks enemies back.
Rekke takes Improved Critical. It's a natural choice for any two-handed warrior.
He also takes Tough. More Health is always good for any two-handed warrior who is himself going take damage.
Maia takes Survival of the Fittest. It's a passive where when she herself is less than 50% Health, her attacks will have a +10 bonus to Accuracy against enemies who are themselves below 50% Health.
She also takes Improved Critical. She has several boosters to Accuracy as it is, which means she will get her share of Critical Hits. Adding +10% to Critical Hit Damage is therefore very sensible.
Serafen takes Heart of Fury. It makes a Full Attack against every enemy within his vicinity, and with 25% bonus Damage. It does require the expenditure of 4 Rage. But my willingness to take this ability is encouraged by another ability that can recoup Rage.
He also takes Vengeful Defeat. It's a passive whereby he'll make a Full Attack against any enemy next to him should he reach 0 Health. And given that this build encourages Critical Hits against him, and he won't suffer any Injuries as a result during ship combats, I don't mind if this ability triggers.
Eder takes Reaping the Whirlwind. It adds an extra +1 Discipline, which helps as he makes frequent use of activated Fighter abilities like Unbending and Disciplined Strikes.
He also takes Improved Critical. His build is partially based on trying to score Critical Hits as often as possible through abilities like Disciplined Strikes and Dirty Fighting. It therefore makes sense to take a passive that increases Critical Hit Damage by 10%.
I reassemble my core party once all that is done. A Figurine called the Permafrost Shard is in a hidden niche at #3.
An Honored Guest
A congregation of Rymrgand's faithful is gathered at #4, with Vatnir leading their congregation. The dialogue choices don't particularly matter. But loud tremors indicate that something called The Messenger has arrived. The congregation immediately leaves the Retreat.
Pallegina takes Spell Resistance on her 17th level-up. It provides a 10% chance to outright avoid the effects of any hostile spell.
*Evil* The Messenger
I return to Harbinger's Watch. A dragon-like creature, The Messenger, is laying waste to the village and lands on the statue of Rymrgand at #2.
It can be a tough fight, and for reasons other than the insane Health and highly damaging attacks that fully grown dragons will usually have. It uses Concelhaut's Corrosive Siphon with frequency, allowing it to replenish Health.
It also has a power that can pull distant characters next to it, and keep those characters Engaged. If you want to avoid that, it has 7 points of Concentration before it can be Interrupted. The Chanter's Thick Grew Their Tongues phrase can wipe out its Concentration if it can overcome the dragon's Will defense. If you have a squishy spellcaster who you do not want affected by the dragon's pull in power, an item that provides immunity to push and pull effects like the Upright Captain's Belt will be helpful.
It is vulnerable to fire damage, so Fire spells or weapons like the Firebrand (either through the Druid spell or through a scroll) will help. It's otherwise a matter of plugging away at it, and eventually outlasting it. Keep in mind that it periodically summons Luminous Revenants to help it. The evil party uses the Salvation of Time-Ancestor's Memory loop, which extends Barring Death's Door on Zarathos and Tekehu and Ydwin, to outlast the undead dragon.
Tekehu takes Garden of Life on his 17th level-up. It can become a powerful source of healing for the particular situation of where you've already managed to pile up some dead bodies. Casting the spell over those dead bodies turns each of them into sources of healing pulses that tick every 3 seconds. It can be a really powerful spell during very long battles against massive hordes.
I make my way back to the door to the retreat.
The Messenger
The good party takes a somewhat different approach. They don't have access to the Salvation of Time-Ancestor's Memory loop. But they do have a lot of passive healing. But sometimes even The Messenger's powerful attacks can outpace the passive healing. So all party members besides Alliria load up with Potions of Major Healing and Potions of Moderate Healing. Alliria has one quick-item spot for her Iron-Clasped Grimoire, while the rest of her quick-item slots are loaded up with Scrolls of Moonwell and Scrolls of Moderate Healing. Mirke switches to her secondary gun set.
I am extremely hesitant to expend any class resources that are not renewable, which is to say other than Alliria's spells that are renewable through Blood Sacrifice and Mirke's Wounds. That is because of the sheer length of the battle itself.
Aloth and Eder tank The Messenger. Pallegina tanks it as well, but she also keeps herself positioned to one side or the other from the rest of the party. She uses And Evil Turned Away From the Sun every four Phrases to keep the party immune to The Messenger's Fear Aura. Sometimes I have a party member put herself in the pathway of the beams when I anticipate I'm about to use it.
Alliria uses Blood Sacrifice to renew Infuse with Vital Essence when she needs to. She also uses it to periodically cast Concelhaut's Draining Touch followed by a Substantial Phantom that will have the Draining Touch as one of its weapons. She also uses it to keep Arcane Veil up and constantly protecting herself.
Mirke fires away with her secondary gun set. She doesn't use Mortification on Enduring Dance or Lightning Strikes. She uses Thunderous Blows whenever she's back to 10 Wounds, which happens a lot when The Messenger uses its breath weapon or other ranged attacks.
I also take out the odd Luminous Revenant whenever one appears, and also taken out the Risen Champion that appears as it can use Greater Lay on Hands. Party members sometimes have to use healing potions or healing scrolls when they've taken enough damage. But I do eventually manage to wear it down in a very long battle.
Vatnir
Now I am back at #1 on the map of Harbinger's Retreat. I speak to Harbinger Valbrendhun and switch in Serafen, Fassina, Rekke and Konstanten as the characters with the least xp.
I go to the Auroch's skull at #5, and make a Perception check of 12 to detect a hidden lever to open the door at #6.
Vatnir is at #7. He'll explain that there is a Temple of Rymrgand nearby, and that the Floe has been expanding around it for some time. He also indicates that the Temple contains a portal to the domain of Rymrgand, the White Void. It naturally falls to you to investigate the Temple.
I could convince Vatnir to join me as a Sidekick. It requires either a Bluff check of 12, a Streetwise check of 9 that earns Cruel disposition, a combined Religion check of 11 and Metaphysics check of 11, or the Benevolent dialogue option. Harbinger Hafjorn will then show up. Vatnir will abdicate his High Harbinger position to Hafjorn. However, if you mock Vatnir as a coward to Hafjorn, then Vatnir will refuse to join you. You also get Vatnir's Icepicks when he joins. But I prefer not to. I am content with my stable of six ship combatants as it is.
Alliria decides to leave him here, but receives Vatnir's Icepicks from him. The Icepicks can be used to make your way up the ice cliff at #4 on the map of Harbinger's Watch.
Konstanten gains two abilities on his 16th level-up. One of them is Brute Force. It's a passive that makes Melee Weapon Attack rolls against Fortitude instead of Deflection if the target's former is lower than the latter. And several of Konstanten's other abilities are meant to lower Fortitude as much as possible. Attacks made while under Spirit Frenzy will impose Staggered (-5 Might, cannot Engage) and result in a -10 hit to Fortitude. The Long Night's Drink Birthed the Revenge of Morning will impose Weakened (-5 Constitution, Healing Received reduced by 50%) Affliction on all enemies within its area-of-effect, and that means another -10 hit to Fortitude. The Body Blows modal for using a Morningstar results in another -25 hit to Fortitude. The cumulative hits to Fortitude will often mean more Critical Hits, and that in turn means getting Phrases faster for Offensive Invocations as a Skald.
He also adds Improved Critical to add 10% Damage to Critical Hits. It's a perfectly sensible choice for a character build that emphasizes scoring Critical Hits as often as possible.
*Evil* Vatnir
Zarathos instead decides to kill Vatnir with an Aggressive dialogue option. Harbinger Hafjorn shows up and demands to know the reason for killing Vatnir. You can make an Intimidate check of 15, a Religion check of 16 (which Zarathos makes), or a Bluff check of 13. You can then follow it up with either an Intimidate check of 16 (like Zarathos) or a Bluff check of 14 to avoid all the villagers going hostile (and any Quests they may give failing or becoming unavailable).
This conversation, however it plays out, marks the completion of the Quest called An Honored Guest and 10,000xp as a reward. It also triggers the Quest called To Rise and Decline.
Tekehu takes the High Harbinger's Robes and wears them as an interim armor. The wearer's Action Speed increases as the wearer's Health decreases. And that certainly fits within the theme of using items whose power increases as Health decreases, while protected by an infinite Barring Death's Door. I also enchant it with Accelerated Decay, which means the wearer causes 10% more damage but also suffers 10% more damage. It only required fairly common crafting ingredients, which I don't mind for an interim item.
I leave Harbinger's Retreat. The Messenger is lifted into the sky by an unseen force.
Either the good party or the evil party now uses Vatnir's Icepicks on the ice cliff at #4 to reach the Outcrop on High.