-

- Forums
- Chatrooms
- Gallery
- Gameplay Videos
- Upload
- Articles
- Mod Reviews
- Shop SP: Games, Movies, Books
|
|
| Pillars of Eternity 2 Video-Based Walkthrough by David Milward |
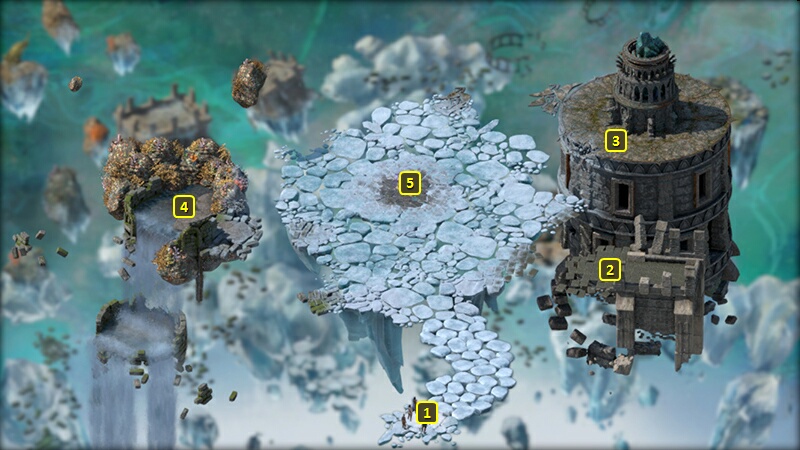
The White Void
*Evil* Neriscyrlas
The evil party arrives at #1 on the map of Neriscyrlas' Lair. My allies are here too, but they can only use their powers if Neriscyrlas is close enough for it.
The soul of St. Waidwen will be at #2. He can use the Fire Storm spell.
The soul of Inquisitor Naxiva will be at #3. She can use a chains power that can Immobilize the dragon.
The soul of King Winguaro will be at #4. He can Daze the dragon.
Neriscyrlas will be waiting for me at #5, and there's multiple ways to handle the situation. The easiest way is to convince her that centuries of her undead state must surely be wearying by now, and that it's time to embrace oblivion and succumbing to the White Void. She'll then end her existence willingly. You won't need to make any skill checks to convince her of it. You just need to keep pressing the point multiple times until she's convinced.
The obvious way is to fight her. This can be a tough fight, even for high level parties. She has a power similar to Llengrath's Safeguard that she can activiate at least twice during the battle, which will boost her Armor Rating considerably. She can also use an enhanced version of Concelhaut's Corrosive Siphon without limit in order to both damage the party and heal herself. One type of strategy for her emphasizes Interrupting the use of her powers. The other type of strategy depends on either boosting the Penetration of your warriors, or lowering her Armor Rating, or both.
I manage to outlast her with the Salvation of Time-Ancestor's Memory Loop, with Barring Death's Door put on everybody besides Mirke. But I still have to be careful though. She can debuff, at least early in the fight. I did at one point have to have Zarathos put his buffs back up, and Xoti put Barring Death's Door back on him. Also note how Ancestor's Memory allows Tekehu to use Taste of the Hunt without limit against a singularly powerful target.
Either killing her or convincing her to succumb to the White Void will lead to the acquisition of both an Amulet called Neriscyrlas' Hope and a Trinket called Whispers of Neriscyrlas. Killing Neriscyrlas requires making an Athletics check of 15 to get Neriscyrlas' Hope from her dying body without sustaining an Injury. But Mirke makes that check easily.
*NOTE* Neriscyrlas' Hope is one of three items that can be used to assemble a powerful Amulet called the Crown of the Exiled Queen. Getting one of the three pieces means that I'll be attacked by minions of Skaen and Woedica once I return to Woedica.
Neriscyrlas
There are some options for avoiding a fight with her. A Wizard character can explore letting you take her phylactery with you to facilitate an escape from the White Void. Note that you need to explore the possibility of Neriscyrlas getting tired of her unlife and possibly giving into oblivion, but then stopping just short of convincing her, to even get your foot into the door for the possiblity of willingly giving you her phylactery. To pursue the taking the phylactery possibility without first broaching the subject of wearying of unlife will lead to a fight against her. Getting your foot in the door after discussing weariness of unlife will also require a combined Insight check of 13 and Arcana check of 13. Neriscyrlas is then open to the idea, although whether she seals the deal depends on your reply to her query as to your intentions. In my experience either the "explore the world" reply, or the "it's what I do as a Watcher" followed by an option that requires 3 points of Benevolent disposition, secures her agreement. She then transfers herself inside her phylactery for your taking.
Tekehu convinces her to attack Rymrgand himself head on, first by broaching the subject of eternal weariness, then suggesting she attack Rymrgand, and then following up with an Arcane check of 17. A Bluff chheck of 18 was possible earlier, but I couldn't make that one. Neriscyrlas drops further down into the White Void to attack the Beast of Winter, and the party drops down after her.
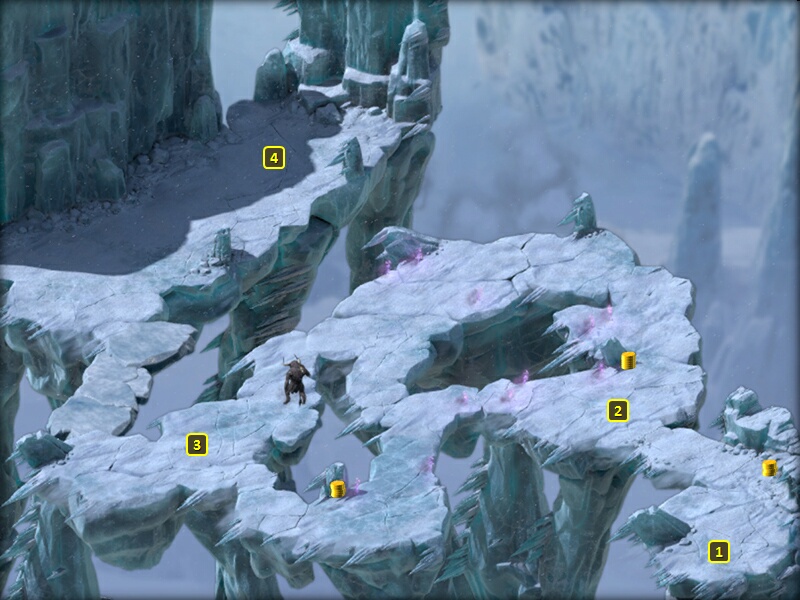
*Evil* The White Void
The evil party already has the Neriscyrlas' Hope in its inventory. But they have to pick up Whispers of Neriscyrlas off the ground, after having killed Neriscylaas and arriving at #1 on the map of the White Void.
Ydwin takes Farcasting on her 18th level-up. Some of her powers are useful but have a somewhat short casting range. Silent Scream in particular will benefit from taking this passive.
I go ahead a little north, and it turns out Ydwin has a lot of questions on her mind after seeing The White Void in person.
I go on ahead to #2. A Shambling Soul begs me to bring him to the Beast of Winter, to hasten his oblivion. I refuse him. I afterwards have to defeat a horde of Shambling Souls led by a pair of Scourges.
I make my west north and west through the White Void, avoiding the winds when I can as they can sometimes cause injuries.
I gang up on a Warden of Decay at #3.
Beast of Winter
I go on ahead to #4, where I witness Rymrgand killing off Neriscyrlas very easily. He then attacks the good party for Alliria not upholding her end of the bargain, no matter what she has to say. Even if I hadn't set Neriscyrlas on him, refusing any agreement leads to a fight against him.
He can use enhanced versions of the Seven Nights She Waited and the Symbol of Rymrgand powers. He can also teleport with a jump attack power like that of a Barbarian. He also periodically summons three Shambled Souls to help him.
Alliria tags him with Branded Enemy, and then constantly keeps Infuse with Vital Essence and Arcane Veil active. Aloth and Eder keep Refreshing Defense active. Mirke uses her secondary gun set for this battle.
Initially I had Pallegina summon her Ogres. But then I noticed that the Beast of Winter occasionally uses area-of-effect attacks that both cause Freezing Damage and Paralyze. So I switched to having her use The Prisoners Turned On Their Captor every three phrases to either immunize the party against Dexterity Afflictions or free them from Paralysis.
My healing passives usually keeps me constantly recuperating whatever comes my way. But Alliria will use White Flames when the party has collectively taken enough damage to warrant its use. Pallegina will occasionally use Greater Lay on Hands on Alliria when she's taken a beating. I eventually manage to go the distance and outast the Beast of Winter.
Defeating him in combat not only convinces him to return the good party to the Temple of Decline, but also gets the Frostfur Mantle.
I go to the exit at #5, and elect to return directly to Harbinger's Watch.
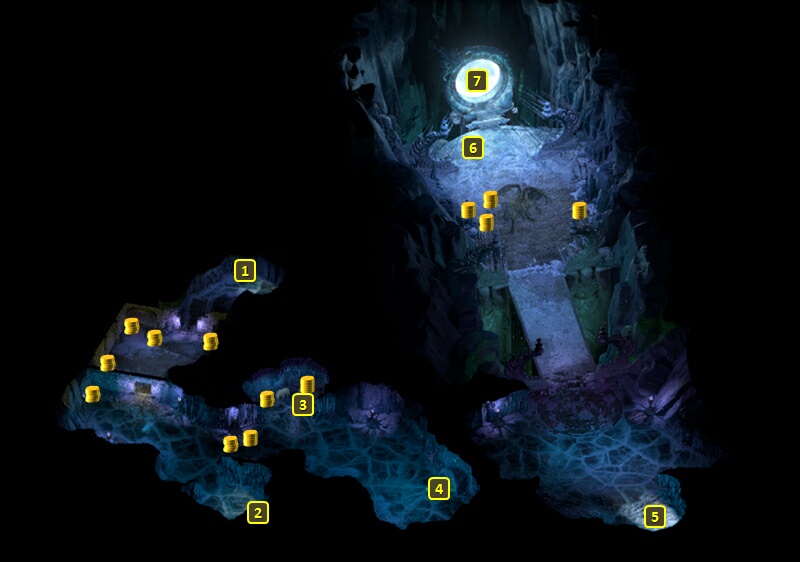
I am now back at #7 on the map of the Temple of Decline. Mirke wears the Frostfur Mantle for the rest of the game. Wearing the cloak means +5 to all Defenses when she self-Afflicts Distracted (-5 Perception, Flanked) on herself while using the Powdered Burns modal.
*Evil* Beast of Winter
If you have the phylactery, either because you killed Neriscyrlas or you convinced her to give it to you, Rymrgand will now want it with the intention of destroying it. It's up to you whether you give it to him or not. If you had convinced Neriscyrlas to give you her phylactery beforehand and now surrender it to Rymrgand, she will now scream in hatred at you for your betrayal.
Rymrgand, whether you gave him the phylactery or refused it, will now want you pledge your soul to him. That means your soul won't return to The Wheel but instead the White Void. Zarathos accepts the offer and is returned to the Temple of Decline.
An alternative that I didn't go for was instead offering him Ydwin as a sacrifice as an acceptable compromise, which would have meant permanently losing her as a sidekick and some pretty severe reactions from everyone else in the party.
Death's Depthless Dominion
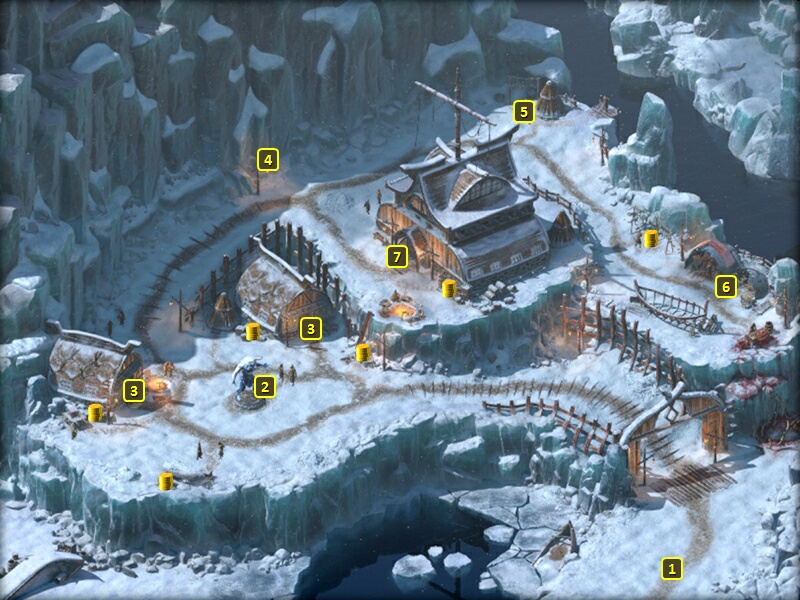
I am now at #4 on the map of Harbinger's Watch. I speak with a crowd of Harbingers led by Vatnir. All of them, except Vatnir, feel dejected by the news of the Vytmadh closing. That means that some of the locals will treat Alliria, and that includes Harbinger Valbrendhun who will no longer provides the services of Harbinger's Retreat to her. I get 12,000+ xp for completing the Quest called Death's Depthless Dominion.
The Burned Book of Law is heating up, so I open it. Alliria ends up having a rather inimical conversaton with Woedica, which prompts the Goddess of Law to no longer want anything to do with The Watcher.
I make for the exit at #1, and return to my ship.
*Evil* Death's Depthless Dominion
Zarathos by contrast is welcomed back to Harbinger's Watch as a hero. He also has a rather friendlier conversation with Woedica after opening the Burned Book of Law.
I will next make another stopover in Neketaka, on the way to Hasongo.