-

- Forums
- Chatrooms
- Gallery
- Gameplay Videos
- Upload
- Articles
- Mod Reviews
- Shop SP: Games, Movies, Books
|
|
| Pillars of Eternity 2 Video-Based Walkthrough by David Milward |
Eastern
*Evil* Eye of Rymrgand
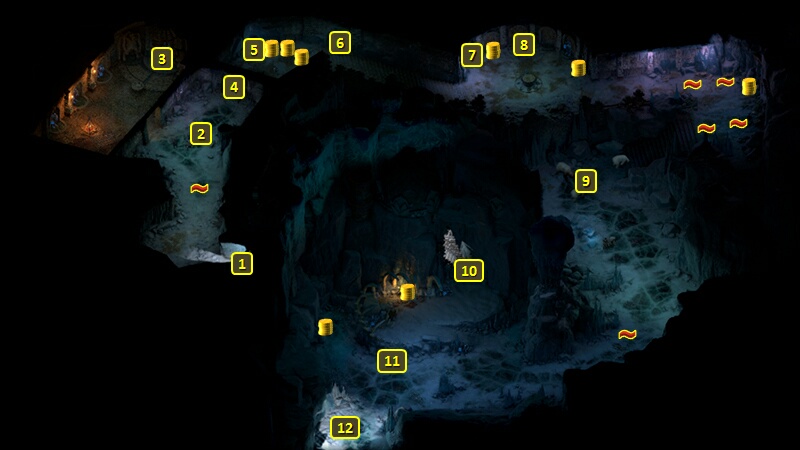
The evil party starts off at #11 on the map of the Eastern Cavern.
A little way ahead at #10 will be the Hoarfrost Imp, who is holding the Eye of Rymrgand that you need.
Trying to swipe it or pry it loose will awaken the Imp, and it will be dead set against parting with the Eye of Rymrgand.
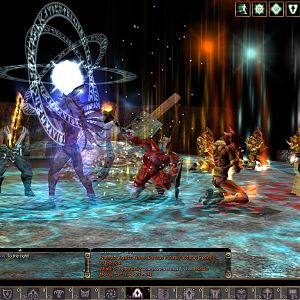
Zarathos makes an Intimidate check of 8 right away that also earns Cruel disposition that provokes the Imp into attacking, along with several nearby Rime Constructs that come to its aid. He loots the Eye of Rymrgand from its dead body afterwards.
I briefly go through the door at #10.
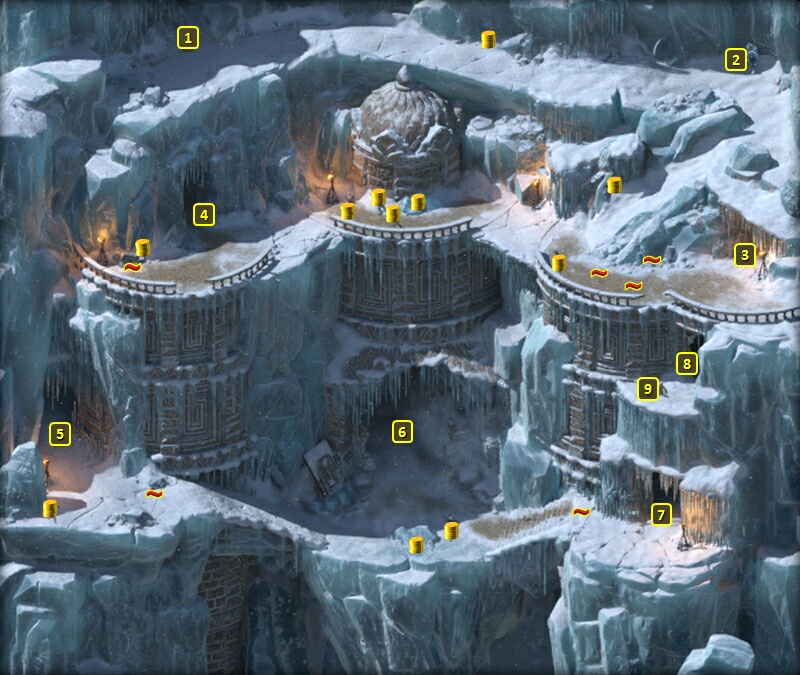
It brings me to the exterior of the Rimebound Temple at #8. I grab the Brooch of Inevitable Winter from the dead body at #9, although nobody in either the good party or evil party has any real use for it.
Eye of Rymrgand
There are alternatives to attacking the Imp. You can try and convince it that holding onto it will lead to misfortune on account of holding onto something sacred to the Gods. That requires a Religion check of 7 to start. Following up with either a History check of 12 or a Religion check of 14 combined with the White That Wends background will convince the Imp to willingly give you the Eye of Rymrgand. The Intimidate check of 8 will provoke it into attacking you.
You can try to trade for it. One pathway involves offering it the Stone Idol from Harbinger's Retreat, followed by either a Bluff check of 10 or an Intellect check of 10. Either attempt will end up provoking the Imp into attacking.
It will turn down an offer of 8,000cp. Attempting a Bluff check of 15 provokes an attack.
Alliria offers 20,000cp, which also earns Benevolent disposition. That convinces the Imp to willingly part with the Eye of Rymrgand.
Papa Snow Bear
I continue northeast and disarm another trap. I fight another horde of Snow Bears and Pilgrims, led by a Papa Snow Bear. I overwhelm them by spamming Fireballs and Stunning Surges.
A corpse on the ground has a Cloak of Greater Protection. I hold onto it for Konstanten.
Wintertide Bulwark
I continue to the northeast corner, and disarm some more traps.
A sarcophagus at #8 has a Soulbound Large Shield called the Wintertide Bulwark. I'll get attacked by several Rime Constructs and Frost Shades should I take it. The Frost Shades will also turn into Greater Ice Blights when killed. So I bunch myself right next to the sarcophagus, with Mirke backed against the wall and everyone else forming a solid shield wall around her. That stops the Frost Shades from reaching her. I gradually outlast them with my healing passives.
The Wintertide Bulwark is an interesting shield, and one of its upgrades offers a 20% chance to convert Grazes to Hits while the wielder is Afflicted. But it doesn't fit into any of my plans. I hold onto it for now, as doing so will help with one of the upgrades for the Guardian's Plate.
Frosty
I go west and press the hidden button at #4 to open the door at #6. There's a cult of pilgrims on the other side. I use the door itself as a bottleneck. Aloth sets up his crowd-control spells, while Alliria spams Fireballs and Mirke spams Stunning Surges. I also disarm a trap to the south.
There is a sarcophagus at #5 that is completely frozen over. Alliria completely melts the ice away with a Fireball. She could have used Flames of Devotion as well.
There were other possibilities that require first making or finding a weakness in the ice itself. Those possibilities include:
That brings me to #3 on the map of the Rimebound Temple. I go back up the rope and hook at #1 to return to the Outcrop on High. My next destination will be The Shattered Passage.