-

- Forums
- Chatrooms
- Gallery
- Gameplay Videos
- Upload
- Articles
- Mod Reviews
- Shop SP: Games, Movies, Books
|
|
| Pillars of Eternity 2 Video-Based Walkthrough by David Milward |
Brass Citadel
*Evil* Dim Prospects
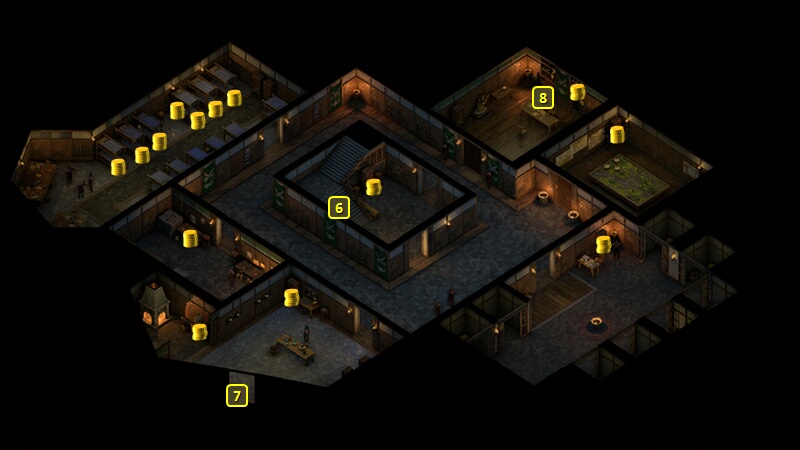
The evil party travels straight to the lower level of the Imperial Command. They start off at the stairs at #6. Maia at this point indicates a need to leave the party temporarily, citing a task that she needs to perform by herself as part of her personal quest, The Courier's Calling.
I speak to Atsura at #8 and inform him of destroying the Adra pillar at Poko Kohara. I gain two moderate increases in positive reputation with the Royal Deadfire Company, 1,250cp and 1,000+ xp as rewards for completing the Dim Prospects Quest. *Good* The good party gets the same monetary and xp rewards as the evil party. But one difference is a moderate loss of reputation with the Royal Deadfire Company, although I could have avoided that with either the Shady dialogue option or making a Bluff check of 4 when Atsura expresses disappointment.
Atsura also advises me to speak to Hazanui Karu, which starts the Quest called A Matter of Import. I go up the stairs at #6.
*Evil* Sabormi
I am now at the stairs at #5. I speak to Sabormi the Quartermaster at #4. She is only willing to sell goods to the party if it has at least 2 points of positive reputation with the Royal Deadfire Company.
I buy the Blunting Belt for Mirke. It adds +1 to both Piercing and Slashing Armor Rating. Mirke's build is based on maximizing armor, so I go all in on any item that can provide Armor bonuses.
*Evil* A Matter of Import
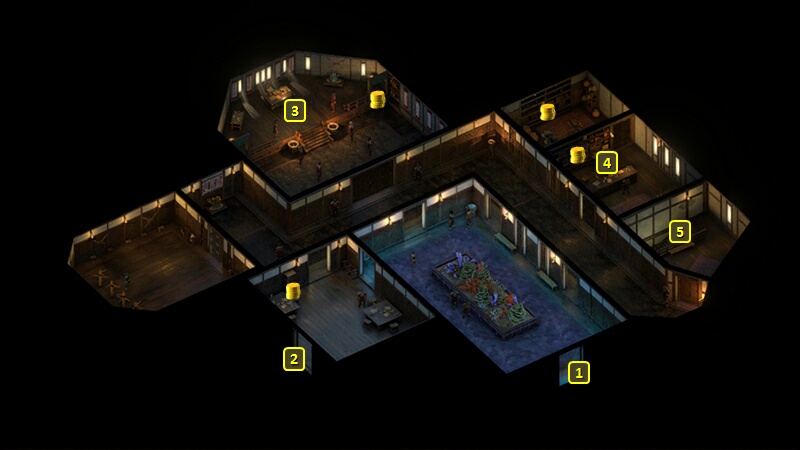
Zarathos speaks to Hazanui Karu at #3. She wants him to rendezvous with a captain named Widla, to make sure sensitive cargo reaches Sayuka. This conversation furthers the Quest called A Matter of Import. I leave out the door at #1.
*Evil* The Courier's Calling
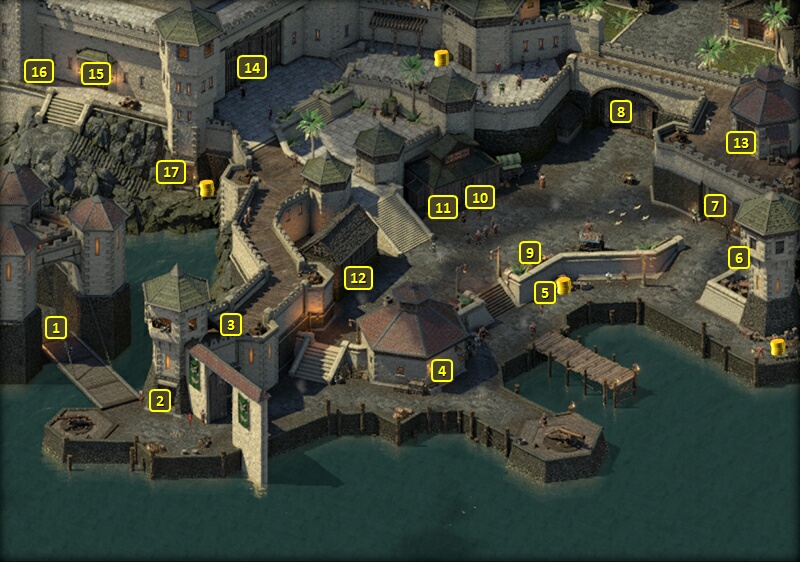
I "Wait" for 5 days in a row to make Maia available to return. Bringing her back in the party is a matter of going to the exit at #8 on the map of the Brass Citadel (or anywhere that offers a party management option like an inn or your ship), and selecting her to join.
Zarathos speaks at length to her. She assassinated a charismatic Huana chieftain on Atsura's orders, and is troubled by the repercussions of always following orders without question. Your responses won't affect your reputation with her, so feel free to choose according to your preferred dispositions. She'll now want to speak to Atsura.
I return to Atsura at #8 on the lower floor of the Imperial Compound. He'll reward Maia with an Arquebus named Three Bells Through. That concludes Maia's personal quest, The Courier's Calling.
Mirke takes Uncanny Luck on her 15th level-up. The 5% chance to completely avoid any attack enhances her tank role, and the 5% chance of converting a Hit to a Critical Hit will help her make the odd extra attack in conjunction with her Monk abilities.
*Evil* Bounty on Burunga
Zarathos speaks to Fleet Master Wakoyo, whose office is at #10 on the map of the Brass Citadel. I collect rewards of 4,000cp and 17,000+ xp for the bounty on Burunga.
Now I reassemble the evil party. Xoti takes Barring Death's Door on her 15th level-up. The spell itself has a short duration, but it will become a foundation for how the evil party conducts many battles in conjunction with Salvation of Time. At the very least Zarathos can freely charge into the thick of battle, heedless of taking extra damage on account of being a Helwalker and the Raw Damage of the Berserker's version of Frenzy. And he'll have little to fear if he's enjoying the protection of this spell prolonged endlessly by Salvation of Time. And if he spends that time with less than 25% Health so as to enjoy the Death Godlike's +3 Power Levels for both the Barbarian's Carnage and the Monk's unarmed attacks, so much the better. Ydwin will be a frequent recipient as well, as she is a squishy spellcaster. And I certainly don't object if her having less than 25% Health coaxes forth the power of her Effigy's Husk. There are some fights where I layer up everyone in the party with this spell, and keep it going until the end of the battle with Salvation of Time.
I return to my ship.
Bounty on Burunga
Alliria reassembles the core party after collecting on the bounty on Burunga.
Aloth takes Wall of Force as an interim spell. It inflicts a small amount of Raw Damage and Hobbled (-5 Dexterity, reduced Stride) on any enemies that step on or through it. And it can be planted in the thick of combat since it only affects enemies. The Raw Damage and Hobbled are not in themselves big deals. But each tick of Damage from the Wall has the potential to trigger a power from a weapon that Aloth will acquire in the future. Also, the spell will become available in a Grimoire that Aloth will acquire in the future. That means that he can instead take a useful passive during his 15th level-up when he retrains after finding the Grimoire.
I return to my ship. It is now time to pursue some more Bounties.