-

- Forums
- Chatrooms
- Gallery
- Gameplay Videos
- Upload
- Articles
- Mod Reviews
- Shop SP: Games, Movies, Books
|
|
| Pillars of Eternity 2 Video-Based Walkthrough by David Milward |
Sayuka
*Evil* Widla
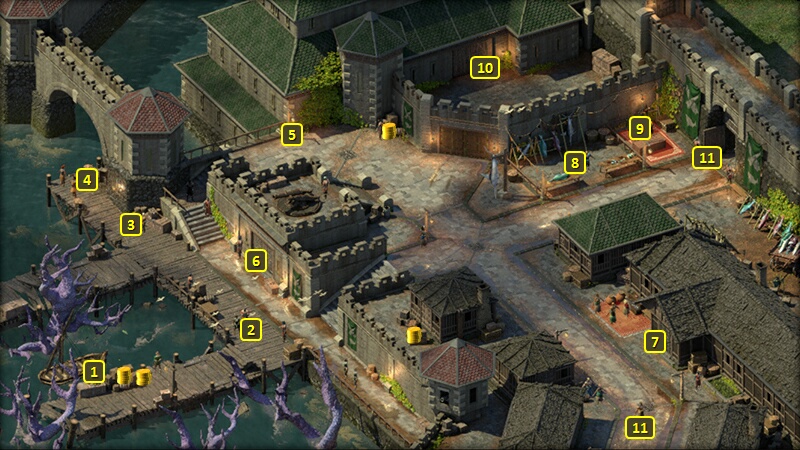
I sail to #44 on the World Map. The ship that Hazanui Karu had been referring to will be waiting and will sail towards me once I am within sight.
Both ships will board each other as I meet Widla and her crew, including her first mate named Perin. She will start off by trying to double her price to 2,000cp.
There are multiple ways of getting her to back down to the original price of 1,000cp. One way is a dialogue option based on having 2 points of positive reputation with the Principi. *Good* This is what happens for the Good party, which makes the whole encounter brief and rather uneventful compared to what happens for the Evil party.
Other possibilities branch out by making an Insight check of 6. Following up with an Intimidate check of 6 will then convince her to go back to the original price.
Following up the Insight check of 6 and then asking Widla if she knows who she's dealing with opens up another branch of possibilities based on probing Perin on whether he's willing to cross Widla.
Asking him to betray Widla but without any skill checks will lead to the whole crew attacking you.
Making a Bluff check of 6 will lead to Widla locking Perin below deck. She'll stick to her doubled price, but Perin won't participate if you refuse and decide to fight her.
It's the Diplomacy check of 8 that convinces Perin to mutiny against Widla and lock her away. He then agrees to the original 1,000cp. Note that refusing to pay him, which leads to a fight, earns both Aggressive
and Shady disposition.
You can, at pretty much any point in this conversation, refuse to pay for the cargo leading to a fight. And that's whether it's her doubled asking price, or if you can negotiate it down to the original price of 1,000cp but then change your mind. Also, if you decide to refuse the price, you can also make an Intimidate check of 8 to scare some of the crew away. Zarathos refuses to pay Widla anything, and provokes her into a fight. I do have to be careful here, because Zarathos will himself be a target for a lot of attacks. I use Barring Death's Door and healing spells on him to weather the onslaught, and finally Withdraw just to be sure as the battle enters its last phases.
The encounter leads to your acquisition of the cargo for purposes of completing the Quest called A Matter of Import.
Iverra
I sail north a little bit and it turns out that a Kith is in one of the crates. A Vailian Wizard named Iverra, and she's the actual cargo that I was assigned to transport. The whole Quest is about smuggling her to the Royal Deadfire Company, whom she feels has the better vision to appreciate her services instead of the profit-hungry Vailians.
I continue north until I reach Sayuka at #5. Iverra thanks me and departs. I take the opportunity to access the supply store and recruit Azuko. She comes ready with two skill points in Cannoneer and two skill points in Deckhand. *Evil* The evil party also recruits Azuko as a spare Crew Member.
*Evil* Fleet Master Okaya
The evil party switches in Aloth, Serafen, Rekke and Konstanten. They're the characters with the least amount of xp. Serafen and Konstanten in particular will benefit from a Quest that I will soon finish.
*Good* The good party switches in Serafen, Ydwin, Mirke and Rekke, and for similar reasons. Serafen's personal Quest is about to come to a conclusion, and the other characters will soon find items that they will equip for the rest of the game.
I interact briefly with Greeter Tebe and the Undersecretary at #2, more for entertainment value than anything else. I then go through the door at #6.
I speak at length with Fleet Master Okaya. I inform her of the delivery of Iverra, which completes the Quest called A Matter of Import. I get 350cp and 7,000+ xp as rewards. I also get another 800cp when I inform her of Widla double-crossing me.
Okaya also wants me to investigate the growth of coral around Sayuka, and recommends that I speak to Iverra in the Workshop about it. That dialogue starts the Overgrowth Quest.
Zarathos gets two abilities on his 16th level-up. One is Brute Force. It's a passive whereby his Melee Attacks will target Fortitude instead of Deflection if the former is lower than the latter. And Zarathos can force the Staggered (-5 Strength, cannot Engage) Affliction on his targets through Spirit Frenzy. He can also force the Weakened (-5 Constitution, -50% Healing Received) Affliction through Enervating Blows. The two together can mean a cumulative -20 penalty on Fortitude, which often results in the passive coming into play.
He also gets Turning Wheel. It upgrades the Intellect modal for Duality of Mortal Presence so that it also adds +2% Burning Damage for each wound.
Marofeto Liano
Now I speak to Marofeto Liano at #3, and pursue the "that's it?" dialogue tree. Alliria convinces him to give her his Amulet, Claim and Refusal with a combined Bluff check of 6 and Diplomacy check of 6.
She also pays him 3,000cp to teach her Marofeto Liano's Training (+1 Insight, +1 Intimidate) for 3,000cp.
Rekke wears Claim and Refusal for the rest of the game. The 10% bonus to Damage with his own Melee Attacks is certainly welcome. The penalty of +10% Damage taken can be swallowed by a ship combatant, who won't suffer any Injuries should he be knocked unconscious. And if wearing the Amulet and taking that penalty leads faster to triggering Unbreakable, along with area-of-effect Damage from his items, then I certainly won't object.
*EVIL* Zarathos first listens to Marofeto's story, and chooses the "I see" dialogue option. He then pays 3,000cp to learn Marofeto's Training.
He speaks to Marofeto to hear the life story again, but this time chooses the "Is that it?" option. That in turn leads to the option to make an Intimidate check of 6 that also gains Cruel disposition, and thereby coerces Marofeto into giving up Claim and Refusal. Marofeto would have refused to have provided the training if Zarathos had previously used the Intimidate check to force him to give up the Claim and Refusal.
Zarathos wears it for the rest of the game. Another 10% Damage is always welcome for a hard hitting character. I will soon be able to keep him constantly invulnerable through the combination of Barring Death's Door plus Salvation of Time, which means taking an extra 10% Damage will cease to be of any concern. The taking extra Damage penalty will actually be welcome since it improves the chances of triggering the +3 bonus Power Levels when a Death Godlike reaches less than 25% Health.
*Evil* A Sorcerer and a Gentleman
Now I complete Serafen's personal Quest, A Sorcerer and a Gentleman. Zarathos and Serafen speak to Remaro at #5. The pair question Remaro as to why he fled from Fort Deadlight. Having completed the Symbols of Death Quest for Captain Furrante will enable dialogue options that can get him to reveal that he was a party to slaving prior to his mutiny. An Insight check of 10 helps in that regard too.
Serafen will feel hurt if the revelation of Remaro's slaving past comes out. But whether that past comes out or not, Serafen will remain adamant about not bringing Remaro in to the Principi. He will not budge from that position. You can try an Intimidate check of 5 and a Streetwise check of 7, but they only elicit different verbal responses with the same position. The Intimidate check will actually lose reputation with him. It becomes a choice between letting Remaro go and keeping Serafen in the party, or attacking Remaro only for Serafen to leave the party for good and attack you alongside Remaro.
Killing Remaro would cause the Quest to fail, and result in a diminished xp reward. If you do that, be sure to collect Remaro's Head.
Zarathos decides to let Remaro go peacefully. He gets 1,000+ xp and a Blunderbuss from Remaro called Fire in the Hole. I have no use for it though.
Zarathos also has 2 points of positive reputation with Serafen at the conclusion of the Quest. So Serafen gives Zarathos a hat called Fair Favor as a gift. Konstanten wears it for the rest of the game. It provides a 10% chance to convert Hits to Critical Hits, and +10% Critical Hit Damage, when using Daggers, Rapiers, Sabres, Stilettos and Swords. It's perfect for Konstanten as it improves his chances of scoring Critical Hits with his Azure Blade and Lover's Embrace. And that in turn improves his ability to accumulate Phrases through Critical Hits as a Skald.
I go to the door at #10. *Good* The good party does as well, but they have something of their own to take care of.
A Sorcerer and a Gentleman
The Quest concludes the same way for the good party. Mirke replaces her Hand Mortar with Fire in the Hole for the rest of the game. It has Explosive Shot just like the Hand Mortar. I enchant it with Chain Shot. That means its Attack will bounce once, and that means two Explosive Shots with each Attack. And two Explosive Shots with each Attack means Stunning Surge is that much more likely to recoup the Mortification spent on it. And that in turns means I can pretty much spam Stunning Surge at will in mob fights. Chain Shot does impose a +15% Recovery Time penalty. But the Streetfighter's Heating Up, the Monk's Lightning Strikes, and the stacking Attack Speed with each hit from Scordeo's Trophy will more than make up for it.
Kaomi
Now I speak to the merchant named Kaomi at #9. I purchase the Spear called Stalker's Patience for Ydwin. It causes bonus Raw Damage over time. But its key feature for purposes of Ydwin's build is that it scores +10% bonus Damage vs. Flanked targets that scales with the Stealth skill. And Ydwin can place Flanked on her targets through either Phantom Foes or Persistent Distraction. Her shield plus the Engaging Thrust modal for using spears plus Persistent Distraction guarantees at least three Engaged enemies so Persistent Distraction forces Flanked on those enemies. And Tactical Meld, once she gets it, can add even more Engagement. The bonus Damage vs. Flanked targets will also stack with the bonus Damage vs. Flanked targets provided by Thaos' Headdress.
I add Mercy Strike, which provides a 20% chance of instant Recovery upon scoring a Critical Hit. That's helped along by the inherent +5 Accuracy bonus for using Spears, the +5 Accuracy bonus vs. Flanked enemies provided by Thaos' Headdress and Dirty Fighting. It's also an easy choice over Standoff, which is a once per Rest ability. I also add Hamstringing instead of Mortal Wounds. Mortal Wounds only slightly increases the Raw Damage over time provided by the Wounding ability the weapon already has. I preferred the 10% chance to cause Hobbled on Hit provided by Hamstringing, as it increases the chances of Deathblows coming into play once I get that ability.
I thereafter go through the door at #10.
Sayuka Workshop
I speak with Iverra and a Coralmason inside the Sayuka Workshop. Iverra reveals the location of Cignath Mor, which will now be accessible through the World Map. She also gives me Diving Equipment. I leave the way I came after that.
*Evil* Attack on Sayuka
Waves of wild animals led by Bog Druids now attack Sayuka. They aren't difficult to deal with. Take out the squishy spellcasting Druids first and foremost, and then flank and cut down the animals. The attacks themselves start the Hunting Season Quest.
Rekke takes Unbending on his 15th level-up, and for pretty much the same reasons as Eder.
Serafen takes Uncanny Luck on his 15th level-up. It's a passive that provides a 5% chance to avoid any attack outright, and a 5% chance to convert a Hit to a Critical Hit. A distinct incentive for Serafen to take it is that Critical Hits from him will trigger both Interrupting Blows and Raw Damage over time through Blood Frenzy.
Aloth takes Farcasting on his 15th level-up. It can be useful to increase the casting range of some of his spells, like Call to Slumber and Gaze of the Adragan.
I speak to Fleet Master Okaya again. She rewards me with 500cp and assigns me the task of eliminating the leaders of the Druids.
I reassemble my core party, and depart for Bentbranch Bog.
Attack on Sayuka
The battles likewise aren't difficult for the good party either. One thing to note is that I had Mirke turn off the Powder Burns modal for her Blunderbuss. The reason being that I don't want to hit the Rauataian Soldiers and thus turn Sayuka hostile against me.
I make to leave town once it's all done and I've spoken to Fleet Master Okaya again. I briefly switch in Xoti, and have her take Tough on her 15th level-up. More Health is always a good thing for any character, but especially a Monk who needs to take Damage to gain Wounds.
I reassemble my core party. Pallegina takes ... And Evil Turned Away From The Sun on her 15th level-up. It upgrades Rejoice My Comrades! Two Fingers of Daylight! so that the two beams also inflict Burning Damage on enemies caught in their path. That Burning Damage is increased against Spirits and Vessels.
Now I depart for Bentbranch Bog.