-

- Forums
- Chatrooms
- Gallery
- Gameplay Videos
- Upload
- Articles
- Mod Reviews
- Shop SP: Games, Movies, Books
|
|
| Pillars of Eternity 2 Video-Based Walkthrough by David Milward |
Cignath Mor
*Evil* Misery's Delight
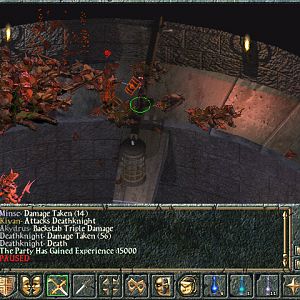
Malnaj now confronts the evil party on her ship, Misery's Delight, no sooner than they've left Sayuka. There is always the option to attack her and her crew throughout the conversation. And she herself is willing to start a battle if she concludes that you're lying to her about Remaro's fate and location. She and her mates will leave behind plenty of Fine and Exceptional gear should you win. Zarathos chooses to attack straight away, and wins rather easily.
Misery's Delight
There are other ways to handle the situation. You can indicate that Remaro is dead, followed by making a combined Diplomacy check of 8 and Streetwise check of 5. It also requires giving her 2,000cp as a share of the bounty. Failing the spot checks, or Serafen being in the party, again causes her to attack you.
You can choose a dialogue option that earns Clever disposition, followed by a Bluff check of 8 to convince Malnaj that Remaro has escaped. Failing the spot check, or Serafen being in the party, causes Malnaj to not believe you and attack.
Alliria uses a dialogue option that invokes the good graces of the Principi's governing council as she has at least 2 points of positive reputation with the Principi. However, she also needs to back that up with a combined Intimidate check of 10 and Streetwise check of 10. She thereby convinces Malnaj to leave without any further conflict.
*Evil* The Coral Queen
A Rauataian Junk named The Coral Queen is nearby, so the evil party attacks it. I wear down its crew some with Magranaite Flamethrowers before boarding and slaughtering the Crew.
The entrance to Cignath Mor is at #46 on the World Map.
Entering Cignath Mor
I click on the entrance once I get there. The Diving Equipment I received from Iverra allows me to enter without drowning.
I am now at #1 on the map of the Cignath More Entrance. Fassina takes Practiced Healer on her 15th level-up. It will add +15% Healing to spells like Nature's Balm, Moonwell and Garden of Life (once she gets it).
I go on ahead and defeat a group of Lagufaeth at #2 without much trouble. I go through the stairs at #4.
Underwater Dungeon Key
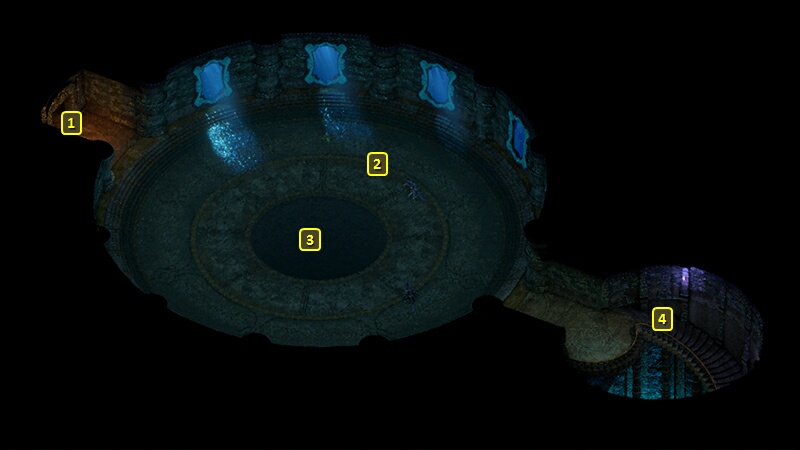
I start off at #5 on the map of Cignath Mor. I go west.
There will be a large group of Lagufaeth and a pair of Sea Trolls at #10. I stop myself short at the door and use it as a bottleneck. I win with crowd-control spells from Aloth, and Alliria spamming Ninagauth's Shadowflame. Pallegina keeps the party protected with The Prisoners Turned On Their Captors.
I find the Underwater Dungeon Key on a table at #11.
I defeat another group of Lagufaeth and a pair of Sea Trolls at #12.
Mohora Tanga
Now I go east. The plaque at #10 indicates that the experiment that created the Kraken came after the one that created the Leviathan.
I continue east and through a door. The plaque at #7 indicates that the experiment that created the Leviathan came after the one that created the Barbed Ravager.
I back track west. The plaque at #6 indicates that the Winding Serpent was the first of the successful Engwithan experiments conducted in this place, at least read along with the other plaques on this level.
I go west and have to fight a few more Lagufaeth that emerge out of a pool, but they're not much trouble by now.
I continue west. The plaque at #13 indicates that the experiment that created the Barbed Ravager came after the one that created the Winding Serpent.
I make my way to a mural at #14, which needs to have its images pressed in the correct order to open the hidden door at #15. It's based on the order in which the Engwithan experiments creating sea monsters were completed. The correct order is:
*Evil* Flooding Cignath Mor
The evil party also goes to the Engwithan machine at #18. Galawain speaks to Zarathos once I select the option to disable it, and demands that he stop. Zarathos falls in with Galawain's request to leave the Engwithan machine in operation, and instead flood Cignath Mor so that nobody can approach the machine again. That involves hitting the switch at the pylons located at points marked #8.
The area will start to flood in earnest once you've shut down all three pylons. That starts a scripted interaction Zarathos puts on the Diving Equipment and swims for the surface.
However, a break will manifest in the diving helmet. Zarathos makes an Athletics check of 10 to make it the rest of the way to the surface without Injury. A Mechanics check of 9, had he been able to make it, would have worked as well.
The evil party is now back on the World Map. Galawain will indicate to you that he's given Zarathos a blessing in gratitude for denying anyone else access to his machine.
Refusing Galawain
The good party also goes to the Engwithan machine at #18. She makes a combined Arcana check of 10 and Metaphysics check of 6 to reveal its purpose, to channel soul energy into the nearby flora and wildlife. Alliria defies the God of the Hunt and destroys the machine. Doing so earns reputation with Pallegina. I would have lost reputation with Xoti had she been in the party.
I thereafter go back up the stairs at #5.
Kraken
I am now at the stairs at #4 on the map of the Cignath Mor Entrance. An enormous Kraken appears at #3.
Alliria switches to Modwyr and The Eye of Wael. Mirke switches to her secondary gun set.
This battle is very long, so I don't bother with buffing up. It's also safer to take everything down at a distance. I instead rely on infinite summons and resources. Pallegina summons her Ogres at the start, and resummons them whenever she's back to four Phrases. Alliria summons her Phantom whenever she needs to.
The Kraken summons several Kraken's Tentacles. And a few more will show up when I take the first batch down. They are capable of the Fighter's Clear Out, and can occasionally cause Injuries with their attacks. Alliria and Mirke use Ranged Attacks on the Tentacles, while the Ogres and Phantom provide alternative targets for the enemy attacks. I don't send anyone forward for Melee combat. But I do keep everyone close to Pallegina so that they benefit from her healing auras.
As long and gruelling as it is, I also use the same process for the Kraken itself. Getting too close to it can lead to multiple party members becoming Terrified and unable to do anything. Alliria does make things easier for herself by tagging it with Brand Enemy.
I eventually wear it down. Alliria and Mirke sustained Injuries, so they each drink a Luminous Adra Potion.
The Kraken leaves behind two items of note. One of them is a Kraken's Eye.
The other is the Mask of the Grotto Deep. Fassina wears it for the rest of the game. The +2 Intellect is one of the obvious benefits for a spellcaster. The +1 Poison Power Levels will enhance spells like Noxious Fumes and Malignant Cloud. It will also increase the Raw Damage over time caused by Nannasin's Cobra Strike. Melee attacks from Stealth also cause Raw Damage over time, which can come into play through the Slippers of the Assassin.
Overgrowth
I switch in Serafen, Ydwin, Rekke and Konstanten. I then travel directly to the Fleet Master's Quarters in Sayuka.
Rekke takes Uncanny Luck. In his case it's more about the 5% chance of converting a Hit to a Critical Hit than the 5% chance to avoid any Attack.
Ydwin takes Tactical Meld on her 15th level-up. It will provide Aware (+5 Perception, 50% chance of converting Graze to Hit) and +3 enemies Engaged to both Ydwin herself and an allied target of her choice. It's a natural choice for a Cipher multi-class who fights upfront in Melee combat. The bonus to Engagement will also enhance her ability to force Flanked on nearby targets through her Persistent Distraction passive.
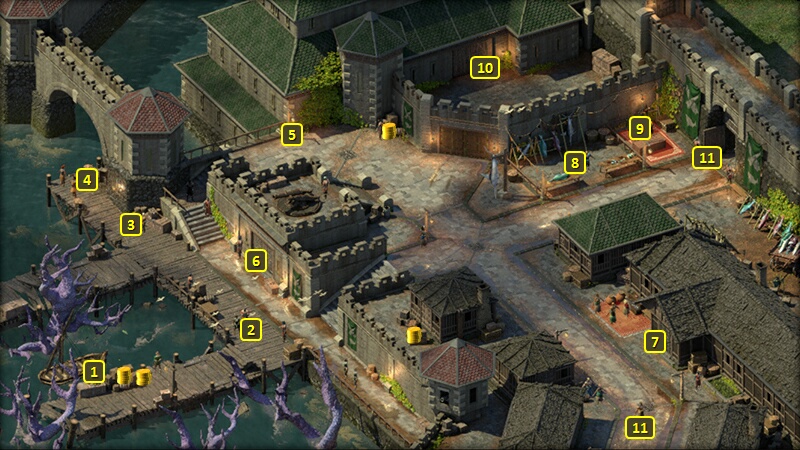
I speak to Fleet Master Okaya and gain 10,000+ xp, 1,800cp and a moderate gain of reputation with the Royal Deadfire Company as rewards for completing the Overgrowth Quest in a way that is satisfactory for the Company.
Serafen takes Uncanny Luck on his 15th level-up. And yes, for him it's also more about the 5% chance of converting a Hit to a Critical Hit than the 5% chance to avoid any Attack. I leave out the door.
I go back up the entrance at #1, and return to my ship. And then I go from #46 to #45 on the World Map to return to Sayuka.
That brings me to the door at #6 on the map of Sayuka. I head for the port exit at #1 and reassemble my core party. Eder takes two abilities on his 15th level-up.
One of them is Critical Defense. It has a 10% chance of reducing any Critical Hit he receives to a Hit. It's a natural choice for a tank.
He also takes Clear the Path. It's an upgrade on Clear Out. Unlike Clean Sweep, which makes a Primary Attack on all enemies in a 360 circle surrounding the Fighter, Clear the Path makes a Primary Attack on all enemies in a straight line in front of the Fighter. There's no limitation on the distance of the straight line, and that includes the Push and knock Prone effects. It's a situational option for when the party is faced with an enemy spellcaster or two who is keeping a healthy distance from the party. I thereafter return to my ship.
I sail southeast and board a Vailian Expert Captain. I continue south and attack a Royal Deadfire Company Master Captain. I end up getting that 1% chance to sink it outright.
I continue to Neketaka at #17 on the World Map. Simply clicking on the city of Neketaka will result in my ship getting instantly repaired, and the Repair Supplies being expended instantly to make it happen. It is afterwards that I attack the nearby Deadfire Merchant Ship, which recoups my Repair Supplies for free.
*Evil* Overgrowth
I switch in Serafen, Maia, Rekke and Konstanten before travelling directly to the Fleet Master's Office.
Zarathos informs her of not stopping the coral, and Cignath becoming flooded. That results in a moderate loss of reputation with the Royal Deadfire Company, but I still get 800cp.
It is also at this point that Zarathos gets his promised reward from Galawain. It's an until Rest bonus called Savage Cunning that provides +1 Perception and +2 Survival.
I return to dock and reassemble my core party. Xoti gains two abilities on her 16th level-up.
One of them is Turning Wheel. It gives her +2% Burning Damage for each wound while she keeps Duality of Mortal Presence active.
She also takes Salvation of Time, which is a linchpin for how the evil party conducts battles during the later parts of the game. She'll often start with a Holy Meditation spell on the party, and then a Barring Death's Door on Zarathos. She'll then receive Ancestor's Memory from Ydwin. She'll cast this spell on the party, which will both extend any and all buffs they may have by 10 sec. She'll be able to cast two Salvations of Time at the outset once she reaches her 19th level. And Ancestor's Memory will itself be extended. The Ancestor's Memory will itself gradually recoup her spells, including the 6th-tier spell slots for Salvation of Time. And regaining Salvation of Time means extending Ancestor's Memory, both combining in a self-sustaining loop that is as broken as it sounds. And any and all buffs the party enjoys can be carried infinitely through to the end of even the longest of battles. And at some point you can isolate only the 6th-level spell slots that get recouped by Ancestor's Memory, to assure an endless supply of Salvation of Time. Of course, that doesn't rule out interjecting another buff I may want in between castings of Salvation of Time, like Blade Turning or Barring Death's Door on another character for example. And the more time added to Ancestor's Memory, the more leeway I have to work in that kind of interjection.
I return to my ship, and attack a nearby Royal Deadfire Company Master Captain. I sailed in close and attacked it with my Magranite Flamethrowers. I ended up getting that 1% chance to sink it outright.
I sail back for Neketaka. I get attacked along the way by a Huana Master Captain. It is during this battle I give a demonstration of the Ancestor's Memory-Salvation of Time loop described above. And an enduring Barring Death's Door means that Zarathos can now employ the full power of his Berserker-Helwalker build, and his +3 Power Levels on being "near death" as a Death Godlike, with no fear of being knocked unconscious.
Now I make another stopover in Neketaka, en route to the Burning Shoals.