-

- Forums
- Chatrooms
- Gallery
- Gameplay Videos
- Upload
- Articles
- Mod Reviews
- Shop SP: Games, Movies, Books
|
|
| Pillars of Eternity 2 Video-Based Walkthrough by David Milward |
Bear Cub
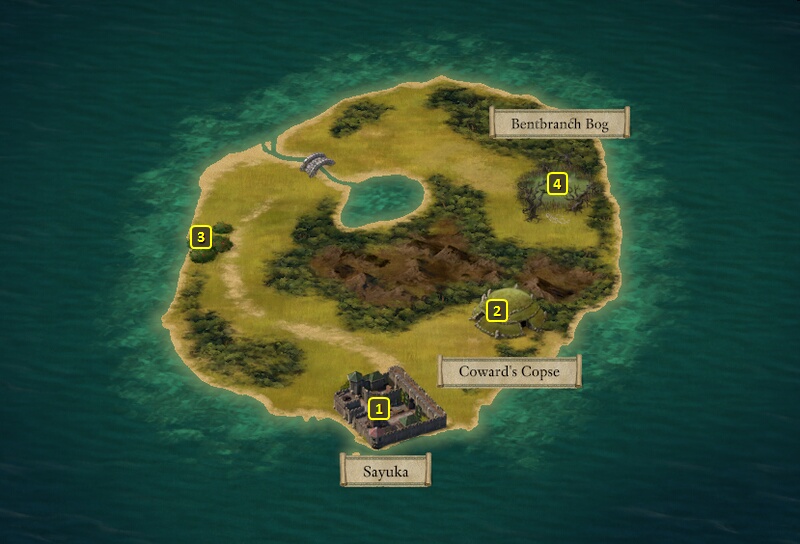
The good party starts off at #1 on the map of Sayuka Island. I get some random items from the Burial Site at #2, and then some Rahi Pods from the grove at #3. I press on ahead to enter Brentbranch Bog at #4.
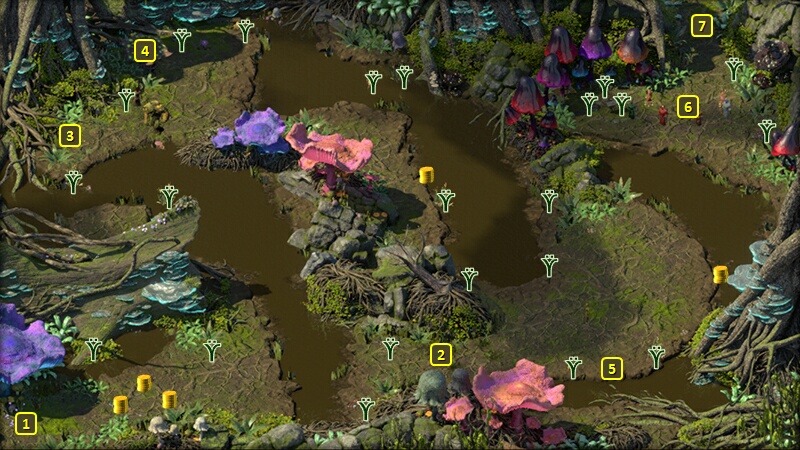
I am now at #1 on the map of Brentbranch Bog. Alliria takes two abilities on her 16th level-up.
One of them is Virtuous Triumph. It's a passive that has a 25% chance of recouping +1 Zeal whenever the Paladin who has it scores a killing blow. It's pretty much a no-brainer for any Paladin.
The other is Improved Critical. It adds +10% Damage to Critical Hits.
A Delemgan Vincecaller and several Assassin Vines attack at #2. Eder and Pallegina go on ahead and attack the nearest enemies. Mirke fires away with her guns. Aloth buffs up, then switches to his Grimoire of Vaporous Wizardry, and then plants a Malignant Cloud over the Vines. The Vines themselves have weak Armor Rating against Burning Damage. It also happens to be day time, which means that Sun and Moon will give Alliria +2 Fire Power Levels. So she begins with Infuse with Vital Essence, Blood Sacrifice, Arcane Veil, Blood Sacrifice. Once she's set up, she spams Fireballs on the Vines non-stop. I soon blow everything away.
A Bear Cub is at #5.
*Evil* Bear Cub
Ydwin takes The Complete Self on her 15th level-up once the evil party arrives at the Bog. It recoups 5 Focus for any Critical Hits scored with her spells. And that can mean plenty of Focus recouped for area-of-effect spells.
The evil party conducts the battle in a similar fashion, with Tekehu and Ydwin bombard the Vines with offensive spells while the others make physical attacks on whoever is within reach.
*Evil* Twix
Now I go north, but stop about halfway. There's a Dank Spore near the northwest corner at #4.
I send Tekehu ahead to get the attention of the Sporelings and Bog Warders and other enemies, and draw them away from the Spore. Tekehu's immunity to slog zones allows him to quickly regroup with the party. I then overwhelm them with the usual methods.
I then send Tekehu and Xoti ahead to kill the Dank Spore by themselves. Their Captain's Banquet resting bonus gives them immunity to the Spore's Domination attacks.
A Pet cat named Twix is at #3, but I have no use for it. The video concludes with the evil party getting odds and ends in the middle of the map.
*Evil* Druids of Seasons
The Druids of Seasons, who are the focus of the Hunting Season Quest, are at #6. I go into Stealth mode so as to sneak across and start the battle already having crossed the slog zone. I start the fight with the Clever dialogue option, which gains reputation with Tekehu and Xoti. Using the Aggressive dialogue option would have lost reputation with Tekehu. The battle itself is otherwise handily won with the usual buffs and methods.
One of the items I loot is a War Bow called Saint Omaku's Mercy. It becomes Ydwin's alternative ranged weapon for the rest of the game. Her Rod blasts are the attack of choice against mobs of enemies tightly packed together. This War Bow is for when she needs to attack single isolated targets for Focus. The reasons why lie in the enchantments I select for it. Saint's Grace provides more Action Speed the lower Ydwin is in Health. And a Barring Death's Door from Xoti will keep Ydwin safe. Galawain's Harry provides a 50% chance of instant Recovery upon scoring a Critical Hit. It's the bow that in my opinion holds the greatest potential for highly damaging and rapid ranged attacks without losing Accuracy (like with the Hunting Bows modal).
*Evil* Hunting Season
I return to Sayuka, and switch in Aloth, Maia, Rekke and Konstanten.
I report the death of the Druids to Fleet Master Okaya, and receive 8,000+ xp, several explosives, and a Blunderbuss called Xera's Emperical Explication as rewards for completing the Hunting Season Quest. The evil party has no use for the weapon.
Konstanten takes Uncanny Luck on his 15th level-up. The 5% chance of converting any Hit to a Critical Hit ties in with his incentive to land Melee Critical Hits as a Skald.
Maia takes Shot on the Run. It's a passive that reduces the Reload Time Penalty for reloading a gun or crossbow while moving. And that will be frequently for a gunslinger managed by the computer's A.I. during ship battles.
I reassemble the core party and return to my ship, with the intention of sailing for Cignath Mor.
Hunting Season
The good party switches in Serafen, Ydwin, Rekke and Konstanten upon my return.
I collect my rewards, leave the Fleet Master's Quarters, and reassemble my core party with the slight adjustment of Fassina going in for Eder for the time being.
Mirke equips Xera's Emperical Explication in the off-hand of her secondary weapon set. Scordeo's Trophy and Fire in the Hole work together as a primary gun set against mobs of enemies. I design my secondary gun set for use against single particularly powerful enemies. Its projectiles score +15% Raw Damage, which will be a plus against bosses. I add the Inexplicable Mass enchantment, which upgrades Matter Repulsion so that Critical Hits no longer push the target back but will now knock the target Prone. I also add Full Choke, which adds 50% Range in exchange for a -10 Accuracy penalty. It does help her keep a greater distance from bosses. Lastly, I upgrade it from Exceptional to Superb.
I also upgrade the Thundercrack Pistol in the secondary weapon set, even though it will eventually give way to another Pistol. I add Charged Field, which adds a -5 Accuracy and -10% Action Speed penalty on anyone friend or foe packing a shield or heavy or medium armor. It's the easy choice over Stormed Rune Shot, which is a once per Rest ability. I also add Magnetized Shot, which does impose a +15% Recovery Time penalty, but also provides +10 Accuracy against targets packing a shield or heavy or medium armor.
I return to my ship and set sail for Cignath Mor.