-

- Forums
- Chatrooms
- Gallery
- Gameplay Videos
- Upload
- Articles
- Mod Reviews
- Shop SP: Games, Movies, Books

|
|
| Pillars of Eternity 2 Online Walkthrough by David Milward |
REKKE, M HUMAN FIGHTER

Stats
Abilities
1st Level - Frenzy and Knockdown: Default starting abilities.
2nd Level - Disciplined Barrage: Provides the Aware Inspiration for a lengthy duration. It's also a prerequisite to Disciplined Strikes.
3rd Level - Two-Handed Style: It's a given as he uses an Estoc as his exclusive weapon.
Fighter Stances: - The Cleaving Stance modal would be a natural choice for any Fighter build that emphasizes inflicting damage instead of tanking.
4th Level - Confident Aim: Provides a 30% chance of converting Grazes to Hits, which is a natural choice for any character that wants to Hit as often as possible.
5th Level - Rapid Recovery: Constant Recovery will now regenerate 7 health per 3 sec.
Disciplined Strikes: It upgrades the Disciplined Barrage ability so that it now provides the Intuitive Inspiration, which means +5 Perception, a 50% chance of converting Grazes to Hits, and a 25% chance of converting Hits to Critical Hits.
6th Level - Mule Kick: It upgrades Knockdown so that the target is launched into the air, and then left Prone on the ground. It amounts to an animation that results in the target being incapacitated for longer than just Knockdown.
7th Level - Weapon Specialization: It provides a 10% bonus to Damage with weapons that he is proficient in, and now includes Estocs.
Body Control: It provides Resistance to Might Afflictions. His numerical Defenses won't be great, especially when I allow for some penalties against them. So when I do take defensive passives, they tend to be Resistance-based.
8th Level - Fearless: It provides Resistance to Resolve Afflictions.
9th Level - Mob Stance: It upgrades Cleaving Stance so that he enjoys a 5% reduction of Recovery Time for every enemy that is within Melee range.
Armored Grace: The 25% reduction of Recovery Time will stack with any reductions applied by Mob Stance.
10th Level - Tough: More Health is always good, especially for a two-handed warrior who himself is going to get hit a lot.
11th Level - Clear Out: A Primary Attack that attacks multiple enemies in a small arc in front of the Fighter. It is ultimately a stepping stone to an upgrade.
Improved Critical: Always a natural choice for a Melee character.
12th Level - Reaping the Whirlwind: It adds +1 Discipline for a character build that will use activated abilities very often.
13th Level - Power Strike: It spends 4 Discipline to make a Full Attack against a single-target with bonuses of +200% Damage and +4 to Penetration. It also Stuns (-5 Might, cannot Engage, -4 Penetration, cannot act) the initial target, and inflicts Staggered (-5 Might, cannot Engage) and Raw Damage on enemies in a cone behind the initial target.
Unbreakable: If Rekke should get knocked out, he'll revive with +100 Health, +10 all Defenses, and +2 Armor Rating. The revival can trigger once per Encounter. Having this trigger while Rekke is a ship combatant will not result in any Injuries for him. That's why I don't mind loading him up with items or abilities that make him take penalties on Deflection, and items that will unleash damage on nearby enemies upon being knocked unconscious.
14th Level - Weapon Mastery: It adds another +5% to Damage with attacks made with his Estoc.
15th Level - Uncanny Luck: In his case it's more about the 5% chance of converting a Hit to a Critical Hit than the 5% chance to avoid any Attack.
16th Level - Clean Sweep: It upgrades Clear Out so that the Primary Attack will hit and Prone all enemies in a complete 360 circle around the Fighter. And that can often come into play during the intensely crowded ship battles.
Toughened Fury: A Critical Hit against the Fighter has a 10% chance of recouping +1 Discipline for the Fighter. Rekke taking Deflection penalties on himself by wearing the Sandals of the Water Lily and using the Vulnerable Thrust modal of an Estoc is meant to maximize the use of this passive. Maximizing the potential for recouping Discipline in turn maximizes his potential to use his activated abilities. And I don't mind if receiving multiple Critical Hits leads to getting knocked unconscious during ship battles, as he won't suffer Injuries as a ship combatant. It will also trigger Unbreakable, and massive explosive damage to nearby enemies through other items that he's wearing.
17th Level - Spell Resistance: A 10% chance to avoid the effects of any spell outright is always good for any character.
18th Level - Overbearing Guard: It adds +50% Damage and +15 Accuracy to Disengagement Attacks. It will stack with the bonuses for Disengagement Attacks provided by One Dozen Stood. And that means enemies will be very hesitant to move away from him for fear of highly punishing Disengagement Attacks, as he gains increasing Engagement as his Health drops through One Dozen Stood.
19th Level - Unrelenting: It upgrades Unbreakable so that he gains +3 Discipline when he revives after getting knocked unconscious.
Take the Hit: He uses it differently than Eder does, as he can't reduce the Damage in the same ways. If he uses it, it will mean absorbing the full brunt of Damage from attacks on other characters during ship combat. But if it increases the odds of him getting knocked unconscious, triggering explosions from his other items that will Damage enemies, and triggering Unrelenting, then I won't object.
20th Level - Inspired Strike: It upgrades Power Strike so that using it successfully also gives Rekke the Acute (+5 Intellect, +1 Power Levels) and Swift (+5 Dexterity, +100% Strike, cannot be Engaged) Inspirations for at least 10 sec.
Inventory

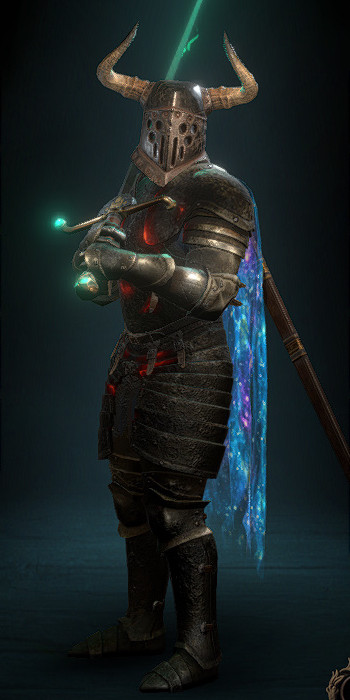
Horns of the Aurochs: Looted from Champion-Ascendant Grymgaer at #10 in the Outcrop on High. His build is premised on encouraging enemies to score Critical Hits on him. This helmet means his next attack will enjoy 10% bonus Freezing Damage whenever he's either Hit or Critically Hit. Immunity to Push and Pull effects is sugar on top.
Claim and Refusal: Obtained from Marofeto Liano at #4 in Sayuka. The 10% bonus to Damage with his own Melee Attacks is certainly welcome. The penalty of +10% Damage taken can be swallowed by a ship combatant, who won't suffer any Injuries should he be knocked unconscious. And if wearing the Amulet and taking that penalty leads to triggering Unbreakable faster, along with area-of-effect Damage from his items, then I certainly won't object.
Cape of the Falling Star: Purchased from Captain Thaenic at #5 in the Deck of Many Things as it nears Neketaka Island. The +7 to all Defenses when no allies are within 5m is useless to me, as I'm not on a solo run. The real point is that it will unleash Burning or Crushing Damage only to enemies and over a large area should the wearer be knocked unconscious. Rekke's build is based on encouraging Critical Hits by lowering his Defenses, Deflection included. And if that means he gets knocked unconscious, he will both unleash a wave of damage only against enemies and he'll revive through Unbreakable when he gets it.
One Dozen Stood: Looted from #4 in The Bridge Ablaze, Moment After. It provides +10 Accuracy and +15% Damage to Disengagement Attacks, and those bonuses will stack with the Overbearing Guard passive when he gets it. I enchant it with Echo of the Godhammer. It will cause Burning Damage to nearby enemies if and when he gets knocked unconscious. And that happens along with the Burning Damage to nearby enemies from the Cape of the Falling Star, and triggering Unbreakable which causes Rekke to revive without Injuries during ship combat. I also enchant it with Hold the Bridge, which provides bonus Engagement as Rekke becomes lower and lower in Health, to a maximum of +3. It maximizes the opportunity to inflict Disengagement attacks, which will enjoy bonuses from both the armor itself and from Overbearing Guard.
Gauntlets of Discipline: Looted from #4 in The Hanging Sepulchers. Rekke's build depends heavily on the use of activated abilities, so an item that adds +2 Discipline is very welcome.
Ring of Regeneration: Looted from an Ogre in the Collapsed Coal Mine, the entrance to which is at #6 on the Cleft Island. It's a sensible choice for a warrior who is himself going to get hit plenty.
Ring of Clenched Muscle: Obtained after defeating The Oracle in The Heart of the Mystery. A Hit by the wearer has a 10% chance of giving the wearer a random tier-1 Inspiration (e.g. Smart, Strong) that lasts at least 10 sec. A Hit also has a 10% of inflicting a random tier-1 Affliction (e.g. Distracted, Shaken) to its target that lasts at least 10 sec. It's underwhelming when you're just attacking a single target, but it can be meaningful for a warrior with powers and abilities that can strike multiple targets. Rekke's Clean Sweep can Hit multiple targets around him. The Ghost Blades unleashed by Engoliero do Espirs is treated as a weapon attack, and therefore also provides multiple opportunities to trigger the ring's power.
Ngati's Girdle: Stolen from a chest in Iolfr's Raiments, the entrance to which is at #22 in Periki's Overlook. The bonus to Athletics and Crushing Armor Rating are nice. But the key point is that his build is based in part on encouraging Critical Hits against him, to replenish Discipline through the Toughened Fury passive that he will acquire later on. He does have several activated abilities that expend Discipline that I want him to use generously through the ship combat A.I. Having an item like this, to make enemies pay the price for those Critical Hits, fits nicely with the build.
Sandals of the Water Lily: Purchased from Sautara at #3 in the Deck of Many Things as it nears Neketaka Island. The immunity to Dexterity Afflictions is a nice benefit. But the real point is to encourage Critical Hits against him by lowering all Defenses by -10. And Critical Hits against him will have a 10% chance of replenishing of +1 Discipline once he gains the Toughened Fury passive. And should it get to the point that he's knocked unconscious, he'll revive through the Unbreakable ability when he gets it, and unleash two waves of damage against enemies only through the Cape of the Falling Star and One Dozen Stood.
Alternatives: A single-class Paladin could perhaps be in an even better place to take advantage of the Cape of the Falling Star and his One Dozen Stood explosions plus revival as a ship combatant.
Sacred Immolation upgraded to Sacred Sacrifice is the revival power. Divine Immolation is a valid alternative if you want to emphasize healing ship combatants.
You wouldn't necessarily have to emphasize Defenses penalties, as the Health drain that comes with using the Sacred Immolation tree of abilities amounts to a self-destruct button for a single-cass Paladin. Or at least it does if I don't mitigate the Raw Damage in ways that I do for Alliria. That gives you room to equip the single-class Paladin with weapons like Magran's Favor and Sun and Moon that provide bonus Fire Power Levels. That not only enhances the Paladin's own class abilities, but also the Cape of the Falling Star and his One Dozen Stood explosions.
The reason I didn't do anything like that with Pallegina during the evil playthrough is that allying with the Vailian Trading Company is literally the only pathway to the game's finale where she'll stay with the party.


