-

- Forums
- Chatrooms
- Gallery
- Gameplay Videos
- Upload
- Articles
- Mod Reviews
- Shop SP: Games, Movies, Books
|
|
| Pillars of Eternity 2 Video-Based Walkthrough by David Milward |
The Heart of the Mystery
The Inner Mysteries
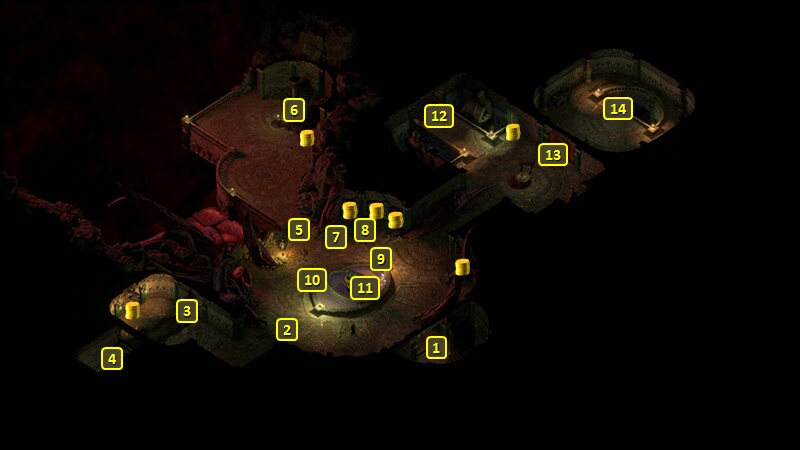
I arrive at #1 on the map of The Heart of the Mystery, which begins a cutscene of the Oracle of Wael absorbing Fyonlecg. A battle with the Oracle now becomes inevitable.
Although I also have the opportunity to retreat west and prepare myself. I also grab the Godseed Inner Core from the pedestal at #2.
Alliria switches to her Crushing Doom set up. She also loads up on a few Scrolls of Moderate Healing, Scrolls of Great Maelstrom and Scrolls of Wilting Wind. Aloth loads up on Concussion Bombs and Unstable Soul Essences (which are healing bombs).
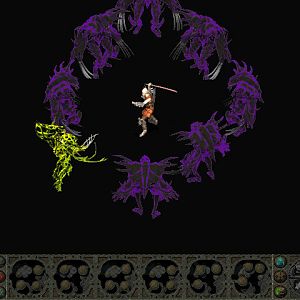
I get into Stealth mode so as to get as close as I can before battle starts. Remember when it could shoot eyebeams at you during your first encounter with it? It still has those powers, but now it also has access to Fyonlecg's spell powers. And that means it will frequently dish out spells like Gaze of the Adragan and Wall of Many Colors among others. Those two spells in particular can hold party members still for extended periods of time.
Aloth and Eder attack it right away. Mirke immediately summons Dichotomous Spirits. And she'll always do so when the previous ones have gone and she has enough Wounds for it. She otherwise uses her secondary gun set on the Oracle itself.
Pallegina uses The Prisoners Turned on Their Captors on the party. And she uses it every three Phrases. The Oracle's powers often inflict Dexterity afflictions, so it's in my interest to keep the party immune to that to the extent it's possible.
Alliria tags the Oracle with Brand Enemy, and casts Infuse with Vital Essence followed by Blood Sacrifice. She tries whenever she can to spam Concelhaut's Crushing Doom on the Oracle in order to minimize its spellcasting.
At some point it summons two Scavengers of Vision and two Soul Mirrors. I make the Soul Mirrors a priority to kill off, as they are both relatively squishy and can cast 8th and 9th-tier spells. Aloth uses an Unstable Soul Essence in anticipation. At one point the party does take a beating from all the spells, so Alliria uses a Scroll of Moderate Healing.
Things are going along when I get hit with one of the chief dangers in this fight, a Wall of Many Colors. USUALLY the advisable strategy is to get off of it as soon as possible. But the victory lap has started. One of the Soul Mirrors is very close to dying and yet distant. So Mirke toughs it out and shoots it to death. Alliria likewise hits the Oracle with another Crushing Doom, which seals its fate. She also uses another Scroll of Moderate Healing when she can.
It is after the Oracle has fallen that I get the party off the Wall of Many Colors. I still have to fight the Scavengers of Visions and Soul Mirrors that have now arrived in significant numbers. Alliria, Aloth and Eder fight the enemies on the right. Mirke and Pallegina fight the enemies on the left.
That wall at some point wears off. So now I have everyone regroup and go all out for a Soul Mirror on the left that has summoned Maura's Tentacles. Get rid of the summoner, and you get rid of the Tentacles.
I'm taking another beating, so Alliria uses White Flames while Aloth uses another Unstable Soul Essence.
At some point I notice that a few Soul Mirrors are gathered together to the east. So I have Alliria use her offensive scrolls on them, and Aloth tosses Concussion Bombs at them as well.
It is after I have wiped out those Soul Mirrors that I'm pretty much home free, and can gang up on the two remaining Scavengers of Vision one by one.
Alliria has a dialogue with Wael the deity once the battle ends. I'll have a say in the fate of at least the Oracle and Wael's titan body. And the choice will have repercussions for the ending slides of the game:
Let the body sleep - You can convince Wael to let the body sleep with a dialogue option based on being a Priest of Wael, an Arcana check of 13, or a Diplomacy check of 16. Wael will then tell you to spare the Oracle.
Kill the body - You can convince Wael to kill the body by reminding it that the titan bodies of the Gods once nearly destroyed the world. Wael will tell you to kill the Oracle.
Convince Wael to use the body against Eothas - You can convince Wael if the Watcher is a Priest of Wael, an Arcane check of 12, or using the dialogue option that starts with "You should really use the body ..." followed by a Metaphysics check of 18 or a Religion check of 10 or a dialogue option based on having 2 points of Clever disposition. Wael will tell you to kill the Oracle.
Let the fungus colony have the body - Alliria pursues this avenue as she reached a peaceful understanding with the Giant Luminescent Spore in the Quarantined Section. Requires either a dialogue option based on being a Priest of Wael, an Arcana check of 13, or a dialogue option that ends with "... might as well let the spores claim it". Alliria follows up with a Religion check of 19. A Bluff check of 13 or a Streetwise check of 7 would have worked too. Wael tells her to kill the Oracle.
*Evil* There is a fifth avenue that the evil party pursues, and is described below.
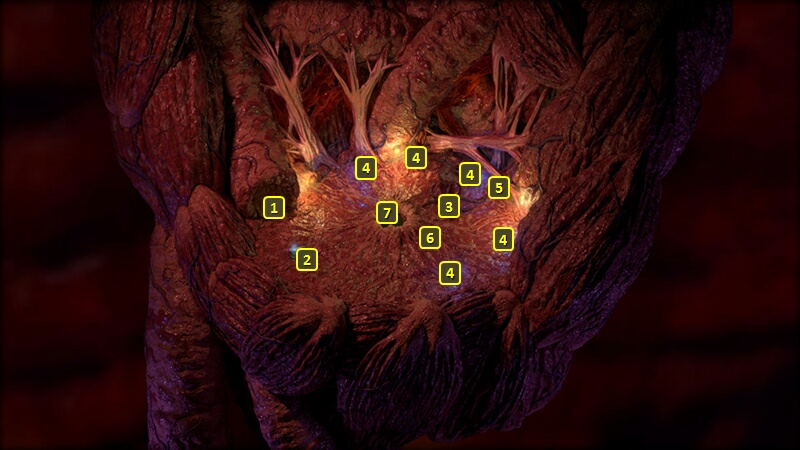
I kill the Oracle upon my return. I then take The Mask of the Weyc from Fyonlecg's body at #6, although it doesn't fit into any of my plans for the good party.
I also grab the Ring of Clenched Muscle and an amulet called Weight of Revelation from the Oracle's dead body before returning to the Temple of Revelation through the portal at #7.
*Evil* The Inner Mysteries
The evil party also crafts Potions of Imperfect Arcane Reflection to help weather the initial barrage.
Mirke puts up her buffs, and immediately summons Dichotomous Spirits to keep the Oracle of Wael occupied from the very start.
Zarathos puts up his usual buffs, then quaffs a Potion of Imperfect Arcane Reflection and then a Potion of Ascension. He in turn also summons Dichotomous Spirits after that.
Tekehu starts with Nature's Balm, but then unleashes an Empowered Her Tears Fell Like Rain while everyone else is close to him. The Omnipotence power of the Robes of the Weyc means everyone gets the Brilliant Inspiration.
Xoti casts Barring Death's Door on Zarathos just as Tekehu begins casting Her Tears Fell Like Rain. She follows up with Salvation of Time just after he finishes Her Tears Fell Like Rain. And from there she proceeds with keeping the loop going, and putting Barring Death's Door on everyone.
And from there Zarathos, Mirke and Xoti (in between castings of Salvation of Time) rotate and keep bringing in new Dichotomous Spirits. All of them having the Brilliant Inspiration from Omnipotence means their Wounds renew automatically. The Dichotomous Spirits keep the Oracle and its minions pinned down, while Xoti keeps everyone's protections going with the Salvation of Time loop. It's only a matter of time before the Dichotomous Spirits wear down the Oracle and its minions.
Zarathos makes the most evil choice possible, to give Wael's body to Concelhaut. It earns disapproval from Xoti, but not enough to end their relationship. This decision is also helped along by the fact that the Ring of Clenched Muscle doesn't fit into any of my plans for the evil party.
Also, I refused to give the Outer Godseed Fragments to the Oracle.
*Evil* The Seeds of Deception
I grab the Inner Godseed Core from the pedestal at #2. I also take The Mask of the Weyc from Fyonlecg's body at #6, and have Mirke wear it for what's left of the game. It will trigger +50 Deflection and +1 Concentration once per Encounter upon the wearer being attacked for the first time in combat, and it can be prolonged indefinitely by Salvation of Time. It also helps maximize the potential for instant recovery through the Insistence power of the Rannig's Wrath Rapier.
I return to the Temple of Revelation through the portal at #7.
Concelhaut gleefully announces his pending apotheosis, and Llengrath is anything but pleased about that.
I speak to Tayn at #2. I would have gotten 13,000+ xp and a Trinket called Tayn's Gratitude as rewards had I given him the Godseed items. Tayn's Gratitude is actually a worthwhile item for parties that aren't doing a no rest run. It can once per Rest place a weapon similar to Kalakoth's Minor Blights in the main-hand, except that it scores Crushing Damage and can hit its targets with random Afflictions in a manner similar to the spell called Tayn's Chaotic Orb.
But I prefer to keep the Godseed Items. I use the Inner Godseed Core to raise Ydwin's Saint Omaku's Mercy from Legendary to Mythic. I prefer to enchant her single-target weapon first, because I am soon going to fight the Mega Bosses.
I briefly switch in Maia. I use an Outer Godseed Fragment to raise her Sharpshooter's Garb from Superb to Legendary. I also give her the Boots of Stealth that Ydwin previously wore.
I next switch in Konstanten. I use the other Outer Godseed Fragment to raise his Contender's Armor from Superb to Legendary.
I switch Ydwin back in and leave the Forgotten Sanctum for good.
The Seeds of Deception
Tayn and Llengrath welcome Alliria back to the Temple of Revelation. I inform Llengrath that I have found the Godseed Devices. I now get the useable versions of the Outer Godseed Fragments and the Godseed Inner Core. I decide to keep them, which earns Llegrath's displeasure. She would have given me a Trinket called Glasanam Argues if I had given them to her.
*NOTE* You must exercise this option when you first emerge from the Heart of the Mystery if you want the useable versions of the Godseed items. Speaking to her and ending the conversation without bringing up the Godseed items will leave you with the Quest Item versions of the items, which you can't use for enchantment purposes.
I speak to Drowsy Puke and briefly bring in Serafen. Alliria uses the Godseed Inner Core to raise her Sun and Moon Flail from Legendary to Mythic. She also uses an Outer Godseed Fragment to raise Serafen's Sungrazer Flail from Superb to Legendary.
I bring in Konstanten and give him the Dreamwalker's Tread. The +2 to Stealth will be meaningless for him. The +1 to Athletics augments the reduction of Recovery Time provided through the Contender's Armor.
I bring in Rekke and give him the Ring of Clenched Muscle. A Hit by the wearer has a 10% chance of giving the wearer a random tier-1 Inspiration (e.g., Smart, Strong) that lasts at least 10 sec. A Hit also has a 10% of inflicting a random tier-1 Affliction (e.g., Distracted, Shaken) to its target that lasts at least 10 sec. It's underwhelming when you're just attacking a single target, but it can be meaningful for a warrior with powers and abilities that can strike multiple targets. Rekke's Clean Sweep can Hit multiple targets around him. The Ghost Blades unleashed by Engoliero do Espirs is treated as a weapon attack, and therefore also provides multiple opportunities to trigger the ring's power.
I conclude by bringing Pallegina back into the party.
Out of Eternal Horizons
Alliria speaks to Bekarna at #10, and gives her the Fragment of Starmetal. Bekarna gives her 12,500+xp and the Celestial Agitator. It can summon 3 Star Servants for at least 30 seconds, once per Rest.
Bekarna invents a new spell, Bekarna's Midnight Daydream. It's a reversal on Tayn's Chaotic Orb in that it gives random Inspirations to party members instead of random Afflictions to enemies. Alliria asks for a copy of the spell, and receives the Celestial Grimoire.
Now I leave the Forgotten Sanctum and return to my ship. It's time to fight the Mega Bosses.