-

- Forums
- Chatrooms
- Gallery
- Gameplay Videos
- Upload
- Articles
- Mod Reviews
- Shop SP: Games, Movies, Books
|
|
| Pillars of Eternity 2 Video-Based Walkthrough by David Milward |
Quarantined Section
*Evil* The Annals of Llengrath, Volume I of V
I show the next few parts primarily from the perspective of the evil party, as Tekehu is pursuing the next upgrade for his Robes of the Weyc.
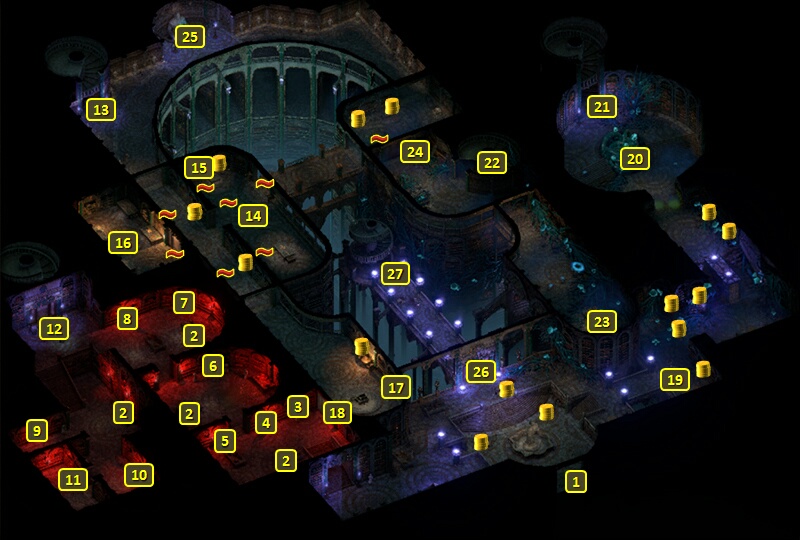
I start off at #1 and go east to #19 to fight some Spore-Infested Librarians. I outlast them as usual with the Salvation of Time-Ancestor's Memory loop. One of them leaves behind The Annals of Llengrath, Volume I of V. Simply picking it up prompts a vision of Llengrath's thoughts during his or her original life, and it also starts the Root and Branch Quest.
*Evil* Fleshy Column of Fungus
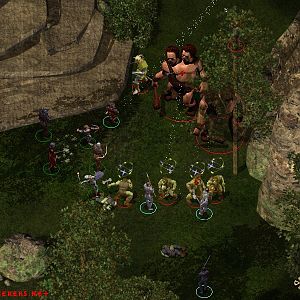
I continue north and fight a couple of Spore-Infested Librarians, several Luminescent Sporelings and a couple of Spore Tendrils.
One thing to keep in mind is that anything of the Luminescent Spore family, including the Sporelings, can strip a character of his or her buffs on connecting with a melee or projectile attack. So the loop works for the most part, but at some point Zarathos had his buffs stripped. But by then I've done enough damage that it becomes a matter of closing the fight out. And of course Tekehu uses an Empowered Her Tears Fell Like Rain for the third time.
I click on the fungal growth. Striking it won't do anything. But I use the Fungicide to kill it, which may end up weakening an enemy I'll soon encounter.
Now I go down the stairs at #21.
Crimson Panoply
That brings me to #1 on the map of the Quarantined Section. I go ahead and easily defeat three Writhing Tentacles at #2.
Now I go to #3, where there's a dormant animated armor that you can one way or another turn into your own wearable Plate armor called Crimson Panoply. Alliria as a Wizard makes an Arcana check of 15, followed by a second Arcana check of 20 to remove the Disenchanted Amulet of Animation without stirring whatever force was animating the armor.
As for the Crimson Panoply, it is definitely a worthwhile armor. One of its key powers is the ability to give its wearer Frenzy upon the wearer receiving a Critical Hit. The other key point is that Frenzy will come with a temporary shield that absorbs damage to the wearer that scales with the Survival skill. It's not hard to anticipate melee builds that don't include Barbarian, like Fighters, Paladins, Monks and multi-class combinations of those characters, that could be based on the armor providing Frenzy without having to include Barbarian in the class mix. And putting all of your passive skill points into Survival means you can combine the armor with a weapon like the Mohora Tanga Spear with the Harpooning enchantment, or the Ngati's Tusk Pike with the Hunter of Hunters enchantment. The latter combination in particular can provide a powerful debuffer for a party that isn't on a no Rest run. But I had other plans, especially as this combination, as appealing as it is, doesn't get realized until very late in the game.
*Evil* Crimson Panoply and Muse of Mystery
The evil party likewise has little trouble with the Writhing Tentacles at #2. Even so, Tekehu makes a point of using an Empowered Her Tears Fell Like Rain for the fourth time.
Zarathos picks a fight with the red armor by swiping the Disenchanted Amulet of Animation without any skill checks. It can use the Frenzy and Heart of Fury abilities of a Barbarian, as well as the Called to Do His Bidding, the Ancient Instruments of Death summons of a Chanter. But I outlast it with the usual methods.
Tekehu using Her Tears Fell Like Rain for the fifth time means he obtains the next upgrade for his Robes of the Weyc, Muse of Memory. It's the upgrade that allows Chanter Phrases to elapse faster.
*Evil* The Weyc's Wand
I go east and have Ydwin disarm a trap on the chest at #4. I wouldn't mind a fight against the Animated Armors that would attack if I didn't disarm the trap, but the trap itself can inflict Injuries that I would prefer to avoid.
The chest has The Weyc's Wand. Tekehu uses it from his off-hand for what's left of the game. The 25% chance to Confuse its target on Hit, and the potential for extra Raw Damage that comes with one of its upgrades, certainly make it a worthwhile weapon. The key point is that one of its upgrades will provide a bonus +3 Power Levels for 20 sec on using an Empowered attack. And again, Sasha's Singing Scimitar makes it a once per Encounter power, and Salvation of Time plus Ancestor's Memory on Xoti will ensure that it lasts the whole fight.
*Evil* The Annals of Llengrath, Volumes II and IV of V.
There will be a couple of Luminescent Spores and several Luminescent Sporelings. There will also be two Spore-Infested Librarians. One is a single-class Monk who can use Whispers in the Wind and the other will be an archer who can use the Energized (+5 Might, +2 Penetration, Interrupt on Critical Hit) Inspiration for his ranged attacks.
I employ a different strategy given that I can't rely on the loop. I have Tekehu and Xoti present themselves visibly to the first Spore. Part of the reason being that their Captain's Banquet resting bonus keeps them immune from the Dominating power of the Spore. Mirke follows behind.
The idea is a simple but effective one. Xoti and Mirke keep Enduring Dance active, putting it back up if and when they have to. They also use The Dichotomous Souls summons whenever they have wounds for it. They don't even wait for the summons duration to expire. They summon new ones whenever Enduring Dance passively recoups them with enough Wounds. The Dichotomous Spirits are very fast, and will run down any targets that are visible to them in no time at all. I let the summons do all the grinding down, and minimize any danger by keeping only Tekehu and Xoti on the periphery, Mirke a little behind, and Zarathos and Ydwin well away from the action.
The lectern at #5 has The Annals of Llengrath, Volume II of V. I read it and experience more memories of Llengrath's past life so as to progress the Root and Branch Quest.
The Annals of Llengrath, Volume IV of V, and more of Llengrath's original memories, are on the lectern at #16.
*Evil* Giant Luminescent Spore
There will be a Giant Luminescent Spore at #7, along with a pair of Luminescent Spores and a pair of Spore Tendrils. *Good* The good party will reach a peaceful resolution with it, see below.
Zarathos wants it dead. I employ a similar process of letting Tekehu and Xoti take the initial heat, but gradually letting the endless Dichotomous Spirit summons absorb all the heat and do all the grinding down, enabled by both Xoti and Mirke keeping Enduring Dance active to ensure a never ending supply of wounds.
I gradually make my way further and further into the room as I make progress. The optimal distance is just out of the Spores' fog of war so that my Enduring Dances can stay active, but still close enough that the endless supply of Dichotomous Spirits always grab their attention and keep the pressure on even as they get continually replaced. The process eventually manages to wear everything down.
The Giant Luminescent Spore leaves behind the Spore Encrusted Key and Muara's Infested Grimoire. The Grimoire has a unique tentacles summon, but the evil party has no use for it. Nearby will be a miniature Sporeling named Amanita, but I have no use for that either.
The evil party also picks up The Annals of Llengrath, Volume V of V from behind where the Giant Luminescent Spore had been.
*Evil* The Annals of Llengrath, Volume III of V
There will be another group of enemies at #8. I handle this one a little differently. It has a larger number of Librarians with Monk and Wizard and archer abilities, but still fighting alongside Luminescent Sporelings who can strip my buffs away. I therefore have Mirke lead them away from the Luminescent Spore and Spore Tendrils, and then fight them. Ydwin shows that Puppet Master can still be a useful ability at these levels, when she turns the powerful Aumaua Monk and his hard-hitting abilities to work for the evil party instead. Tekehu's Garden of Life also becomes a real difference maker once the party still gets hit hard and often enough.
It is after I've wiped them out that I flood the Spore and Spore Tendrils with Dichotomous Spirit summonings.
The lectern has The Annals of Llengrath, Volume III of V. I again experience more memories of the original Llengrath. Collecting all five of the volumes results in their replacement with the The Collected Annals of Llengrath.
Now I through the door at #10.
Giant Luminescent Spore
Alliria briefly replaces her Sky Dragon Wurm with the Dog named Kaz. The point is I need its +1 bonus to Survival.
The Giant Luminescent Spore is at #7. Alliria tries to reason with it, and she needs a foot in the door. Either a Diplomacy check of 23 or Survival check of 18 will work. An alternative conversation pathway opens up if you have previously obtained all of The Annals of Llengrath, Volume I of V, The Annals of Llengrath, Volume II of V, The Annals of Llengrath, Volume IV of V and The Annals of Llengrath, Volume III of V. The acquisition of those Volumes overlaps with the completion of the Root and Branch Quest.
Alliria gives it the Fungal Fertilizer she had previously obtained from the Hall of Reconfiguration. It's a start, but she needs a follow up.
The dialogue option of "Feel free to grow on Wael. I'm not here to stop you." will leave open the possibility of allowing the Spore to grow on Wael's body at the end of the expansion. She then makes a Survival check of 15, helped along by Kaz, to convince the Spore to share a symbiotic connection with her. That in turn requires a Resolve check of 12 to successfully ingest the symbiote. That now opens up the possibility of having the Spore infest Wael's body at the end of the Forgotten Sanctum expansion.
The Giant Luminescent Spore now gives her Maura's Infested Grimoire, which has a unique tentacle-summoning spell, and the Spore Encrusted Key.
There is a Sporeling named Amanita, near the Giant Luminescent Spore, that you can take as a Pet.
I now switch out Kaz for my Sky Dragon Wurm.
Collected Annals of Llengrath and Bekarna's Depleted Grimoire
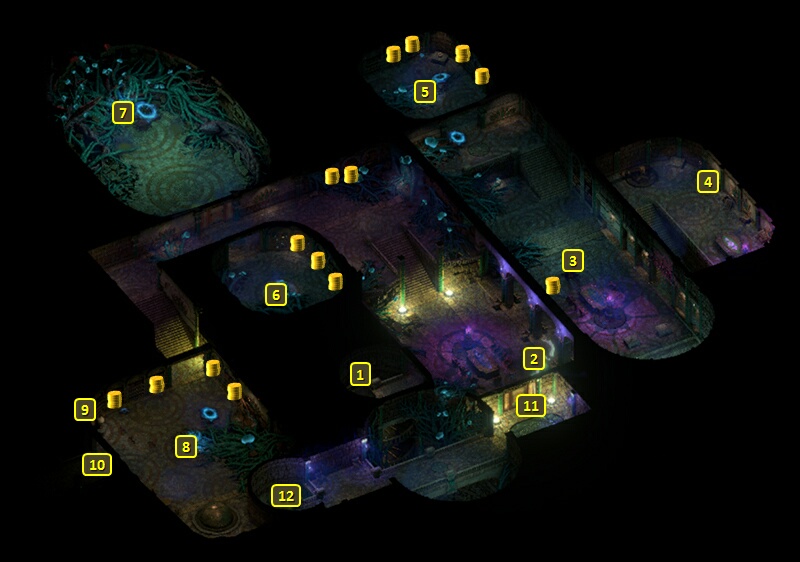
The good party also goes around to collect the Annals of Llengrath at spots marked #7, #6, #5 and #8. The difference is they don't have to fight through Spores and Spore-Infested Librarians, as Alliria has reached an understanding with the Giant Luminescent Spore. And they get The Collected Annals of Llengrath all the same.
Alliria also obtains Bekarna's Depleted Grimoire at #9.
I go down the stairs at #10.
*Evil* Notnok
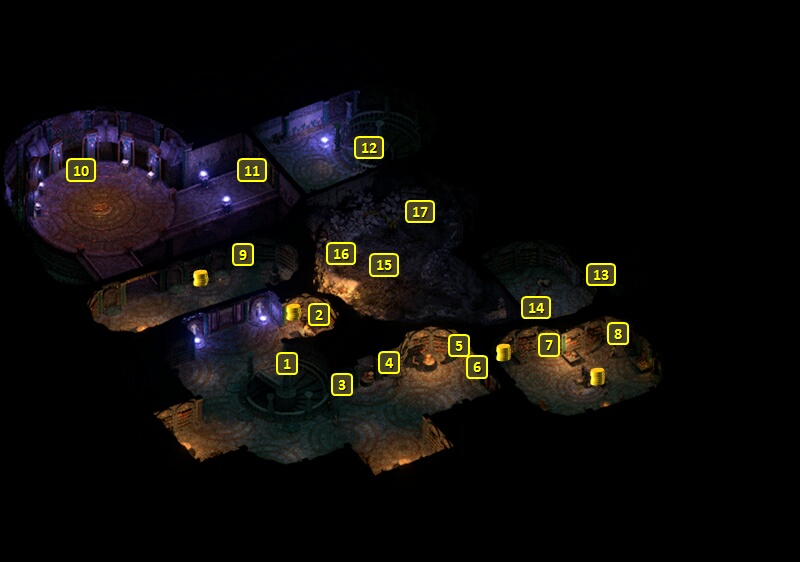
Either party will now be at #13 on the map of the Restricted Section. I go through the Burrowed Hole at #14.
I show this battle from the perspective of the evil party, to again show the need to be mindful of a danger that can hit its particular set up. At #15 will be another giant Imp named Notnok. He can cast 8th and 9th-level spells like Concelhaut's Corrosive Skin, Concelhaut's Crushing Doom, Minoletta's Missile Salvo and Kalakoth's Freezing Rake without limit. He also tends to keep himself protected with Llengrath's Reflection. He is also immune to Interrupts. He also periodically uses summons like Alguls, Risen Undead and Greater Flame Blights.
For now I keep the evil party near the Burrowed Hole at #13. I set up my buffs and the Salvation of Time-Ancestor's Memory loop. And Xoti gradually starts to put Barring Death's Door on everyone, and keep it going with Salvation of Time.
Zarathos and Mirke, after they have set up their buffs, keep Notnok occupied with endless Dichotomous Spirits. Zarathos taking damage from his own Berserker version of Frenzy will replenish his own Wounds. Tekehu switches to Many Lives Pass By once his Phrase buffs start being extended.
I keep it going until Notnok summons the Risen Undead. The particular danger here was that the Risen Mage could have used Arcane Dampener to suppress the endless buffs that I have put in place. Staying near the Burrowed Hole kept me within striking distance when the time came, and I killed him off before he could use that Arcane Dampener. It is once that danger has passed that the evil party charges in to finish off Notnok.
A niche at #17 has a Great Sword called Burden. It has some interesting properties, but it doesn't fit into any of my plans. I leave through the opening at #13.
I open the door at #11 with the Spore Encrusted Key, and then go down the stairs at #12.
*Evil* Aretezzo's Cane
The evil party emerges at #22 on the map of the Central Stacks. There's more Spore-Infested Librarians and a couple of Luminescent Spores at #23. The process of flooding them with Dichotomous Spirits works here as well.
The sarcophagus has a Club called Aretezzo's Cane. It does have a certain potential, with its ability to lower the Deflection Defense combined with lowering the Will Defense through the Bewildering Blows modal for Clubs. In particular, you can enchant it with the Haughty power that raises the Deflection penalty in scale with the Intimidate skill, and then combine it with the Breastplate called Casita Samelia's Legacy, which increases the wearer's Deflection according to Intimidate. But that didn't fit into my plans.
I open the door at #24 by using the lever to its left.
*Evil* Incantations of the Hand
I grab the Incantations of the Hand from #25 in plain view of some of the Librarians, which provokes them into a fight. I flood them with Dichotomous Spirits to minimize the dangers of their spellcasting. I kill off a second group the same way.
I return to the Temple of Revelation through the door at #1.
Incantations of the Hand
Alliria can simply take Aretezzo's Cane without a fight.
Mirke goes into Stealth mode and grabs the Incantations of the Hand to avoid a fight with the nearby Librarians.
Root and Branch
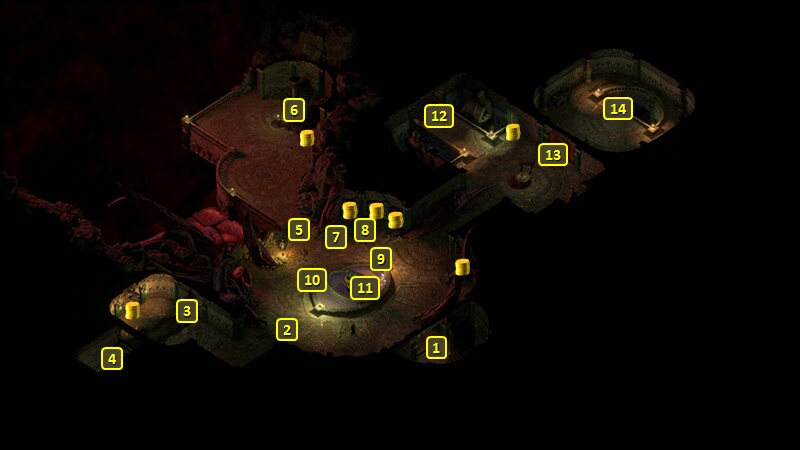
That brings me to #12 on the map of the Temple of Revelation.
I speak to Llengrath at #9, and show her The Collected Annals of Llengrath. I don't give them to her just yet.
Now I speak to Tayn at #2. He takes an interest in The Collected Annals of Llengrath as well. But I avoid giving them to him.
I instead speak to Llengrath again and give her The Collected Annals of Llengrath. She provides 11,000+xp, Llengrath's Tome of Preservation and three Scrolls of Withdrawal as rewards for completing the Root and Branch Quest.
I had previously completed A Shout in the Dark in Llengrath's favour. Also doing the Root and Branch Quest in her favour means she'll soon give me The Seeds of Deception Quest. *Evil* As seen below, getting The Seeds of Deception Quest from Tayn means doing A Shout in the Dark and Root and Branch in his favour. If you do A Shout in the Dark for either Llengrath or Tayn, but then do Root and Branch for the other, you won't get The Seeds of Deception.
Aloth uses Llengrath's Tome of Preservation for what's left of the game. It has the same combat buffs he's been using from Llengrath's Martial Masteries, but with two differences. One is that it has Wall of Draining. That means I don't have to switch to the Grimoire of Vaporous Wizardry after putting up my buffs. I can put up the Wall of Draining right away. I only have to do the switch if I want to put up a second Wall of Draining.
It also has the Wall of Force spell, which I previously selected during my level-ups. But now that it's in the Tome, I speak to Drowsy Puke at #7 and retrain Aloth. He does all 20 level-ups the same, but with the one difference that he takes Farcasting on his 15th level-up instead of Wall of Force. Farcasting can be useful to increase the casting range of some of his spells, like Call to Slumber and Gaze of the Adragan.
I now speak to Bekarna at #10 and show her Bekarna's Depleted Grimoire. She asks Alliria to expose it to starlight so that it works properly again. That request starts the Quest called A Rising Star.
I go back through the stairs at #12.
*Evil* Root and Branch
First, I speak to Drowsy Puke at #7 and briefly switch in Serafen, just long enough to take the Animancer's Energy Blade from him. I'll need it for a Soulbound upgrade soon.
Zarathos speaks to Llengrath, and informs her of having found some books of interest to her. I chose the dialogue option of an Orlan writing his thoughts beneath an oak tree so that the conservation ends itself.
Zarathos then gives The Collected Annals of Llengrath to Tayn, who replaces them with The Modified Collected Annals of Llengrath, with the intention of implanting false memories in Llengrath.
Zarathos gives The Modified Collected Annals of Llengrath to Llengrath, which earns Shady disposition. *Good* In fact, the very reason for having Alliria side with Llengrath instead was falling in with Tayn would have resulted in enough Shady to earn a rank in the disposition, and that would have meant a penalty for her Defenses.
Llengrath provides 11,000+xp, Llengrath's Tome of Preservation and three Scrolls of Withdrawal as rewards for completing the Root and Branch Quest.
The difference is that the reputation gain is with Tayn instead of Llengrath. So it becomes Tayn who gives me The Godseed Manuscripts, as I completed both A Shout in the Dark and Root and Branch in his favor. That branch of the conversation also starts The Seeds of Deception Quest.
Now I'm headed for The Oratory of Wael.