-

- Forums
- Chatrooms
- Gallery
- Gameplay Videos
- Upload
- Articles
- Mod Reviews
- Shop SP: Games, Movies, Books
|
|
| Pillars of Eternity 2 Video-Based Walkthrough by David Milward |
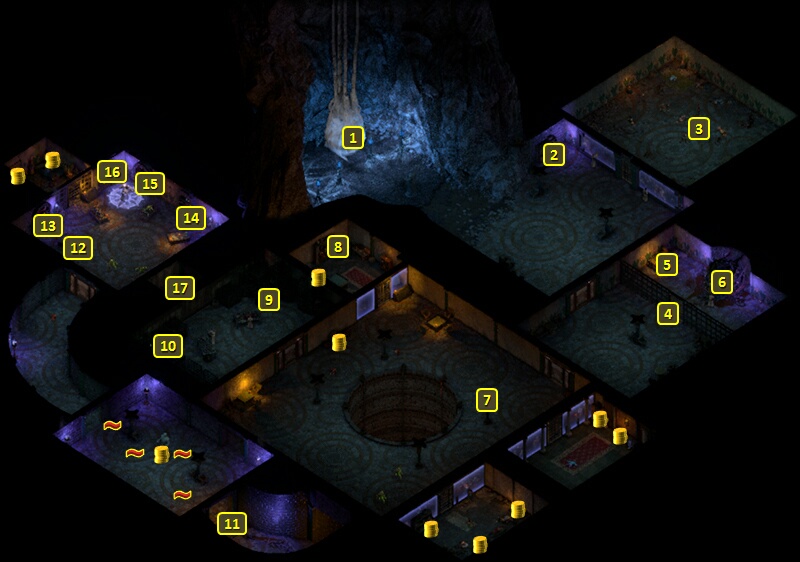
Hall of Reconfiguration
Scourge of Bezzello
I start off at #1 on the map of the Hall of Reconfiguration. I sneak and steal A Note on the Child from a shelf at #2.
The Frightened Child will be in a cell at #3. It will conjure up several Imaginary Friends. I conduct the battle early on according to the theme of buffing up and maximizing those buffs through Walls of Draining. But a key danger in this battle is that the Child is a powerful Cipher, and will occasionally put Disintegrate on a party member. That meant for this battle riding it out with healing potions, and other healing powers like Greater Lay on Hands and White Flames.
I eventually manage to thin the crowd out enough so that the Child is within reach and not surrounded by a mob that makes him hard to reach. So I grab the chance to gang up on him. Killing him ends the battle then and there, even if there were still some Imaginary Friends in the fight.
The Child leaves behind a Crossbow called the Scourge of Bezello. One of its selling points, besides its ability to impose a Perception Affliction on a Critical Hit, is that it fires 3 bolts per round but at reduced damage. That can make it an interesting possibility for a ranged Interrupt build when using the Interrupting Shot modal. It didn't fit into any of my plans though.
Flesh Construct Controller
The door at #4 can be opened with the Flesh Controller Room Key, but Mirke gets it open with a Mechanics skill check.
She also sneaks and steals A Request from the Oracle at #5.
The Flesh Construct Controller is at #6. I could blow it with an Explosives check of 15. But that is likely to kill at least one of the nearby Librarians, and the good party doesn't want that. I instead consult the Maintenance Log - Flesh Construct Controller and give the machine a "hard squeeze" to instantly kill all the Flesh Constructs. *NOTE* This option also means that a first fight against the ultimate enemy during the expansion becomes unavoidable.
I continue south with the whole party in Stealth mode. The Vithrack Wardens patrol on the east side, but they won't attack unless I am first caught by the Observers. So I sneak around to the west side and take out the Observers to avoid the Vithrack Wardens going hostile. I loot random items from chests in the cells on the east side.
*Evil* Flesh Construct Controller
Two more options are available on account of my having the Maintenance Log - Flesh Construct Controller in my inventory, which I found in the Central Stacks. I first consult the Log while interacting with the Controller itself. A "hard squeeze" would destroy the Augmented Flesh Constructs, just like with the Explosives checks.
Zarathos instead gives it a "soft squeeze". That makes the Augmented Flesh Constructs allies of the evil party, and they immediately go about attacking the Vithrack Warden and the Observers.
Lucero and Ooblit
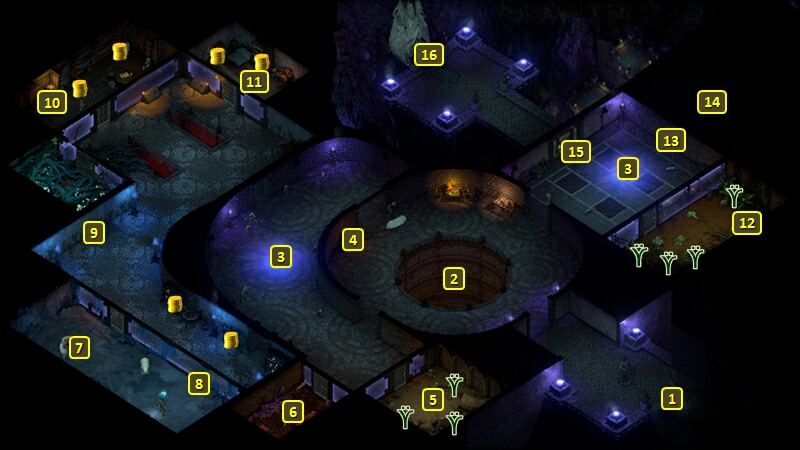
Mirke goes into Stealth mode and lifts the Pet ooze named Ooblit from #9, and the Pet miniature horse named Lucero from #10 without the Librarians noting. But I already have my Pets.
Advanced Wistful Stargazing
Now I go to the room towards the southwest corner, and have Mirke disarm some traps. I also kill an Observer as I now go northwest.
A shelf at #13 has the Flesh Controller Room Key, but I don't need it by now.
Mirke, while in Stealth, lifts a book called Advanced Wistful Stargazing from the shelf at #14. This is the book that Bekarna needs for purposes of the Wasting Minds Quest.
A bookcase at #16 has a Shakily Written Note. I hit a lever at #15 to open at #17.
I return to the lift and #1, and take it to The Enclosures.
That brings me to #16 on the map of The Enclosures.
I go to #11 and give Advanced Wistful Stargazing to Bekarna to advance the Wasting Minds Quest.
I go back to the Lift at #16, and take it to the Hall of Reconfiguration.
Fungal Fertilizer
That brings me to #1 on the map of the Hall of Reconfiguration. I go to the table at #12, which has some Fungus and some Fungicide.
Pallegina makes an Alchemy check of 17 to convert the Fungicide to Fungal Fertilizer. That may come in handy for pursuing a more peaceful avenue down the road.
I also use a little bit of it to obtain 5 Huana Mahe instead of just 3.
*Evil* Fungicide
The evil party of course slaughters the Librarians in the room. Zarathos has no interest in using Advanced Wistful Stargazing to help Bekarna, so he just forgets about it in his inventory after stealing it (which provoked the fight).
He also leaves the Fungicide as is, and will ultimately use it for destructive purposes.
Both the good and evil parties now enter the Assembly of Echoes through the stairs at #11.