-

- Forums
- Chatrooms
- Gallery
- Gameplay Videos
- Upload
- Articles
- Mod Reviews
- Shop SP: Games, Movies, Books
|
|
| Pillars of Eternity 2 Video-Based Walkthrough by David Milward |
The Upper Bowels
Deep Wrangler
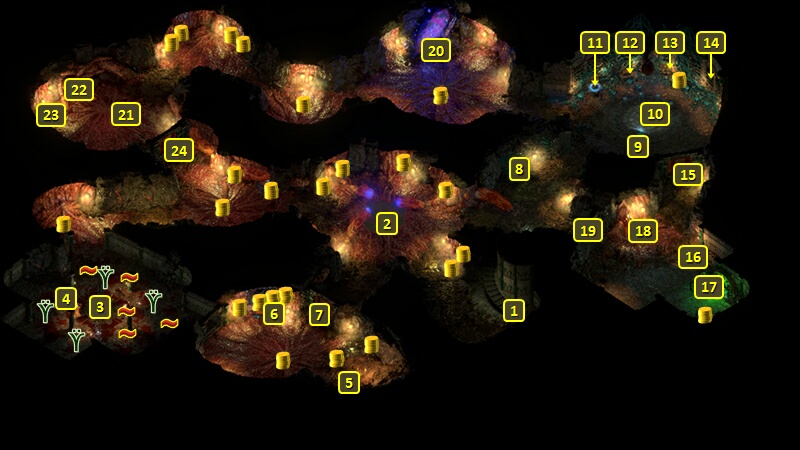
I start off at #1 on the map of the Upper Bowels. I go ahead to #2. There is a pool at #2, where I witness a man get digested alive when three flesh ducts pour bile into it. The objective becomes to close the three flesh ducts.
I go west and approach a room at #3. The room itself has several Scavengers of Visions and Shimmering Dreambeasts led by a Deep Wrangler. It also has some Glyphs that can cause damage and Injuries, and they can't be disarmed. I stay just out of the room and conduct the early parts of the battle spamming Ninagauth's Shadowflames and Stunning Surges on them. I lead the remaining few out of the room itself and hack them down once the numbers have gone down.
I have everybody go east through the room one at a time to avoid the glyphs, and also grab the Outer Godseed Fragment from the pedestal at #4 along the way.
*Evil* Deep Wrangler
I craft 20 Fugue Spores, enough to fill all of Tekehu's quick-item slots. The next upgrade for his The Weyc's Wand requires that he apply 25 Intellect Afflictions on his enemies.
The evil party won't have to worry about the glyphs. They won't be there since I've completed both the Annotated History and Under Observation Quests in ways that favored Tayn over Llengrath.
I have Tekehu start the battle with Nature's Balm, and then an Empowered Within Ngati's Embrace. It's a Chanter Invocation that won't damage the enemies. And it also gives the nearby Xoti the Brilliant Inspiration to get the loop started. She gradually puts up Barring Death's Door for everyone, inserted between castings of Salvation of Time that sustain the loop.
Nobody besides Tekehu gets to do any attacking. He begins by using a Fugue Spore on his weapons, and then making a melee attack against a nearby target. He does this until he runs out of Fugue Spores.
After that, he keeps his distance and attacks only with his The Weyc's Wand. I check over his target each time his Wand attack connects. If it is now Confused (which is an Intellect Affliction), I switch targets to another enemy that isn't Confused. I keep going until Tekehu has only one enemy left. When it gets Confused, I have Tekehu sit still until the Confusion expires before resuming the attack. I keep this process going until Tekehu has literally killed every enemy by himself so as to maximize his chances of applying Intellect Afflictions to his targets. And I can afford to do so with everyone protected by Barring Death's Door infinitely extended by Salvation of Time.
And it's enough for me to get the next upgrade for The Weyc's Wand, Revelating Missiles. It has a 50% chance of unleashing a seal that causes Raw Damage to nearby enemies when the Wand scores a Critical Hit on its target.
The pedestal at #4 has an Outer Godseed Fragment.
*Evil* Alchemical Charge
I show this part just from the perspective of the evil party. Tekehu for this battle replaces Sasha's Singing Scimitar with the Animancer's Energy Blade.
I take the Alchemical Charge from the chest at #5, which provokes the nearby Caretakers into attacking him. I set up the Salvation of Time-Ancestor's Memory loop the old way, first waiting until Ydwin gets enough focus to put Ancestor's Memory on Xoti. The reason being I don't want to use an Empower Point when Tekehu doesn't have Sasha's Singing Scimitar equipped. I gradually get everyone under Barring Death's Door.
The next upgrade for The Weyc's Wand requires the wielder to inflict 500 points of Raw Damage. And again, it doesn't have to be from Revelating Missiles, as long as the wielder somehow personally scores 500 points of Raw Damage on his enemies. So everyone stands pat while Tekehu cuts the Caretakers down one by one with the Animancer's Energy Blade.
That next and last upgrade is Attuned Channel, which boosts the wielder's Power Levels by +3 whenever he or she uses an Empowered attack. And again, Sasha's Singing Scimitar makes that once per Encounter and will be infinitely extended by Salvation of Time.
I use the Alchemical Charge on the flesh duct at #4, which stops one of the flows of bile into the pool at #2.
*Evil* Dreamwalker's Tread
Zarathos easily makes the Alchemy check of 16 to extract the Fungal Ingredient at #8.
There are two Luminescent Spores, along with several Spore-Infested Caretakers and Luminescent Sporelings, in the cave to the northeast. I win by the usual method of flooding them with Dichotomous Spirits and Skeletons from a distance.
A chest at #12 has a pair of boots called the Dreamwalker's Tread. Ydwin wears them for what's left of the game. The obvious benefit is the +2 to Stealth. The +1 to Athletics is sugar on top. I don't really have much use for the Feast of Dreams power, since it's once per Rest. I'll hold onto the Boots of Stealth for Maia.
There will be three bookshelves at #11. Between them they have:
Dreamwalker's Tread
I send Pallegina on by herself so that she can make the Alchemy check of 16 to extract the Fungal Ingredient at #8.
The Luminescent Spore in the northeast cave is friendly towards Alliria, and it even opens the door at #15 for her so I don't have to bother with the Volumes of the History of Eora and the lecterns.
I also grab the Dreamwalker's Tread from the chest at #12. I'll hold onto them for Konstanten.
And I likewise grab the Outer Godseed Fragment from the pedestal at #9.
Antiseptic Cream
I continue south to #16 and defeat several Shimmering Dreambeasts led by the Caretaker Alchemist.
The table at #17 has Antiseptic Cream as well as a note called Fungal Growth Concerns.
There is another flesh duct at #18. I use the Antiseptic Cream and the Fungal Ingredient that I obtained earlier to seal the duct shut. Two out of three now.
I use a lever to open a door at #19.
Fragment of Star Metal
The good party heads to the fallen star at #20. I chip off a Fragment of Star Metal that Bekarna will want.
I'm forced to fight several Celestial Spectres afterwards. I win without much trouble. I could have avoided a fight had I been able to make a Metaphysics check of 15, and then a second Metaphysics check of 20. But I wasn't able to make the second check.
It's just as well, since I also get several gems that they leave behind, including a couple of Emeralds. Having two Emeralds and at least two Adra Ban means I have enough to upgrade a single-handed weapon from Superb to Legendary. I wouldn't have gotten the gems if I had avoided a fight.
Blinky
Now I go west to #21 and fight several Observers, Scavengers of Visions and a couple of Shimmering Dreambeasts. It can be a tough fight because of the multiple rays and beams. Alliria and Aloth keep them locked down with Ninagauth's Shadowflame and Pull of Eora respectively.
There is an observer named Blinky at #23 that you can take as a Pet.
There is also a very large eye at #22. Destroying the polyps to either side of it destroys the eye itself, and closes the last remaining flesh duct.
Now it's time for The Heart of the Mystery.