-

- Forums
- Chatrooms
- Gallery
- Gameplay Videos
- Upload
- Articles
- Mod Reviews
- Shop SP: Games, Movies, Books
|
|
| Pillars of Eternity 2 Video-Based Walkthrough by David Milward |
The Oratory of Wael
Vault Door of the Hand
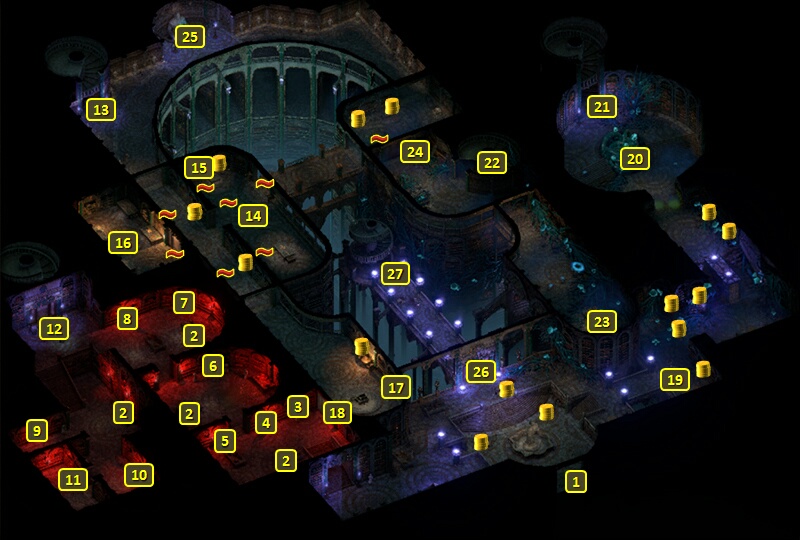
I start off at #1 on the map of the Central Stacks. I use the Incantations of the Hand to open the door at #26. The stairs at #27 lead to The Oratory of Wael.
*Evil* Maura
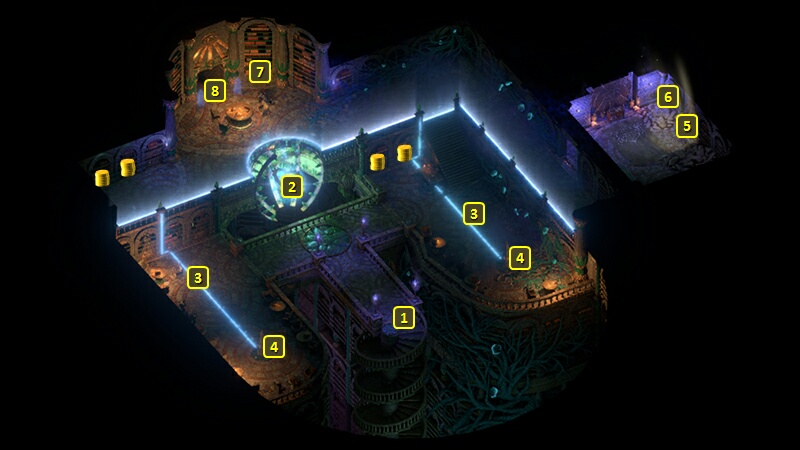
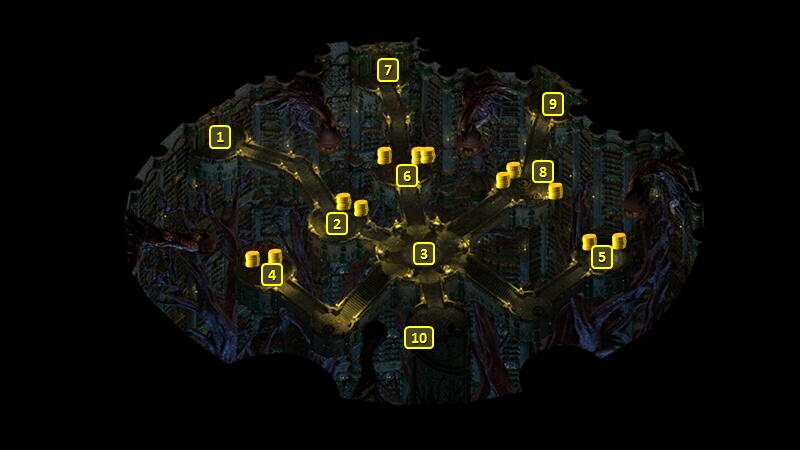
I show this battle from the perspective of the evil party, since it's where I obtain another Soulbound upgrade. I arrive at #1 on the map of the Oratory of Wael. I craft a Potion of Insubstantial Form and equip it in Tekehu's quick-item slot. The reason is that it will help him obtain the next and last upgrade for his Robes of the Weyc.
I on ahead a bit, and Maura lies dead on the floor. Only she rises up as though she were undead, but under the control of the fungus that has infected the Sanctum. A couple of Spore-Infested Librarians join to help her. *NOTE* If I had come here first before confronting the Memory Hoarder in the Assembly of Echoes, I would actually witness the moment of Maura's death when Fyonlecg kills her. I would instead fight Fyonlecg and two Soul Mirrors. And it will turn out that I only defeated a copy of Fyonlecg that resembles a Worm That Walks. It would also mean getting the Mask of the Weyc now instead of later.
But Maura and the Librarians don't participate in the fight, at least not yet. There will be groups of Enchanted Armors at points marked #3. The machine at #2 periodically shoots beams that inflict massive damage. A point in my favor is that it can't shoot beams at right angles to itself. So I run to the corner due west of it. I set up the Salvation of Time-Ancestor's Memory loop, and with Barring Death's Door on everyone, but I don't kill the armors right away. I have a different purpose in mind.
The next upgrade for the Robes of the Weyc requires that enemies Miss the wearer with attacks 25 times. I have Tekehu put himself in harm's way, with the aim of eventually accumulating all 25 Misses in one go and all the while protected by Barring Death's Door. He ingests his Potion of Insubstantial Form to help that along, as it provides a 25% chance of converting a Graze to a Miss. And that benefit will get extended indefinitely by Salvation of Time. I notice sometimes the Enchanted Armors zero in on a different target like Zarathos or Mirke. So Xoti will once in a while use a Withdraw spell on that character to encourage the Armors to switch targets to Tekehu. I eventually have to settle for two of them at least always attacking him.
I wait (quite some time actually), and check periodically, until I confirm that he's gotten his 25 Misses. That's when I actually do kill the Enchanted Armors. I destroy the Obelisk to the south, which is one of two that's empowering the machine.
I go east, avoiding the beam whenever I can, and kill the rest of the Enchanted Armors as well as a couple of Spore Tendrils. I destroy the second Obelisk to the south, and that results in the machine and its beams getting shut down completely.
It is at that point that Maura and her two Librarians show up. I manage to gang up on them to conclude the fight. Maura leaves behind Maura's Grasping Belt. It allows use of Maura's Writhing Tentacles once per Rest. Perhaps its real point is that it provides +1 Engagement through the belt slot, which may be of interest to character builds focused on maximum Engagement.
Tekehu gets the last upgrade for his Robes of the Weyc, Omnipotence. It provides the Brilliant Inspiration (+5 Intellect, +1 Power Levels, +1 class resource per 6 seconds) to all nearby allies on using an Empowered ability. It becomes my preferred way of setting up the Salvation of Time-Ancestor's Memory loop whenever I can pull it off, as it will mean everyone in the party recoups their resources, not just Xoti. It also means I don't have to wait on Ydwin to get to 70 Focus to begin the set up. And yes it's once per Encounter because of Sasha's Singing Scimitar, and everyone will have it extended infinitely through Salvation of Time.
Ydwin somehow got knocked unconscious near the end of the fight. I decide to concoct a Luminous Adra Potion, which she ingests to remove her Injury. A Luminous Adra Potion is the recourse for removing Injuries during a no Rest run. But only as a last resort. I strive to win every battle without Injuries whenever possible, because Luminous Adra Dust as the base ingredient is not available in infinite supply. But I do so in this instance because I don't want to undo my progress through a quick-load. Or more plainly I don't want to grind for Misses for Tekehu's upgrade all over again.
Maura
Alliria is able to avoid a fight with Maura as she reached a peaceful understanding with the Giant Luminescent Spore. She still has to avoid confrontational dialogue choices, and make a Diplomacy check of 17 to keep Maura from going hostile. A Metaphysics check of 15 would have worked too.
A Rising Star
The good party now "Waits" until Evening. I then click on the pedestal at #5 and place Bekarna's Depleted Grimoire on it. It gets replaced with Bekarna's Celestial Grimoire as a Quest Item. I go back out the door at #1.
That brings me to the door at #25 on the map of the Central Stacks. I go back out the door at #1.
That brings me to the door at #12 on the map of the Temple of Revelation.
I speak to Bekarna at #10, and give her Bekarna's Celestial Grimoire. She gives me 5,000cp and 11,000+ xp as rewards to complete the Quest called A Rising Star.
She now wants me to find a fragment of starmetal for her. That request starts the Out of Eternal Horizons Quest.
I thereafter return to The Oratory of Wael the way I came.
*Evil* Annotated History
I show this part from the perspective of the evil party, as it involves another Soulbound upgrade.
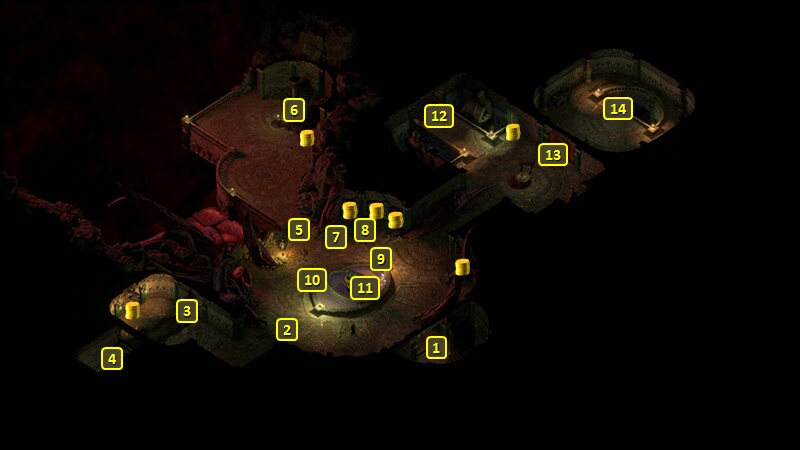
I go to the bookcase at #6, and take the Memoirs of Heldr. Simply grabbing it is the requirement for the first upgrade for Tekehu's The Weyc's Wand, Muddling Bolts. A Hit with its attacks have a 25% chance to cause Confused on the target.
I go to the bookcase at #7 and grab The Sacrifice the Eyeless Face Demands. That completes the Annotated History Quest, which earns 15,000+ xp. I go through the door at #8 to enter the Scriptorium.
*Evil* The Trephine
I start off at #7 on the map of The Scriptorium. Llengrath and Tayn will now be at #3, and arguing with each other as always, now that I've completed both the Annotated History and Under Observation Quests.
But first things first. I place the Memoirs of Heldr on the lectern at #5. Now all the candles around the sarcophagus at #6 are lit. A small shield called The Weyc's Oracular Focus will now be within the sarcophagus. I can see it as fitting within some builds, especially those built around using Empowered abilities. But it didn't fit into any of my plans.
The Trephine
The good party gets the Quest called The Seeds of Deception from Llengrath instead, as they did the Annotated History and Under Observation Quests in ways that favored her.
Both the good and the evil parties now click on the Trephine at #3. I need the memory obtained from the Memory Hoarder at the conclusion of the Under Observation Quest, and then I need to sacrifice the knowledge of how to use the Trephine. Those together open up stairs at #10, which lead to The Upper Bowels.