Pillars of Eternity 2 logo


Pillars of Eternity 2 Online Walkthrough by David Milward

INTRO & ABOUT | CHARACTERS | COMBAT AND RULES | ITEMS | SHIPS
Quests | Areas | Mega Bosses
Disable all ads!

Main Game: Main Quests | Character Quests | Side Quests | Tasks | Bounties
Faction Quests: Huana | Principi | Royal Deadfire Company | Vailian Trading Company
Expansions: Beast of Winter | Forgotten Sanctum | Seeker, Slayer, Survivor

Forgotten Sanctum Main Quests: Hidden Depths | Annotated History | Under Observation | The Inner Mysteries
Forgotten Sanctum Side Quests: A Shout in the Dark | Wasting Minds | A Rising Star | Out of Eternal Horizons | Root and Branch | The Seeds of Deception

Annotated History

Temple of Revelation

  1. This Quest starts on completion of the Hidden Depths Quest. You'll have a conversation with Tayn and Llengrath when you first enter the Temple of Revelation. Your goal is to search for their colleague, Maura. Tayn also gives you Maura's Field Notes.

  2. The stairs at #10 lead to The Central Stacks.
  3. The Central Stacks

  4. You'll now be at #1 on the map of The Central Stacks. A Librarian informs you that there are rules against going to the upper levels, and against taking any books from the archives and libraries.

    He will also confirm that a tall woman went to the Quarantined Section, and was pursued by a masked man, if asked about it.

  5. The next key objective is to open the door at #26. And there's three pathways to do it.
  6. Pick the Lock

  7. You can pick the lock on the door if you can manage a Mechanics check of 26. Failing the check results in losing any Resting bonuses that may be in place.
  8. Restricted Section

  9. Keep in mind that taking any books from the shelves will result in the Librarians going hostile and attacking you. You can slaughter them if you like, but future dialogue during the expansion can be different can differe depending on whether you kill them or let them live.

    The stacked books at points marked #2 can be tipped over. Nearby Librarians will converge on the fallen books to put them back on the table. That can buy your Stealth character a window to steal the books you need undetected.

  10. The books you need for this pathway are the The History of Eora, Volume II: The Tribe of the People of the Deer at #6, and The History of Eora, Volume IV: The Founding of Readceras at #8.

  11. Go to the room at #12. The door on the north side of the room is magically sealed. Before the door will be a rune device flanked by two lecterns. The lecterns themselves provide clues as to what needs to be placed on them.

    Place The History of Eora, Volume IV: The Founding of Readceras on the left lectern, and The History of Eora, Volume II: The Tribe of the People of the Deer on the right lectern. Now click on the rune device to open the door.

    The stairs on the other side of the door lead to the Restricted Section at #1.
  12. Restricted Section

  13. The Librarians in the Restricted Section are all hostile. They will also turn some of the statues in the level into Enchanted Armors that fight alongside them if they attack you. You could slaughter them. But it can also change the dialogue during the expansion if you can sneak around them and get what you need without killing them.

  14. The books you now need to get are The History of Eora, Volume V: The Great Orlan Empire at #2, The History of Eora, Volume X: The Man Who Would Be Skaen at #4, The History of Eora, Volume IX: The Birth of Engwith at #8, and The History of Eora, Volume VII: The Three Body Agreement at #9.

  15. The rune device at #10 is protected by a Librarian. If he spots and attacks you, he will be aided by a Naga Marauder, a Steelspine Warrior, an Ancient Fampyr Priest, and a Steelclad Construct. He will leave behind Shea's War Staff should you defeat him.

    There will be two lecterns to its left, and two lecterns to its right. The correct placement of books on the lecterns from left to right is The History of Eora, Volume VII: The Three Body Agreement, The History of Eora, Volume X: The Man Who Would Be Skaen, The History of Eora, Volume IX: The Birth of Engwith and The History of Eora, Volume V: The Great Orlan Empire.

    Now use the rune device itself to open the door at #11.

    The stairs at #12 lead to The Central Stacks at #13.

  16. The statue at #25 has the Incantations of the Hand. Taking it in plain view of the nearby Librarians will cause all of the Librarians to go hostile and attack you. You can avoid that by having a character take it while in Stealth mode.

  17. The switch at #17 can be used to open the door at #18.

  18. Now use the Incantations of the Hand to open the door at #26. The stairs at #27 lead to The Oratory of Wael.
  19. The Central Stacks

    Quarantined Section

  20. There will be several Spore Infested Librarians at #19 who attack on sight.

    One item that they leave behind will be Log: Subject K-1121's Confiscated Possessions, which indicates that Bekarna was taken captive.

    Another item they leave behind is The Annals of Llengrath, Volume I of V. Picking it up starts the Root and Branch Quest.

  21. You'll get attacked by several more Spore Infested Librarians at #20, along with Luminescent Sporelings and a couple of Spore Tendrils.

    There will also a large fungus outgrowth. You can interact with it during a scripted interaction, but the option to strike it doesn't accomplish anything.

  22. The stairs at #21 lead to the Quarantined Section at #1.
  23. Quarantined Section

  24. The Giant Luminescent Spore is at #7. You can attack it if you wish. It will leave behind Maura's Infested Grimoire and the Spore Encrusted Key.

    You can also try to reason with it. You first need to get a foot in the door, either with a Diplomacy check of 23, a Survival check of 18, or giving it the Fungal Fertilizer if you previously obtained it from the Hall of Reconfiguration. An alternative conversation pathway opens up if you have previously obtained all of The Annals of Llengrath, Volume I of V, The Annals of Llengrath, Volume II of V, The Annals of Llengrath, Volume IV of V and The Annals of Llengrath, Volume III of V. The acquisition of those Volumes overlaps with the completion of the Root and Branch Quest.

    Any of those three branches requires a follow up. The dialogue option of "Feel free to grow on Wael. I'm not here to stop you." will leave open the possibility of allowing the Spore to grow on Wael's body at the end of the expansion.

    Either an Alchemy check of 15 or a Survival check of 15 can convince the Spore to share a symbiotic connection with you. That in turn requires a Resolve check of 12 to successfully ingest the symbiote. If you can complete those steps, it opens up the possibility of having the Spore infest Wael's body at the end of the expansion.

    *NOTE* There is also an option to weaken the Giant Luminescent Spore at the same time these options appear, and if you previously obtained the Fungicide from the Hall of Reconfiguration. You can now offer the Fungicide to the Spore and then select a dialogue option to attack it, although I don't know exactly what effect it has on the Spore.

    Coming to an understanding with the Spore with respect to Wael's body or sharing a symbiote convinces it to willingly give you Maura's Infested Grimoire and the Spore Encrusted Key.

  25. You can now use the Spore Encrusted Key to open the door at #11. The stairs at #12 lead to The Central Stacks at #22.

  26. There will be a lot of Spore Infested Librarians and Luminescent Sporelings in the room at #23 of The Central Stacks. They will attack if you killed the Giant Luminescent Spore in the Restricted Section. But they will let you pass freely if you reached a peaceful understanding with the Spore.

    The sarcophagus in the room has Aretezzo's Cane.

  27. The door at #24 can be opened with the lever to its right, and from the south side.

  28. The statue at #25 has the Incantations of the Hand. Taking it in plain view of the nearby Librarians will cause all of the Librarians to go hostile and attack you. You can avoid that by having a character take it while in Stealth mode.

  29. The switch at #17 can be used to open the door at #18.

  30. Now use the Incantations of the Hand to open the door at #26. The stairs at #27 lead to The Oratory of Wael.
  31. The Oratory of Wael

  32. Oratory of Wael
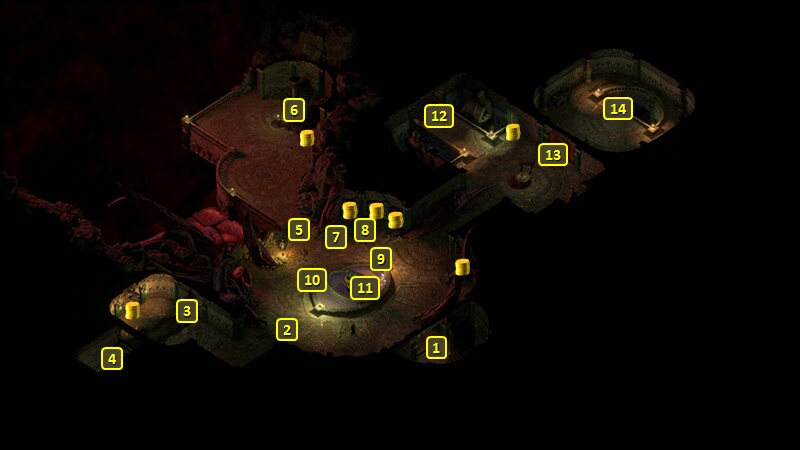
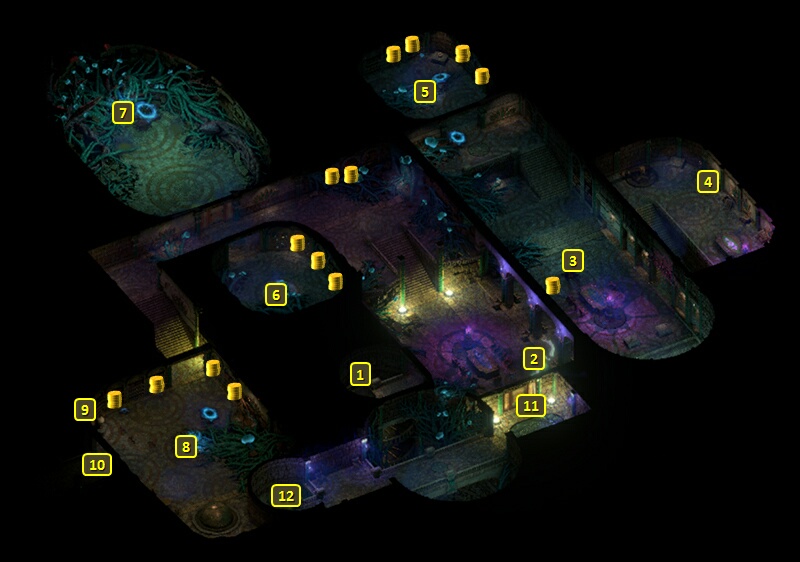
You'll start off at the stairs at #1. Step ahead towards #2. and you'll face a new foe. If you completed the Under Observation Quest before coming here, Maura will already be dead. But she'll emerge under the control of the spore colony that has infested the sanctum, and attack you. *NOTE* However, you can avoid a fight with Maura if you reached a peaceful resolution with the Giant Luminescent Spore in the Quarantined Section. Avoid dialogue options that provoke a fight, and then make either a Diplomacy check of 17 or a Metaphysics check of 15 when both become available.

    If you came here without having completed the Under Observation Quest, you'll witness an argument between Maura and a masked Wizard named Fyonlecg. Fyonlecg will kill Maura and then attack you.

    Either Fyonlecg or Maura will retreat to near the door at #8. Several Enchanted Armors will guard the power conduit at #3 and to the left of the machine at #2. A few more Enchanted Armors will also guard the power conduit at #3 and to the right of the machine. If it's Fyonlecg who attacks, there will also be a couple of Soul Mirrors who can cast Wizard spells near the power conduit to the right. It it's Maura who attacks, it will be a couple of Spore Tendrils near the power conduit to the right.

    The machine at #2 will periodically fire beams of energy, as shown in the screenshot. They can do tremendous damage. But they only fire at fixed angles. In fact, you can keep yourself completely safe from the beams by huddling near either of the points at #3 but either straight left or straight right from the machine. The beams won't fire at straight left or straight right angles. So you can fight the Enchanted Armors without worry at either of those blind spots.

    The next step is to take out the Power Conduits at points marked #4. Missile weapons will work. Taking both of them out renders the machine inoperable, and it won't be able to fire beams anymore.

    But that also means either Fyonlecg or Maura will arrive to attack you. If it's Fyonlecg, he'll be helped out by a couple of Soul Mirrors. If it's Maura, she'll be helped out by a couple of Spore Infested Librarians. But the hard part will be over and done with, and you can use Interrupts or anything else you have to disrupt their spellcasting.

    If it was Fyonlecg you killed, you can examine his body during a scripted interaction. You can take The Mask of the Weyc from his corpse. Only his body gets revealed to be a clone composed of worms, like as a Worm That Walks.

    If it was Maura, you'll run into Fyonlecg at a later time and get the Mask then. Maura will leave behind Maura's Grasping Belt.

  33. The bookcase at #7 has The Sacrifice the Eyeless Face Demands. Obtaining it earns 15,000+xp and completes the Quest.

  34. If you have already completed the Quest called Under Observation Quest when you complete this one, having completed both Quests triggers The Inner Mysteries Quest.

Amazon.com
Amazon.ca
Amazon.co.uk
Sorcerer's Place is a project run entirely by fans and for fans. Maintaining Sorcerer's Place and a stable environment for all our hosted sites requires a substantial amount of our time and funds on a regular basis, so please consider supporting us to keep the site up & running smoothly. Thank you!

Disable all ads!