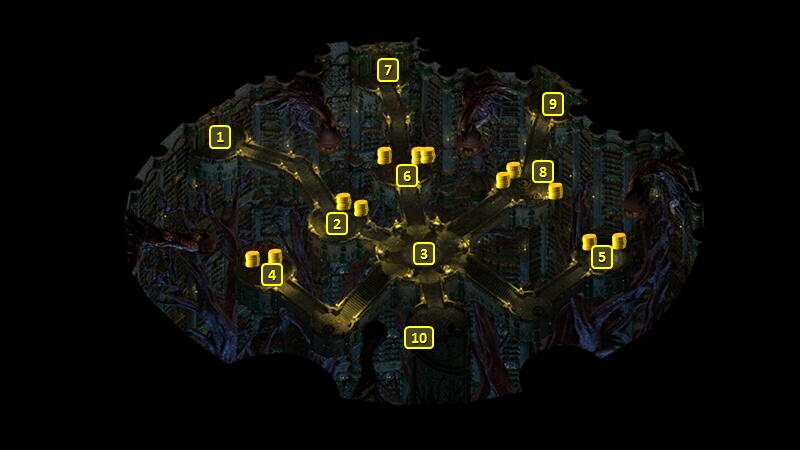
This Quest starts on completion of both the Annotated History and Under Observation Quests. Tayn and Llengrath will now be at #3 in The Scriptorium. The goal is now to make your way deeper inside the titan body of Wael, and make a decision on what to do about it.
Click on the Trephine at #3. You'll now be able to use the memory you obtained from the Memory Hoarder during the Under Observation Quest to open it. You will also have to sacrifice that same memory upon opening it, which means you can only use the Trephine once. After that, stairs will appear at #10 that leads to the Upper Bowels at #1.
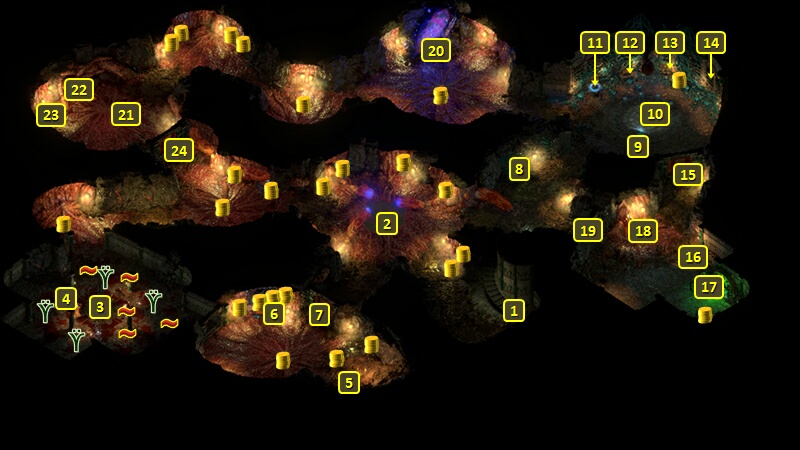
The Memory Siphon is at #3 in the southwest corner. The Deep Wrangler guards it, along with several Shimmering Dreambeasts and Scavengers of Visions. The traps in this room are actually magical glyphs that can cause Injuries and cannot be disarmed. It may be advisable to overpower the Wrangler and her minions through ranged combat (i.e., missile weapons and spells) first. You can safely walk around the glyphs afterwards.
However, the glyphs won't be in the room if you completed the Quest called A Shout in the Dark in a way that favored Tayn.
The chest at #6 has the Alchemical Charge. The Caretakers in the chamber will attack you if they catch you taking the items while not in Stealth mode.
Use it to destroy the duct at #6. The Caretakers will definitely go hostile after that.
The door at #7 can now be opened by pulling on the level next to it.
The Fungal Ingredient is at #8. You need to make an Alchemy check of 16 or a Sleight of Hand check of 18 to obtain it safely. Grabbing it without making a check means you'll still get it, but the Watcher will suffer the Acute Rash (-5 Fortitude, -3 Corrosive Armor Rating) Injury as a result.
There will be a rune device at #12. It is surrounded by four lecterns, two to its left and two to its right.
There will also be two Luminescent Spores, as well as several Infected Caretakers and Luminescent Sporelings, that will attack you.
*NOTE* If you previously reached a peaceful understanding with the Giant Luminescent Spore in the Quarantined Section, the Luminescent Spores and their minions here won't attack you. In fact, they'll open the door at #15 for you.
There will be The Bowels Alchemist and a few Shimmering Dreambeasts who will attack on sight once you enter the chamber at #16.
At #18 is another of the ducts that keeps the pool at #2 filled with bile. Use the Antiseptic Cream from #17 and the Fungal Ingredient from #8 on it. The liquid going through it will solidify and block the duct itself.
This door can only be opened with the lever on the east side of it.
The chamber at #22 will have several Shimmering Dreambeasts, Scavengers of Visions and Observers that will attack you on sight.
There will be a very large eye at #23, flanked by two Polyps. Destroy the Polyps to destroy the large eye as well. That will both stop one of the ducts from pouring bile into the pool at #2, and open the door at #24.
Stop all three ducts and the pool at #2 will now be clear of any bile. Going down it now leads to The Heart of the Mystery at #1.
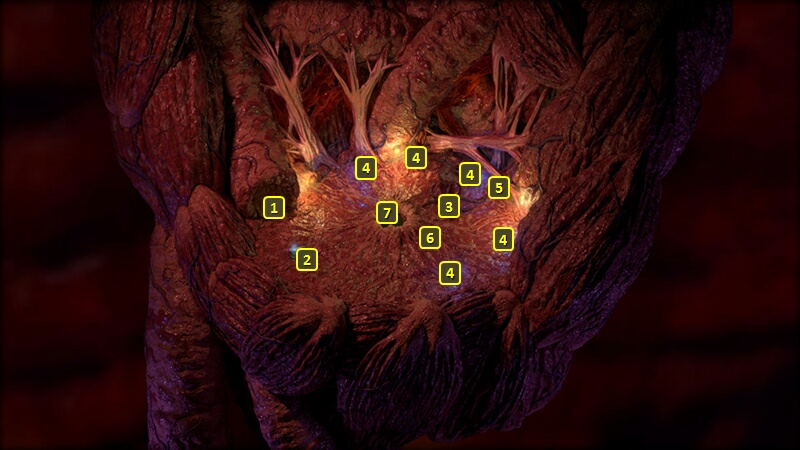
You'll be treated to a cutscene on arrival of the Oracle of Wael absorbing the Wizard named Fyonlecg. A battle with the Oracle now becomes inevitable.
Remember when it could shoot eyebeams at you during your first encounter with it? It still has those powers, but now it also has access to Fyonlecg's spell powers. And that means it will frequently dish out spells like Gaze of the Adragan and Wall of Many Colors among others. Those two spells in particular can hold party members still for extended periods of time.
Soul Mirrors and Scavengers of Visions will frequently arrive to assist it as well.
At the bare minimum, strategies against the Oracle boil down to two or three themes. Having your party members use either Arcane Reflection spells or Potions of Imperfect or Improved Reflection throughout the fight. The beams will frequently damage the Oracle instead of your party members, and that goes a long way to tipping the scales in your favour. Second, use any and every ability at your disposal that is capable of Interrupt, or otherwise preventing its spells from going off (i.e., if they can knock it Prone for example). That can include spells like Concelhaut's Crushing Doom (which can be cast more than once and makes repeated attempts at knocking its target down), or melee abilities that Interrupt like those of a Fighter, Monk or Rogue. Third, try and take out the Soul Mirrors and Scavengers quickly if you can. The damage they can dole out with their spell powers, in addition to the Oracle's powers, can add up in a hurry. Note that even if you reduce the Oracle to zero Health, you still have to deal with its remaining minions to win the fight.
Now you'll have a dialogue with Wael the deity. You have a say in the fate of at least the Oracle and Wael's titan body. And your choice will have repercussions for the ending slides of the game.
Let the body sleep - You can convince Wael to let the body sleep with a dialogue option based on being a Priest of Wael, an Arcana check of 13, or a Diplomacy check of 16. Wael will then tell you to spare the Oracle.
Kill the body - You can convince Wael to kill the body by reminding it that the titan bodies of the Gods once nearly destroyed the world. Wael will tell you to kill the Oracle.
Convince Wael to use the body against Eothas - You can convince Wael if the Watcher is a Priest of Wael, an Arcane check of 12, or using the dialogue option that starts with "You should really use the body ..." followed by a Metaphysics check of 18 or a Religion check of 10 or a dialogue option based on having 2 points of Clever disposition. Wael will tell you to kill the Oracle.
Let the fungus colony have the body - Only possible if you reached a peaceful understanding with the Giant Luminescent Spore in the Quarantined Section. Requires either a dialogue option based on being a Priest of Wael, an Arcane check of 13, or a dialogue option that ends with "... might as well let the spores claim it" followed by a Bluff check of 13 or a Religion check of 19 or a Streetwise check of 7. Wael will tell you to kill the Oracle.
Give the body to Concelhaut - Requires having Concelhaut's Skull in your inventory.
If you follow through and kill the Oracle, its dead body will leave behind an Amulet called Weight of Revelation and the Ring of Clenched Muscle. You won't get the items if you let it live.
Deciding the fate of the Oracle, one way or another, completes the Quest. The party will earn 16,000+ xp.
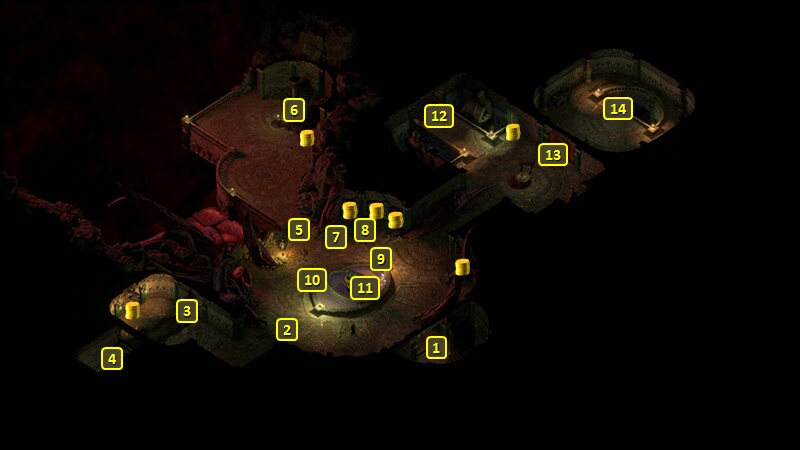
The dead body of Fyonlecg will be at #6. It will have at least Elementalist's Bracers and a few other items.
Sorcerer's
Place is a project run entirely by fans and for fans. Maintaining
Sorcerer's Place and a stable environment for all our hosted sites requires a substantial amount of our time and funds on a regular basis, so please consider supporting us to keep the site up & running smoothly. Thank you!
Supporting Sorcerer's Place
Has Sorcerer's Place been useful? If you'd like to show your appreciation
for our hard work on the site, and help us pay the bills the site generates
every month, please consider helping support SP.
Thank you!

 You'll be treated to a cutscene on arrival of the Oracle of Wael absorbing the Wizard named Fyonlecg. A battle with the Oracle now becomes inevitable.