-

- Forums
- Chatrooms
- Gallery
- Gameplay Videos
- Upload
- Articles
- Mod Reviews
- Shop SP: Games, Movies, Books
|
|
| Pillars of Eternity 2 Video-Based Walkthrough by David Milward |
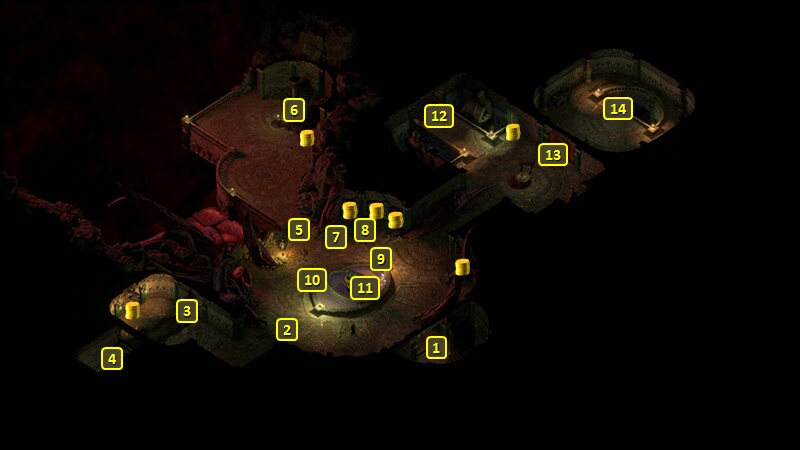
The Enclosures
Handwritten Note
I arrive at #1 on the map of The Enclosures. Alliria switches over to Modwyr and The Eye of Wael. She also switches to the Iron-Clasped Grimoire. She also uses Concelhaut's Skull as the alternative pet.
I go ahead to #2, where a prisoner tries to hurl himself into a screaming pit only to be stopped by a Vithrack.
A table at #4 has the Handwritten Note, where a prisoner describes the gradual loss of all memories.
There will be a few Vithracks in the room to the west. I huddle the party at the door a little south of #4. Alliria goes ahead a little bit to get the attention of one of them, and then regroups with the rest of the party. The Vithrack come in collectively through the door. That has two benefits. One is that they're now bunched together for Mirke to spam Stunning Surges on them. The other involves the Vithrack Luminary, who can cast high-level Wizard spells. Forcing him to come through the door brings him within range of Concelhaut's Crushing Dooms cast by Alliria.
Slender Jim
I go to the cell at #6, and defeat a Shimmering Dreambeast. It has an attack that resembles the Monk's Whispers in the Wind, and it can split itself into fragments as it nears death. I don't have much trouble with it though. A pet Dreambeast called Slender Jim will also be in the cell.
There will be a few Xaurips and Grubs in the cell at #5. But they won't fight back even when attacked, and don't have anything of value, so I don't bother. I do collect a few Plants from the cell though.
Auntie
Alliria now switches to Magran's Favor and Sun and Moon and Zandethus' Dragon-Scaled Grimoire. Aloth switches to Jernaugh's Careful Calamities. I also "Wait" until Morning.
The cell at #7 has several Rimebound Rathun, several Snow Bears, and an especially large Snow Bear called Auntie. They're all vulnerable to Burning Damage, so I set up crowd-control at the door, and spam Stunning Surges and Fireballs on them.
A crate has a ring called Whispers from the Depths, which I'll hold onto for Fassina.
A table at #9 has the Enclosures Lift Access Key.
*Evil* Auntie
The evil party wins this battle handily through its usual methods. I also have the Whispers from the Depths in mind for one of the ship combatants.
Bekarna
There's some pirates in the cell at #10. Mirke sneaks around and grabs some items, including the Sharply Written Note that suggests that Citzal the Archmage was himself imprisoned here.
I now speak with Bekarna in her cell at #11. I start off with the Benevolent option of giving her a Sapphire, of which I now have enough to spare, and get an Adra Ban in return which I will soon use.
Speaking to her at length also reveals that something is wrong with her and her memory. The conversation starts the Wasting Minds Quest where the objective is to cure her malady.
*Evil* Although Zarathos speaks to her briefly, he has no intention of saving her and will leave her to rot.
Carefully Scribed Note
There will be a few more Vithracks in the northeast room. Alliria goes back to her Concelhaut's Crushing Doom set up again. I lure the Vithrack out the door and use the same strategy as for the other Vithracks, where the Luminary gets taken out with the Crushing Dooms.
Alliria switches again to her standard fire-based set up. The cell has a few Bog Oozes and Bog Lurkers led by a Vicious Menpwgra. Alliria and Aloth buff up to the max and sustain those buffs with Walls of Draining in a familiar strategy.
A corpse in the room has the Carefully Scribed Note.
Dragon Skeleton
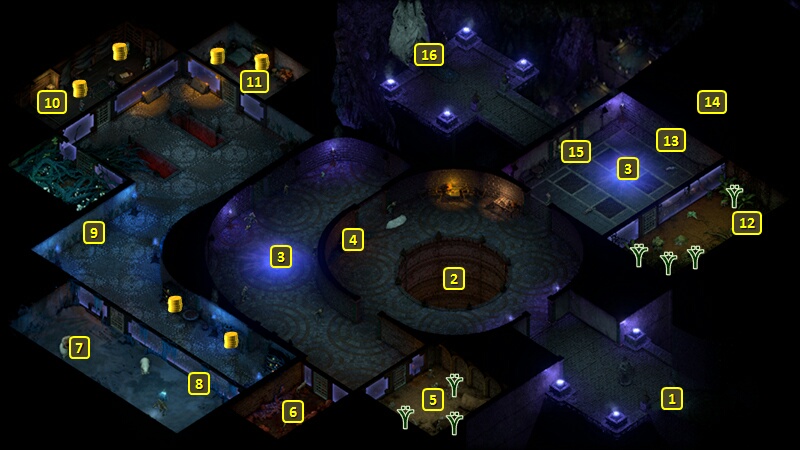
The hidden door at #13 can be opened one of three ways:
That brings me to #4 on the map of the Temple of Revelation. An Imp named Drowsy Puke is at #7. He offers tavern services, including being able to switch other companions and sidekicks in and out.
I use the Magma Dragon Gizzard Stone to upgrade The Willbreaker wielded by Konstanten from Superb to Legendary. Doing it that way avoids having to spend four Adra Ban and four Emeralds that I don't have.
I give the Whispers from the Depths to Fassina. It has a 30% chance on scoring a killing blow to provide Acute (+5 Intellect, +1 Power Levels) for 8 seconds. It's an alternative item and possibility for gaining an Intellect Affliction in addition to the Shroud of the Phantasm. And that is to say that both items together maximize the probability of Fassina gaining at least +5 Intellect and +1 Power Levels during ship combat.
I use the Sea Dragon Scale to upgrade the Casita Samelia's Legacy Breastplate worn by Ydwin from Exceptional to Superb. And again that avoids having to use Adra Ban to do it. It admittedly took a long time, but I didn't mind when it comes to somebody who's primarily a ship combatant. I then spend two Rubies and Sapphires to upgrade it further from Superb to Legendary.
I then spend two Adra Ban and two Emeralds to upgrade Scordeo's Edge wielded by Serafen from Superb to Legendary.
I go back through the stairs at #4.
*Evil* Dragon Skeleton
Tekehu makes the Explosives check to open the door.
I use the Magma Dragon Gizzard Stone to upgrade Eder's axe, Amra, from Superb to Legendary. And again, for a two-handed weapon it avoids having to spend four Adra Ban and four Emeralds that I don't have.
Rekke gets the Whispers from the Depths in the evil party. It has a 30% chance on scoring a killing blow to provide Acute (+5 Intellect, +1 Power Levels) for 8 seconds. And that +1 raise of Power Levels will enhance the powers of Lord Darryn's Voulge in combination with his Deltro's Cage armor.
Both the good and evil parties return to The Enclosures through the door at #4. They then use the Enclosures Lift Access Key to open the door at #15, and then use the Lift at #16 to reach the Spun Terrace.