-

- Forums
- Chatrooms
- Gallery
- Gameplay Videos
- Upload
- Articles
- Mod Reviews
- Shop SP: Games, Movies, Books
|
|
| Pillars of Eternity 2 Video-Based Walkthrough by David Milward |
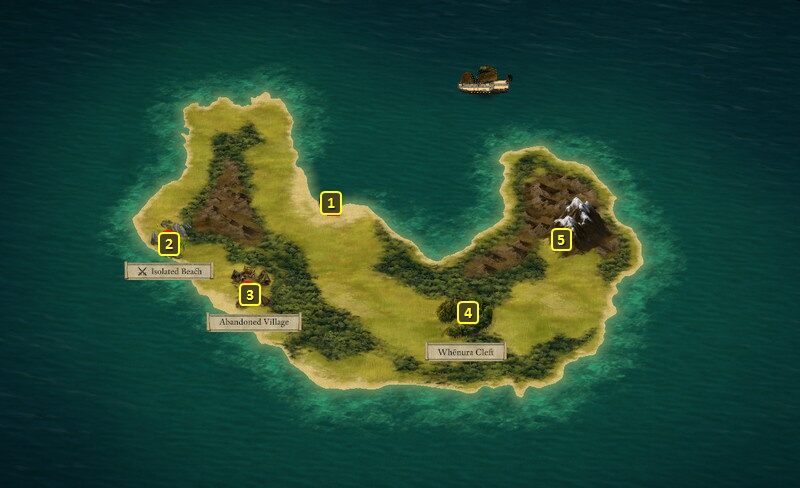
Cleft Island
*Evil* Grisundr
The evil party sails north and boards a Rathun Longship named Grisundr. I easily slaughter its crew led by Kratunos.
I thereafter sail east to reach Cleft Island at #41.
Isolated Beach
I begin at #1 on the map of the Cleft Island. I go to the Isolated Beach at #2. It has several Coral Naga led by a Coral Naga Shaman inhabiting it. They also have a Sigil of Pain set up.
You can choose to scout ahead, allowing you to sneak up on the Coral Naga. The potential drawback is that you likely have to get past the Sigil of Pain to get close to them. Protecting yourself beforehand with a Sigil of Pain Wardstone can negate that.
A Chanter or Druid can identify the Sigil beforehand. Alliria identifies it with a combined Arcana 10 and Religion 14 check. That allows me to destroy the Sigil outright, although that alerts the Naga to my presence and begins combat immediately. I win the fight very easily.
Xoti gains two abilities on her 16th level-up. One of them is Resonance, which allows a Monk to add Resonance to a creature on each strike landed on that creature. The Monk may unleash that Resonance at a time of his or her own choosing, resulting in 15 points of Raw Damage per Resonance. It is a game changer against very powerful bosses.
The other is Razor's Edge. It's a passive that adds +1 Accuracy for each Wound that the Monk has.
An Abandoned Village is at #3. I obtain Boots of the White. Xoti wears them for the rest of the game. The +2 to Freezing Armor Rating helps offset the penalty to the same that comes with wearing Fleshmender. The Resistance to Dexterity Afflictions and +1 Resolve are good benefits to have too.
*Evil* Isolated Beach
Tekehu gains four abilities on his 16th level-up after the battle.
He automatically gains Not One Foe Was Spared Amira's Wrath as a Stormspeaker. It's the equivalent of the Wizard's Chain Lightning spell, but one that a Stormspeaker can use.
He automatically gains Watery Double, which is the Watershaper's version of Substantial Phantom. It will inherit all of Tekehu's equipment, including his weapons.
He selects Improved Critical. The bonus 10% Damage for Critical Hits also applies to Critical Hits scored with damaging spells, which definitely makes it a welcome passive for Tekehu.
He also selects Rot Skulls. It's a summoned weapon that only occupies the main-hand weapon, leaving the off-hand free for another weapon or a shield. Its initial impact scores Crushing Damage on a single target. It then unleashes the Rot Skulls condition on any enemies within a small area-of-effect, which inflicts Corrosive Damage over time. The idea is that for very long fights I can cast this spell, then summon a Watery Double that will have the Rot Skulls equipped, and then Tekehu can use his Shark Spiritshift on himself.
Mirke gets the Boots of the White in the evil party. The +1 to Resolve raises her Deflection. The +2 bonus to Freezing Armor will stack with her other Armor Rating bonuses. The Resistance to Dexterity Afflictions is a welcome defensive bonus as well.
Whenura Cleft
I return to the ship and switch out Xoti for Konstanten and return to the island.
I travel to the Whenura Cleft at #4. Mirke makes a Survival check of 11 that reveals no immediate threats to the party. Aloth makes a History check of 13 to deduce that the rope spanning the Cleft is of Dyrwoodan make.
Konstanten makes an Athletics check of 12, followed by another Athletics check of 14, to safely get the party along the rope and to the other side of the Cleft. There is a real danger of the party dying if you fail the checks.
I come across a tree on the other side of the Cleft, with dead Aumaua bodies hung from the branches. A few of the Crew Members now appear after I've reached the other side of the Cleft. At least one of them will want to loot the bodies.
Commanding them to depart post haste for the ship, which earns Aggressive and Passionate disposition, results in a -5 loss of Morale.
Alliria asks them what they're doing in the Cleft, and then uses the Benevolent option that obliges them to bury the bodies. That won't increase or decrease Morale. However, it results in one of the Crew Members giving her the Footprints of Ahu Taka. Pallegina wears them for the rest of the game. The +2 to Dexterity will help her Recover a little faster between actions, and that can help her use Lay on Hands or her Chanter Invocations a little sooner during tense situations. The +10% bonus to Healing provides yet another bonus that will augment her passive healing auras such as Ancient Memory and Exalted Endurance among others.
Alliria uses her Watcher powers to learn what happened. Dyrwoodan raiders murdered the Huana Druid, broke the staves of the Elders, and hung the villagers from the tree.
If you did not previously oblige the Crew Members to bury the dead bodies, you can now do so yourself or burn the bodies. Either action will at this point lead to you finding the Footprints of Ahu Taka yourself.
The good party makes its way to the entrance to the Collapsed Coal Mine at #5.
*Evil* Whenura Cleft
I switch out Tekehu for Rekke when I briefly return to the ship on my way to the Cleft.
Mirke makes the Athletics checks to get the evil party across the Cleft.
Zarathos chooses the dialogue option that earns Stoic and Shady disposition and allows his Crew to loot the bodies, and results in a +5 Morale boost for them.
Xoti gets the Footprints of Ahu Taka in the evil party. The +2 to Dexterity helps to reduce her Recovery Time that much more, which is crucial for when she wants to keep peeling off Salvation of Time, and may want to sneak something like Blade Turning or another Barring Death's Door in between castings of Salvation of Time. The +10% Healing will enhance her use of her Restore spells. The bonus 2nd-tier Priest spell makes possible another Withdraw should she need to use it.
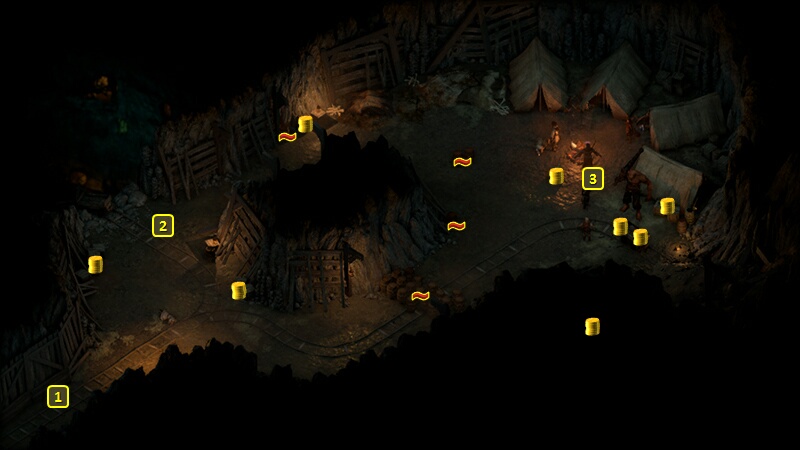
Collapsed Coal Mine
I start off at #1 on the map of the Collapsed Coal Mine. I go on ahead, and overhear an argument between the raiders that have now occupied the Mine. Alliria sets up with the Iron-Clasped Grimoire and Concelhaut's Skull.
I go on ahead to #2, and kill the Wizard named Eccea. She leaves behind two items of note.
One of them is Eccea's Grimoire. It provides an interesting mix of crowd-control and combat-buff spells. But it doesn't move the needle for me at this point, as Aloth has both Jernaugh's Careful Calamities and Llengrath's Martial Masteries. And both were available much earlier.
The other is a Pistol named Eccea's Arcane Blaster. Mirke now equips it in the main-hand of her secondary gun set, which is now complete as I want it. Its projectiles score Raw Damage, which already makes it ideal for use against powerful single targets. I also activate Imbued Ammunition, which adds bonus Corrosive or Crushing Damage, but with a Recovery Time Penalty. I gladly spent two Adra Ban to add Elemental Shot: Force. The Pistol now has a 20% chance to Knockback and Interrupt its target, which will come in handy against powerful bosses. I don't bother with Fractured Bullet, which can result in multiple attacks against multiple enemies, as I use this gun for powerful single-targets. I instead go with Bullet Time, which provides a 10% chance of instant Reloading.
I go on ahead to fight the rest of the band at #3. There's plenty of enemies, but they're too spread out for area-of-effect spells to be active. So I rely on taking them out one by one, helped along by my healing resources. Pallegina periodically summons her Ogres to provide alternative targets. Alliria, in addition to her usual buffs, also casts Concelhaut's Draining Touch followed by Substantial Phantom to summon a Phantom that can self-heal through its own attacks. She repeats the sequence once the first Phantom expires.
One of the enemies leaves behind a Ring of Regeneration. Konstanten wears it for the rest of the game. It's a sensible choice for a warrior who is himself going to get hit plenty.
I leave the Mine and name the name the Island to "Silvermoon Gate".
I then return to the ship, and I switch out Konstanten for Fassina, who will prove very useful for the next area I'm about to explore.
*Evil* Collapsed Coal Mine
The Salvation of Time-Ancestor's Memory loop assures victory for this fight as well. Rekke's Blood Frenzy, Unbending and Disciplined Strikes all get extended infinitely by the loop.
Xoti also had to sustain an indefinite Barring Death's Door on Ydwin. But that had the benefit of awakening the power of her Effigy's Husk. And that meant that the enemy Priest couldn't do much to heal his comrades.
Rekke gets the Ring of Regeneration in the evil party. And again it's a sensible choice for a warrior who is himself going to get hit plenty.
I name the island "Mordor" as I leave.
Motare O Kozi is my next destination.