-

- Forums
- Chatrooms
- Gallery
- Gameplay Videos
- Upload
- Articles
- Mod Reviews
- Shop SP: Games, Movies, Books
|
|
| Pillars of Eternity 2 Video-Based Walkthrough by David Milward |
Bekarna's Observatory
*Evil* To Berkarna's Observatory
The evil party sails south and boards a Huana Master Captain along the way.
I switch out Tekehu for Aloth, and dock at the island at #42. I enter Bekarna's Observatory.
Shroud of the Phantasm
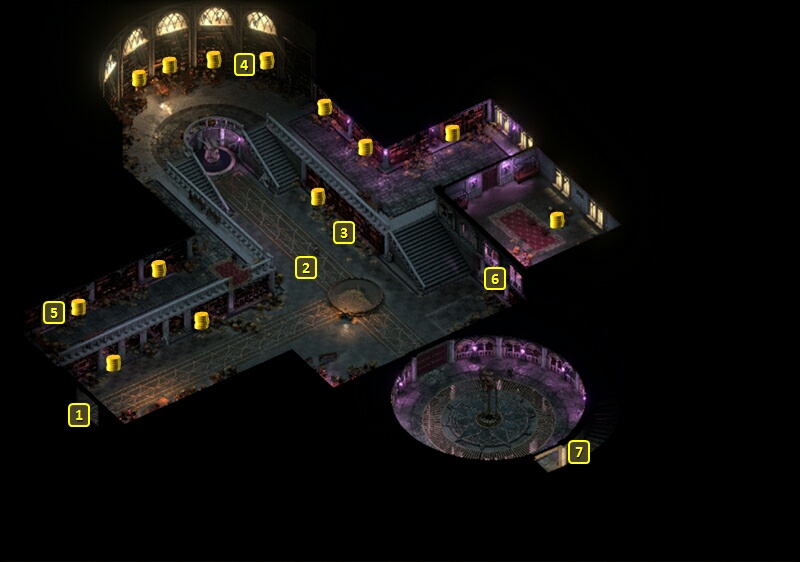
I start off at #1 on the map of Bekarna's Observatory. I have Aloth load up on Bombs. I have Fassina craft and equip five Scrolls of Plague of Insects and five Scrolls of Embrace of the Earth's Talon. Alliria crafts and equips five Scrolls of Great Maelstrom and five Scrolls of Wilting Wind.
I go ahead to #2 and start a battle with the large group of Torn Bannermen led by Carset. Pallegina regularly buffs with party with The Prisoners Turned on Their Captors.
Mirke activates Enduring Dance and spams Stunning Surge in the thickest part of the enemy mobs whenever she can. She'll also activate Lightning Strikes and Thunderous Blows and periodically renew them once she reaches 10 Wounds.
Alliria activates Infuse with Vital Essence followed by Blood Sacrifice. She did manage to use a Scrolls of Wilting Wind, but then she got hit with a Perception Affliction that reduced her range. So she had to spend the rest of the battle in Melee Combat protected by Arcane Veil. She does use White Flames or a Scroll of Minor Healing when the party's taken enough damage.
Aloth buffs himself up to the max, and then tosses Immolators to catch as many enemies as he can.
Fassina starts off by buffing the party with Nature's Balm, and then a Moonwell with its area-of-effect shrunk but still covering the party. Recall that Spell Shaping allows a spell to have its area-of-effect shrunk in exchange for an increase in Power Levels (i.e., more Healing, lasts longer). She then uses her Scrolls, or casts spells like Noxious Fumes or Malignant Cloud or Relentless Storm.
I eventually manage to wear everything down. Notable items that get left behind include a Ring of Minor Protection, Gauntlets of Greater Reliability and a Torn Bannerman Grimoire.
A hidden niche at #3 has the Shroud of the Phantasm. This is one of those items that can be used to tremendous effect for a party that Rests regularly. One of its powers is to summon 10 Living Illusions, which will have the same armor and weapons as the wearer. That opens up a lot of interesting possibilities. The wearer could for example load up on items like The Maker's Own Power and Nemnok's Cloak to create multiple illusions that will litter up the battlefield but that the enemies just can't kill. Or you can load up with items like the Cape of the Falling Star and One Dozen Stood and Effort to create 10 kamikazes that can detonate and take the enemies with them.
But it also has constant benefits for a party member during a no Rest run. Fassina wears it for the rest of the game. The cloak has a 1% chance of triggering the Brilliant Inspiration (+5 Intellect, +1 Power Levels, +1 Class Resource per 6 sec) whenever she takes Damage. She'll also get another item in the future that can trigger the Acute Inspiration (+5 Intellect, +1 Power Levels). If either happens it will trigger the +10% Action Speed with spells provided by this cloak whenever the wearer is under an Intellect Inspiration.
*Evil* Shroud of the Phantasm
The process of keeping up the buffs infinitely through the Salvation of Time-Ancestor's Memory loop works for the evil party during this battle too. I add a little nuance here too. Xoti doesn't necessarily have to limit Barring Death's Door only to just Zarathos. She can insert it in between castings of Salvation of Time for squishy party members who are themselves being attacked. And she does that for both Ydwin and Aloth.
But there is a danger to be mindful of. The two Torn Bannermen Wizards can cast Arcane Dampener. And if it connects, any party member who cannot succeed on their Will defense roll will have their beneficial effects suspended for the duration of Arcane Dampener. And that can include Ancestor's Memory and Barring Death's Door. The latter possibility is especially dangerous for any party member whose health is near zero.
Aloth does stop one cold with a ranged use of Crippling Strike at the start of the battle. And Zarathos does make taking down a Wizard a priority whenever one is within reach. There was a point where Aloth was dangerously close to dying while his Barring Death's Door was suspended. But he managed to keep himself to the flank. Also, Xoti managed to avoid having her Ancestor's Memory suspended. So just enough went my way that I could outlast the enemies. And Zarathos pretty much wrecked a whole horde of enemies by himself, with little fear of harm.
Aloth gets the Shroud of the Phantasm in the evil party, and for the same reasons as Fassina in the good party. The Infuse with Vital Essence spell will often be his trigger for the +10% Action Speed with spells.
Huntress, Leviathan and Kingfisher
I go up the stairs in the middle, and then west. I find a lone Torn Bannerman. I find a book called The Leviathan.
I come back east and find another book called The Kingfisher at #4.
I look around for a few items, go back down the stairs and find another book called The Huntress at #6.
I kill another couple of Torn Bannermen at the south end, and then go up the stairs at #7.
Concelhaut
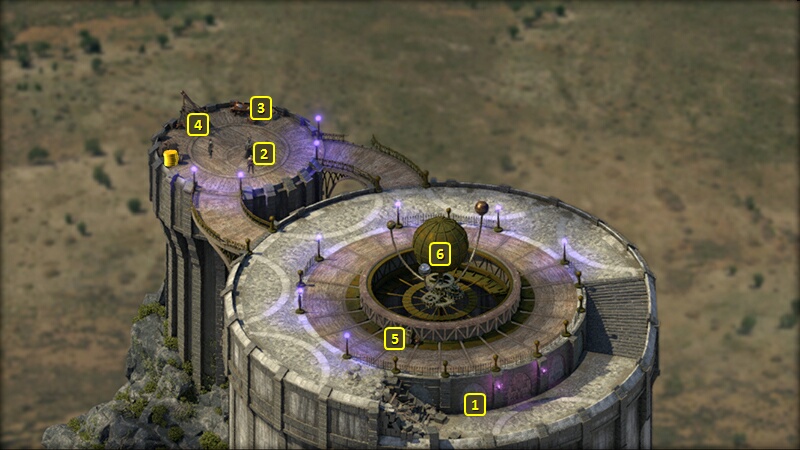
I start off at #1 on the map of the Orrery. Aloth switches to Jernaugh's Careful Calamities. Fassina crafts five Scrolls of Garden of Life for herself and equips them in a quick-item slot.
The good party goes east a little, and then north until they reach the top of the stairs. Alliria goes on ahead by herself and speaks briefly with the newly risen Lich named Concelhaut at #2. I lead him and his horde back to the rest of the party. This has the benefit of keeping the battle away from the Sigil of Atrophy and Sigil of Death. Note that Fassina has been immunized with a Sigil of Atrophy Wardstone but not with a Sigil of Death Wardstone.
Pallegina activates The Prisoners Turned On Their Captors to protect against Might and Dexterity Afflictions.
Aloth begins with Infuse with Vital Essence. He plants a Grease spell directly in front of the party. He then aims a Pull of Eora at the enemy Imps and spellcasters, including Concelhaut.
Mirke activates Enduring Dance and spams Stunning Surge in the thickest part of the enemy mobs whenever she can. She'll also activate Lightning Strikes and Thunderous Blows and periodically renew them once she reaches 10 Wounds.
Fassina begins by buffing the party with Nature's Balm and then a shrunken Moonwell. She then uses offensive spells like Relentless Storm and Malignant Cloud.
Alliria activates Infuse with Vital Essence then Blood Sacrifice, and then Arcane Veil followed by Blood Sacrifice. However, she gets affected by Concelhaut's fear aura and loses her position. That allows a few of the enemies to reach Mirke and Fassina. Pallegina and Alliria (once her Terrified ends) ends up having to perform reardguard fighting, and sometimes use healing resources like Lay on Hands and White Flames to protect Mirke and Fassina.
At one point Alliria uses a Scroll of Wilting Wind and Aloth throws a Concussion Bomb at the horde. That wipes some of them out. And that's when Fassina uses a Scroll of Garden of Life. The enemy dead bodies become healing fonts that regenerate the whole party. The battle is pretty much won by that point, and it's just a point of following through.
Pallegina periodically summons Ogres to keep Concelhaut occupied. That allows the party to finish off the few remaining enemies. Mirke now switches to her secondary gun set.
Now I surround Concelhaut. Alliria tags him with Brand Enemy. Pallegina now positions herself so that she helps Flank Concelhaut, but a wall is on the other side of Concelhaut from her. The point is that I now want her to use And Evil Turned Away From The Sun every time she's back to 4 Phrases, to immunize the party against Concelhaut's fear aura. The positioning is so that the beams can bounce back to her, and give her the immunity to Resolve afflictions as well. It's only a matter of time before I wear down Concelhaut.
There's quite a bit of loot to be had. One of Concelhaut's lieutenants, Aeflyn, leaves behind Boots of Stability and a Girdle of Eoten Constitution. More of these don't really fit into any of my plans.
The warrior named Taog leaves behind Boots of Speed and a Great Sword called Effort. A possibility for this weapon is to enchant it with a power that allows its wielder, upon being knocked unconscious, to make a Full Attack on all enemies within reach. That ability can be combined with other items like the Cape of the Falling Star and One Dozen Stood. I thought about it for Rekke, although in the end I still preferred that he wield an Estoc along with its -15 penalty to Deflection that encourages Critical Hits against him.
Concelhaut himself leaves behind two items that are of interest to Alliria. One of them is the Iron-Clasped Grimoire. The key point is that it is only through this Grimoire that a Wizard can use the unique spell, Concelhaut's Crushing Doom. It is probably the best single target spell in the entire game. It attacks for Crushing Damage multiple times over the course of its duration, and it can knock its target Prone with each Hit. Alliria as a Blood Mage can use Blood Sacrifice after each casting so that she can actually have multiple Concelhaut's Crushing Dooms pinning down a boss monster. The other spell of note is Concelhaut's Draining Touch. It causes the next Primary Attack to both damage its target and heal the Wizard. Of itself, it's no big deal since it only works for one attack. But if you cast this spell, and then cast Summon Phantom, the Phantom will have the draining touch as its primary weapon and be able to use the draining touch to heal itself with each attack for as long as the Phantom lasts.
The other item of note is Concelhaut's Skull as a Pet. Its key benefit is +1 Power Levels when using spells whose names start with "Concelhaut's". Alliria keeps it in her personal stash, and uses it as an alternative Pet for battles when she's going to make heavy use of the Iron-Clasped Grimoire.
Everybody besides Fassina, who keeps herself at a safe distance, goes on ahead to smash apart the two Sigils.
Pallegina takes two abilities on her 16th level-up. One of them is ... For They Do Enjoy Stomping On Your Head. It upgrades Oh, but Knock not on the Door of Urdel and Gurdel so that the Ogres' attacks will now hit multiple enemies in an area-of-effect similar to Clear Out.
She also takes Virtuous Triumph. It's a passive that has a 25% chance of recouping +1 Zeal whenever the Paladin who has it scores a killing blow. It's pretty much a no-brainer for any Paladin.
*Evil* Concelhaut
The evil party conducts this battle differently. I back Aloth and Ydwin against the wall to the left of the door at #1. The rest of the party forms a shield wall.
Zarathos goes on ahead by himself and speaks with Concelhaut. He then leads Concelhaut's minions back on to the rest of the party. Concelhaut and the Torn Bannermen Wizard stay behind. That removes one of the key risks, as the Wizard's Arcane Dampener won't become a factor.
The party does their usual buffs, fed by the Salvation of Time-Ancestor's Memory loop. Aloth uses Kalakoth's Minor Blights from behind the shield wall, and bombards the enemy at a safe distance. Note that the Tactical Meld that Ydwin places on Zarathos will also get extended endlessly by the loop. I kill off everyone but Concelhaut and the Wizard.
Now I go up onto the platform. Ydwin switches over to her bow. The whole party goes into Stealth mode and creeps forward. The exception is Aloth, who I leave behind because he isn't protected by any Wardstones.
The party sneaks up on and surrounds the Torn Bannermen Wizard. I quickly put up my usual buffs, but then kill the Wizard as quickly as possible. That prevents his Arcane Dampener from becoming a factor.
Now it's time to gang up on Concelhaut. His spells are powerful, so I have Xoti gradually insert a casting of Barring Death's Door in between castings of Salvation of Time until everyone is protected. And usually it's in order of who's the most vulnerable or who's been taking a beating.
I eventually manage to wear Concelhaut down. I thereafter destroy the Sigil of Atrophy and the Sigil of Death.
Aloth gains two abilities on his 16th level-up. One of them is Improved Critical, which improves Critical Hit Damage by 10%. It's an obvious choice for a Spellblade who has other abilities like Dirty Fighting and Merciless Gaze that improve the chances of scoring Critical Hits.
The other is Spell Resistance. It provides a 10% chance of avoiding the effects of any spell outright.
Zarathos takes Improved Critical. It is likewise an obvious choice for a character build that is predicated on scoring Critical Hits as often as possible.
*Evil* Bekarna's Research
I find another book called The Panther from the bookshelf at #3.
I wait until at least Evening. It is only at night time that I can properly use the telescope at #4 to gain the coordinates of all four constellations described in the books that I have found, The Leviathan, The Kingfisher, The Huntress and The Panther.
Now I click on the machine at #5, and enter the constellation coordinates so that its orbs align in a straight line. The outermost orb opens, and I now take from it Bekarna's Research and A Whale of a Wand. The former item is needed for the Quest called Bekarna's Folly.
Tekehu will use A Whale of a Wand as an interim weapon. And because it's an interim item, I don't find it worth it to invest any high-tier gemstones into enchanting it.
Ydwin takes two abilities on her 16th level-up. One is Time Parasite. It provides an additional option that involves a temporary boost to the Cipher's Action Speed while lowering the Action Speed of several enemies. It can't be extended by Salvation of Time though, because the buff is linked to the debuff that's applied to enemies. I chose it over Stasis Shell, because I figured that Puppet Master already provides an option against a singularly powerful enemy that targets the Will Defense.
She also takes A Soul's Echo. 15% of Hits by Cipher powers that target the Will defense will be converted to Critical Hits. Puppet Master and Silent Scream will benefit from this.
I thereafter return to my ship and swap out Aloth for Tekehu. The latter now equips A Whale of a Wand.
Bekarna's Research
The good party does the same sequence. Alliria takes Farcasting on her 17th level-up. It allows her to cast her offensive spells and use scrolls at a greater distance. And that sometimes obviates the need for her to walk away from the rest of the party to use those spells on enemies who hang back and remain at a considerable distance.
I leave the Observatory and return to the ship. I switch Xoti in for Fassina.
The Cleft Island is my next destination.