Pillars of Eternity 2 logo


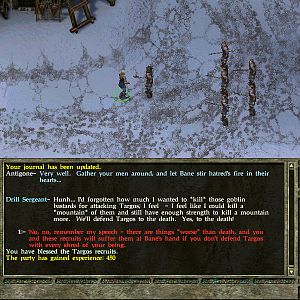
Pillars of Eternity 2 Online Walkthrough by David Milward

INTRO & ABOUT | CHARACTERS | COMBAT AND RULES | ITEMS | SHIPS
Quests | Areas | Mega Bosses
Disable all ads!

Main Game: Main Quests | Character Quests | Side Quests | Tasks | Bounties
Faction Quests: Huana | Principi | Royal Deadfire Company | Vailian Trading Company
Expansions: Beast of Winter | Forgotten Sanctum | Seeker, Slayer, Survivor

Side Quests: Helping Hands | Lost Dues in Good Faith | Mapping the Archipelago: Port Maje | Mapping the Archipelago: Tikawara | Mapping the Archipelago: West Wakara Reef | Mapping the Archipelago: The Burning Shoals | Mapping the Archipelago: Razai Passage | A Bigger Fish | A Sinking Feeling | Family Pride | The Archmage's Vault | Bekarna's Folly | Food for Thought | Harsh Medicine | The Cornett's Call | Eulogy for the Dead | Broodmother's Fury | The Storms of Poko Kohara | Hunting Season | Cruel Cargo | Tip of the Spear | Nemnok the Devourer | The Final Voyage | A Paradise of the Mind

Bekarna's Folly

World Map

  1. This Quest starts after you have completed the Task called A Cordial Invitation.

    Arkemyr, and apparently the remaining members of the Circle of Archmagi, want you to find the lost arcane research of Bekarna.

    Bekarna's Observatory will be at #42 on the World Map.

  2. Bekarna's Observatory

  3. You start off at #1 on the map of Bekarna's Observatory.

    A legion of Torn Bannermen led by Carset will be at #2, including a couple of Eotens. You'll have to fight and kill all of them. Distinctive items to be found among the loot include:

  4. You will need to find three sets of notes here that provide clues. They are The Kingfisher at #4, The Leviathan at #5, and The Huntress at #6. It is not enough to simply get them. You'll have to r-click and read them.

  5. The stairs to The Orrery are at #7.
  6. The Orrery

  7. Concelhaut
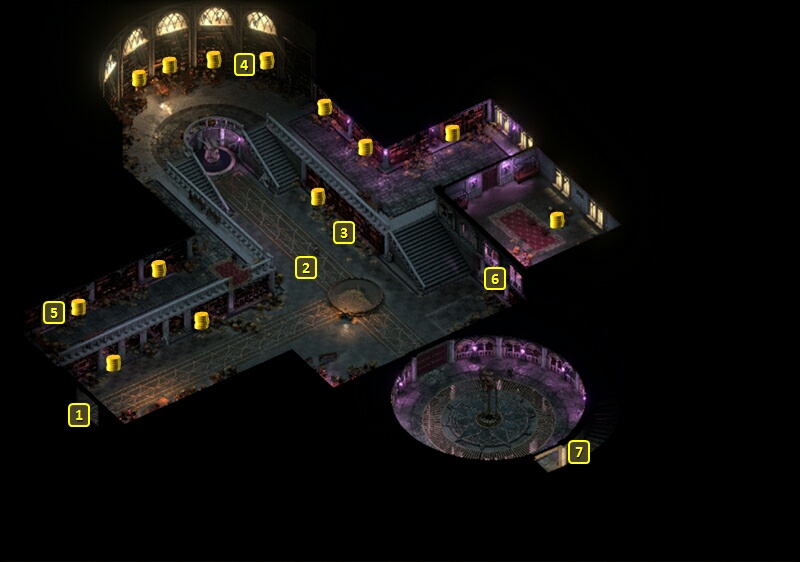
You'll start off at #1 on the map of The Orrery. You'll have to fight Concelhaut at #2, who has a new body since his defeat in Pillars of Eternity 1, along with several more Torn Bannermen at #2. There will be some conversation, but a fight becomes inevitable. Keep in mind that a Sigil of Death will be to his left, and a Sigil of Atrophy will be to his right. You can either try to lead him and his forces away from the sigils, or otherwise protect your party with the appropriate Wardstones beforehand. Avoid using single-target spells on him, since he starts off with a long-lasting reflection spell. I recommend maximizing your Defenses to the extent you can and take out his minions first. He'll be significantly easier to deal with after that. You can also use summoned creatures to distract him and absorb some of his spells.

    Concelhaut himself leaves two distinctive items. One is the Iron-Clasped Grimoire, which includes the unique spell called Concelhaut's Crushing Doom. The other is his Skull, which functions as a Pet.

    Taog, one of Concelhaut's warriors, leaves behind Boots of Speed and a Great Sword called Effort.

    Aeflyn, another of Concelhaut's warriors, leaves behind a Girdle of Eoten Constitution and Boots of Stability.

  8. There will be a hidden Cloak at #3, the Shroud of the Phantasm.

  9. You will find another book you need called The Panther at #3. You also need to read it to advance the Quest.

  10. The telescope is at #4. You need to use it to find four constellations with it. Finding those constellations requires finding and reading beforehand the notes that describe their locations.

    They include The Kingfisher, The Leviathan, and The Huntress, at #3 and #4 at #5 in Bekarna's Observatory respectively.

    They also include The Panther from the nearby table at #3.

    Once you've found all four constellations with the telescope, your Watcher character will learn the coordinates for The Huntress constellations to use on the console at #5.

  11. Entering the coordinates for The Huntress constellation at the console at #5 causes the prongs of the device at #6 to align together. A capsule of the device will then open to reveal Bekarna's Research, as well as A Whale of a Wand. Obtaining the former item is a key objective of the Quest.
  12. Arkemyr's Manor, Main Floor

  13. Report back to Arkemyr, who will still be at #2 on the map of main floor of Arkemyr's Manor. He will request that you join him at his scrying pool below. The stairs to Arkemyr's Laboratories are at #5.
  14. Arkemyr's Manor, Laboratories

  15. The scrying pool is at #12 on the map of Arkemyr's Laboratories. Arkemyr will be waiting along with several Steelclad Constructs.

    What follows is a scripted interaction whereby the Watcher is interviewed by the Circle of Archmagi, who obviously look down on everyone besides themselves. Giving them Bekarna's Research is the last action needed to complete the Quest.

    Arkemyr will reward you with 18,000+ xp, 5,000cp and a Grimoire called Arkemyr's Illuminating Discoveries. It has Arkemyr's Brilliant Departure as a unique spell. It's basically an escape and go invisible option similar to the Rogue's Shadow Step or similar abilities, but also causes Confusion in enemies near where the caster used to be.

    If you're feeling it up to it, you can force-attack him to start a fight with him and his Constructs. This fight can be challenging even for higher level parties, as Arkemyr will keep himself buffed to the max and his Constructs dish out a lot of damage and have high Armor Ratings. He will leave behind Arkemyr's Grimoire should you succeed. It has Arkemyr's Brilliant Departure, as well another unique spell, Arkemyr's Mercurial Madness. It causes a single target to have a random condition every few seconds, some beneficial and some harmful.

Amazon.com
Amazon.ca
Amazon.co.uk
Sorcerer's Place is a project run entirely by fans and for fans. Maintaining Sorcerer's Place and a stable environment for all our hosted sites requires a substantial amount of our time and funds on a regular basis, so please consider supporting us to keep the site up & running smoothly. Thank you!

Disable all ads!