You can start this Quest either by starting the Terms
of Trade Quest for the Vailian Trading Company, or the Dim
Prospects quest for the Royal Deadfire Company.
It can also be started by first speaking to either Vektor or Ranga
Ruanu in Tikawara.
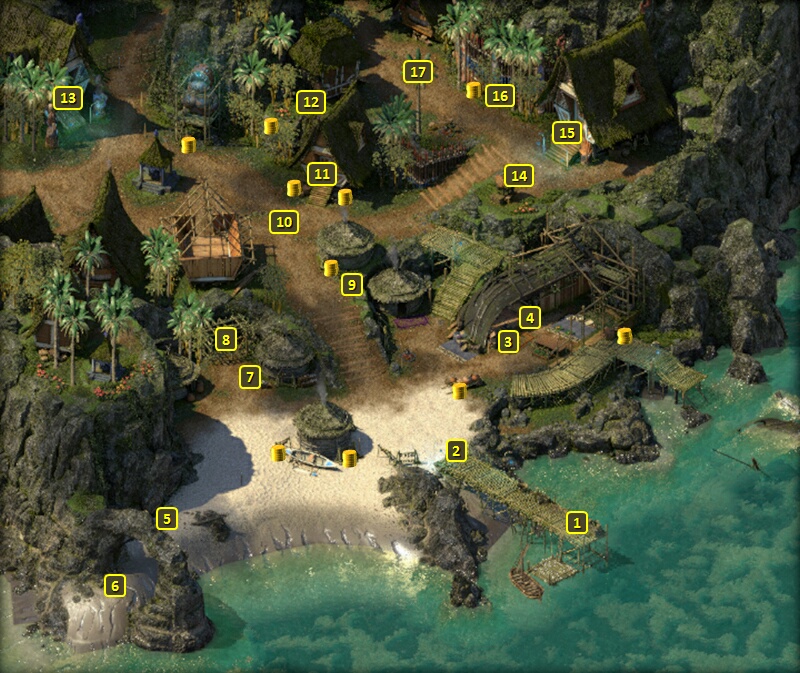
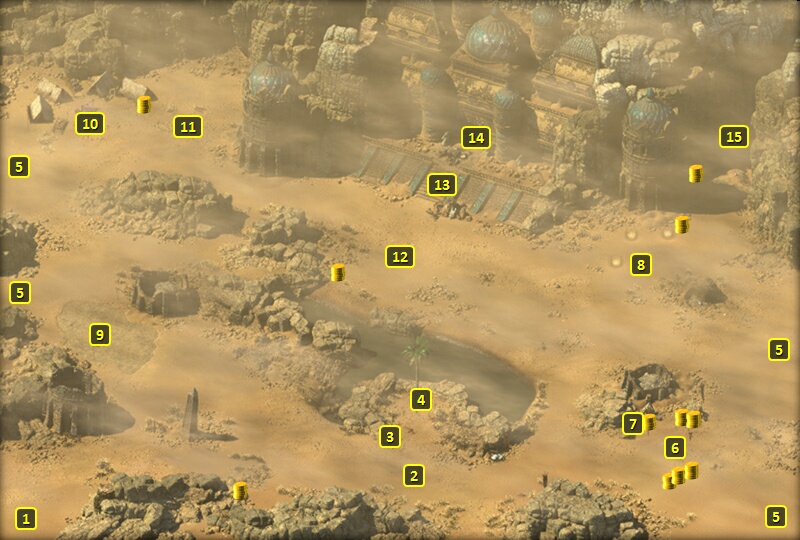
You'll start off at #1 on the map of Tikawara.
You can speak to Vektor at #2. He'll let on that the rest of his
expedition has gone missing. He also suspects the local Ranga and
priestess of working against him and the expedition.
You can speak to Nairi in her shrine at #12. She'll indicate a
distinct preference for destroying the adra pillar at the Poko Kohara
ruins, in the hopes that the Vailian Trading Company will stop taking a
mercantile interest in Tikawara as a result.
You can also speak to Ranga Rauna in his hut at #15. He'll indicate a
preference for stabilizing the adra pillar, hoping that a partnership
with the Vailian Trading Company will mean a prosperous future for
Tikawara. He'll also give you the Copper
Muzuma Shell Key.
Using your Watcher powers at points marked #10 and #12 will reveal that
the Vailian Trading Company expedition did indeed come here, but likely
met with a grisly fate.
You'll have to fight an Engwithan Titan at #13. It has powerful but
slow kick attacks that can push back, and can knock down its targets as
well. It will also summon Sand Blights once reduced to 50% health.
Use a Prybar, although that
results in the Sprained Wrist injury (-10 Deflection).
Force the door open with your own strength. Making a Might check of 20 opens the door without Injury. Failing that check results in the
Wrenched Shoulder injury (-3 Might) and the door only partially
opened. Fully opening it next requires using a Rope
and Grappling Hook on the gear, or using a Sleight of Hand
check of 4 to pull the gear yourself. Failing the Sleight of Hand check results in
the Smashed Hands injury (+20% Recovery Time).
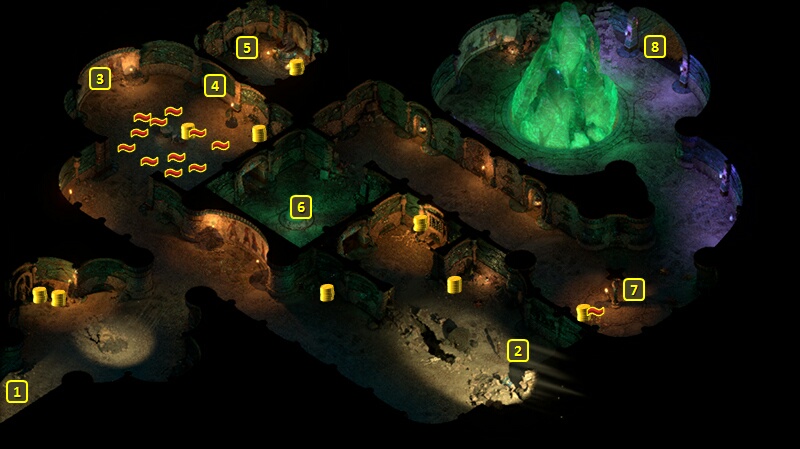
You'll start off at #1 on the map of the first
level of the Engwtihan Waystation. You'll need to fight you way
through several monsters. But you want to make your way to the stairs at
#8.
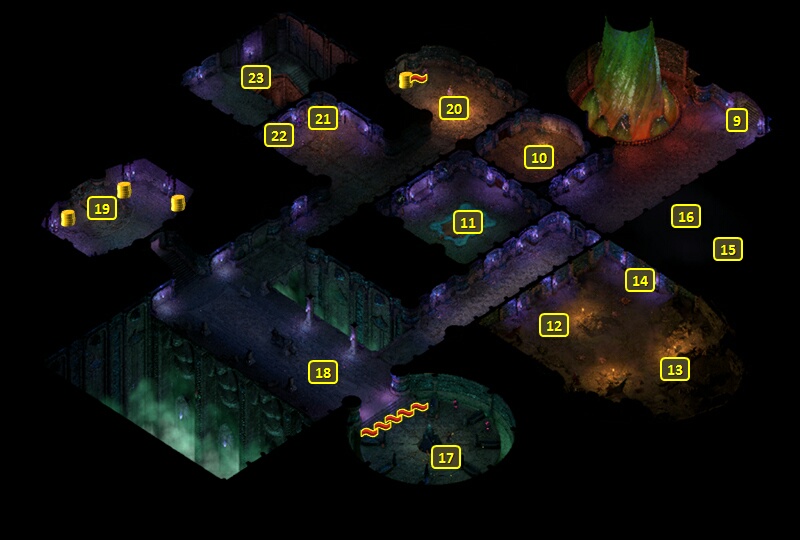
You'll end up at #9 on the map of the second
level.
You can find the Poko
Kohara Expedition Log on the dead body at #10, which provides some
insight on the early course of the expedition.
You will have to fight several Desert Spiders and Desert Spiderlings
in the room at #12. A skeleton at #13 will have the Old
Copper Key.
There will be a line of traps before the room at #17. The room itself
will have a few Adra Constructs and an Engwithan Saint here. The dead
body in the room will have a Wardstone
of Nightmares, which will come in handy here.
You will have to fight a LOT of undead at #18, many of whom crawl up
from the side of the cliff to the south.
There will be a few undead and Adra Constructs gathered around a Sigil
of Nightmares at #21. You can either neutralize the effects of the Sigil
by using the Wardstone of
Nightmares from #17 beforehand, or draw the monsters forward to
avoid the Sigil and then destroying it at a distance.
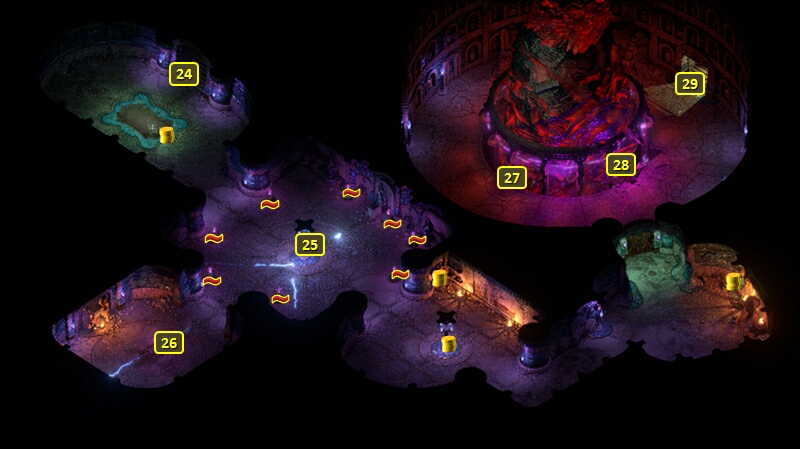
You'll now be at #24 on the map of the third
level.
The machine at #25 intermittently shoots bolts of lightning that cause
the System Shock injury (-2 Perception, -3 Shocking Armor Rating). Send
a character in to both avoid the lightning bolts, and then attack and
destroy the Essence Batteries at points marked 'x' one by one to
permanently end any danger.
You'll find the dead body of the leader of the expedition, Beza, at
#26. You can obtain Ngati's
Idol and Beza's Pages.
Both items together suggest that some Huana at Tikwara gave the
expedition the idol in a deliberate effort to confuse and mislead them.
The Pages may be of use once you return to Tikawara.
The Watcher can also read Beza's soul to learn what befell the
expedition, and possibly the true intentions of the Vailian Trading
Company towards the Adra Pillar.
Activate the panel here to open the portal at #28. The portal itself
leads to The Adra Realm.
The Adra Realm itself is a
small space where the only purposes are to encounter several spirits
trapped inside the Adra Pillar, and then make a decision about the
Pillar itself.
Step forward a little and you'll encounter Huana spirits led by the
former Priest of Tikawara, Anaharu, and spirits of the Vailian Trading
Company expedition led by Beza. Anahara will speak first, and proclaim
that he's deliberately causing the storms by blocking the flow of souls
through the Adra Pillars. It's easier to keep him hostile to you then on
your side, even without Aggressive dialogue options that pick a fight
with him. There will be an opportunity to ask him about the Pillar
itself, which includes an opportunity to relive his soul memories of his
unsuccessful challenge against Ranga Rauna's authority.
Getting him and the other Huana spirits to depart peacefully requires a
specific dialogue sequence that begins with asking him if he really
thinks causing the storms will actually save Tikawara, then asking why
not let the Huana of Tikawara defend themselves, and then promising
to destroy the Adra Pillar. Doing so will lose reputation with Pallegina
if she's in the party. Anaharu will leave the party, but then Beza and
the other spirits of the expedition will attack you. Note that the other
options besides asking why he can't let Tikawara defend itself when that
option actually does appear is likely to get all of the spirits, the
Vailian ones included, attacking you.
If you neither promised him to destroy the Pillar, or managed to avoid
angering him into attacking you outright (which is otherwise very easy
to do), Beza will cut in. She'll express an interest in having the souls
of the expedition join with the bodies outside the pillar. Playing on
her hopes that it's possible will only end up provoking all of the
spirits into attacking you. Being honest with her and telling her that
it isn't possible will convince her to depart peacefully, but with the
result that Anaharu and the other Huana spirits will attack you.
Once you've dealt with the spirits one way or another, you now have a
decision to make. You can either restore the flow of souls through the
Adra Pillar, or destroy it altogether. The former is favorable to the
Vailian Trading Company for purposes of the Terms
of Trade Quest, while the latter will be favorable to the Royal
Deadfire Company for purposes of the Dim
Prospects Quest. A portal leading back to #28 in the third
level of the Engwithan Waystation will appear once you've made
your decision.
Now return to Tikawara. The locals will be gathered near the docks
when you arrive. Ranga Ruanu will jubilantly reward you with an
Exceptional Spear if you restored the pillar, but be outraged if you
destroyed it. The crowd will disperse afterwards.
You can now see Nairi in her Shrine. She'll allow you to Rest in her
Shrine for free (no other Resting benefits though) if you destroyed the
pillar.
You can give her Beza's Pages,
which will confirm she has reason to be suspicious of the Vailians.
Doing so will lose reputation with Pallegina
if she's in the party. Beza will reward you with 1,000cp if you had
destroyed the Pillar. She'll also throw in two Potions
of Moderate Healing and two Potions
of the Resilient Body if you choose the Rational option that
presses for more of a reward, but again only if you destroyed the
Pillar. You can also pickpocket Beza's
Pages back from her if you want, whether you had restored the
Pillar or destroyed it.
Further meaningful interaction with Ranga Ruanu is only possible if
you restored the Pillar. Simply speaking to him in his lodge will now
result in a major gain of positive reputation with Tikawara. You can now
also give him Beza's Pages.
You can also try to demand that he give you the pages back, and he'll
initially bristle against it. Only the Shady option convinces him to
give the Pages back willingly. The others see him insisting on keeping
the pages, leaving you with the choice of either backing down or
attacking him and his servants in the lodge. Alternatively, you can also
end the dialogue and pickpocket the Pages back if you still want them.
You can also give Beza's
Pages to Vektor, but there's no reward or in-game consequence for
doing so.
Sorcerer's
Place is a project run entirely by fans and for fans. Maintaining
Sorcerer's Place and a stable environment for all our hosted sites requires a substantial amount of our time and funds on a regular basis, so please consider supporting us to keep the site up & running smoothly. Thank you!
Supporting Sorcerer's Place
Has Sorcerer's Place been useful? If you'd like to show your appreciation
for our hard work on the site, and help us pay the bills the site generates
every month, please consider helping support SP.
Thank you!

 The Adra Realm itself is a
small space where the only purposes are to encounter several spirits
trapped inside the Adra Pillar, and then make a decision about the
Pillar itself.
The Adra Realm itself is a
small space where the only purposes are to encounter several spirits
trapped inside the Adra Pillar, and then make a decision about the
Pillar itself.