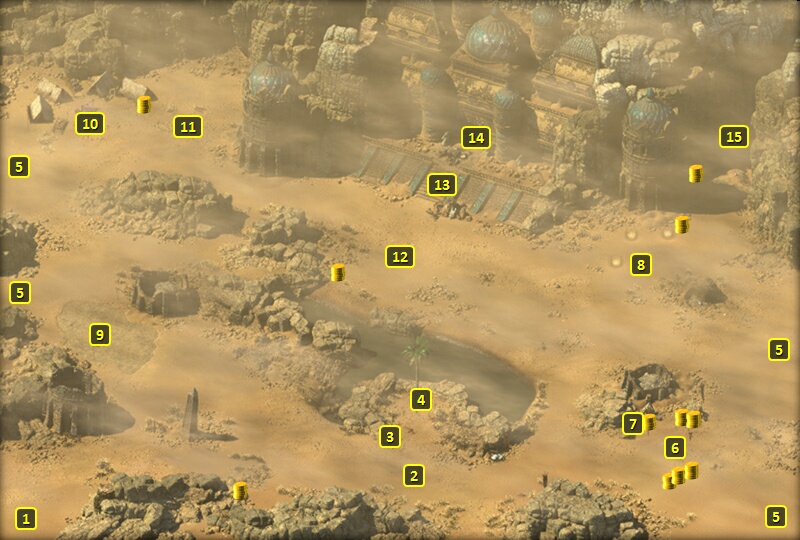
You'll have to fight a Scarab Beetle and a few Sand Blights here.
There is a slog zone here, where you'll have to fight a Sand Blight
and several Sand Grubs.
Your Watcher powers will reveal this location to be the camp of the
ill-fated Vailian expedition.
You can interact with the well here through a scripted interaction.
Getting anything out of it requires choosing a character to go down on a
rope. An Athletics of 3 by the character that goes down the rope can
obtain the bag lodged in the side of the well. A Dexterity check of 12
by the same character will retrieve several Aquamarines,
Garnets and Emeralds.
Using your Watcher powers at this point will reveal that an awful fate
befell the Vailian expedition.
You'll have to fight an
Engwithan Titan here. It has powerful but slow kick attacks that can
push back, and can knock down its targets as well. It will also summon
Sand Blights once reduced to 50% health.
The door here, once opened, provides access to the Engwithan
Waystation at #1. There are a number of ways to open it:
Use a Prybar, although that
results in the Sprained Wrist injury (-10 Deflection).
Force the door open with your own strength. Making a Might check of 20 opens the door without Injury. Failing that check results in the
Wrenched Shoulder injury (-3 Might) and the door is only partially
opened. Fully opening it next requires using a Rope
and Grappling Hook on the gear, or using a Sleight of Hand
check of 4 to pull the gear yourself. Failing the Sleight of Hand check results in
the Smashed Hands injury (+20% Recovery Time).
These stairs lead to #29 on the third
level of the Engwithan Waystation, but only after you've climbed
up the stairs from below after having thoroughly explored the
Waystation.
Sorcerer's
Place is a project run entirely by fans and for fans. Maintaining
Sorcerer's Place and a stable environment for all our hosted sites requires a substantial amount of our time and funds on a regular basis, so please consider supporting us to keep the site up & running smoothly. Thank you!
Supporting Sorcerer's Place
Has Sorcerer's Place been useful? If you'd like to show your appreciation
for our hard work on the site, and help us pay the bills the site generates
every month, please consider helping support SP.
Thank you!

 You'll have to fight an
Engwithan Titan here. It has powerful but slow kick attacks that can
push back, and can knock down its targets as well. It will also summon
Sand Blights once reduced to 50% health.
You'll have to fight an
Engwithan Titan here. It has powerful but slow kick attacks that can
push back, and can knock down its targets as well. It will also summon
Sand Blights once reduced to 50% health.