Pillars of Eternity 2 logo


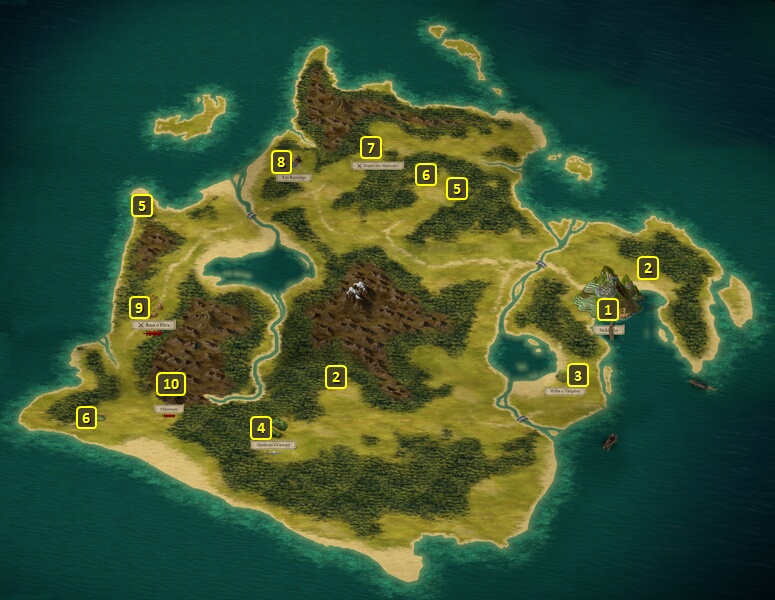
Pillars of Eternity 2 Online Walkthrough by David Milward

INTRO & ABOUT | CHARACTERS | COMBAT AND RULES | ITEMS | SHIPS
Quests | Areas | Mega Bosses
Disable all ads!

Areas: World Map | Deck of Many Things | Maje Island | Fort Deadlight | Neketaka | Kangati Islands | Karatapu Channel | Wakara Reef | Dunnage | Tehiwai Islands | Burning Shoals | West Wakara Reef | Sayuka | Hasongo | Crookspur | Rikihu's Maw | Magran's Teeth | Splintered Reef | Ukaizo
Expansions: Beast of Winter | Forgotten Sanctum | Seeker, Slayer, Survivor

Neketaka Island: Neketaka Island | Neketaka (City) | Pahowane | Pahowane Underground
Queen's Berth: Queen's Berth | The Wild Mare, Main Floor | The Wild Mare, Upper Floor | Vailian Trading Company Headquarters, Main Floor | Vailian Trading Company Headquarters, Upper Floor | Bardatto Estate | Bardatto Vault | Valera Estate
Periki's Overlook: Periki's Overlook | The Dark Cupboard | Luminous Bathhouse, Main Floor | Luminous Bathhouse, Upper Floor | Boiler Room | Arkemyr's Manor, Main Floor | Arkemyr's Manor, Upper Floor | Arkemyr's Bedroom | Arkemyr's Manor, Laboratories | Watershapers Guild | Guild Ruins
Serpent's Crown: Serpent's Crown | Takano's Estate | Kahanga Palace, Main Floor | Kahanga Palace, Upper Floor | Kahanga Palace, Rooftop
The Sacred Stair: The Sacred Stair | Temple of Gaun | The Hanging Sepulchers | Spire of the Soul Seers | Spire of the Soul Seers, Rooftop | Realm of the Beast of Winter
Brass Citadel: Brass Citadel | Imperial Command | Powderhouse
The Gullet: The Gullet | The Hole, Main Floor | The Hole, Upper Floor | Delver's Row | Undercroft
Old City: Old City Overlook | Old City Ruins | Old City

Neketaka Island

Neketaka Island

  1. Here is the city of Neketaka.

    The first time you enter here, you'll start off in Queen's Berth.

    The other districts will become accessible from here as you explore the city, including Periki's Overlook, Serpent's Crown, The Gullet, the Brass Citadel, and The Sacred Stair.

  2. Here are groves from which you can get Fresh Fruit.

  3. Here is Weba a Tangaloa, which is the equivalent of a Burial Site for purposes of obtaining random items.

  4. CottaHere is Maukotu's Canopy, which involves an extensive scripted interaction. You'll notice a thoroughly trashed campsite. You can use your Watcher powers to determine that the camp was destroyed by Lurkers. A Survival check of 10 will also determine the same thing. A Perception check of 13 will determine that whatever destroyed the camp came from and returned to the south.

    You can search the camp to obtain numerous numerous Food items and creature parts of various sorts.

    Xoti can gather the souls of the slain into her Lantern for purposes of The Lantern of Gaun Quest.

    You can either burn or bury the bodies of the slain. Doing so will earn reputation with Eder and Xoti, but lose it with Pallegina.

    You can leave the area without any further interaction or combat if you so wish. Following the tracks instead leads you to sighting the Lurkers. Using a Spyglass will reveal the additional presence of Dank Spores and Sporelings, as well as the corpse of an elven woman with a frost-sheened bow.

    You can also use the Essential Phantom spell to have the Lurkers leave so that you fight only the Spores and Sporelings.

    You can make a Stealth check of 10 to start off combat in Stealth and allow you to set up a preferred starting position for combat. Be warned that if the character you choose fails the Stealth check, he or she will start the fight with an injury.

    Once you've done what you can or chosen to do or not to do, you can then start the fight. It will include at least the Spores and Sporelings, as well as the Lurkers if you didn't lead them off elsewhere.

    If you win, a Pet dog named Trixie can be picked up.

    The corpse can also be looted for the War Bow called Frostseeker.

  5. These spots will have Abandoned Camps from which you can get some Hardtack.

  6. These spots will have Oases from which you can get some Water.

  7. Here is where you can pursue a Nomu the Marauder.

  8. Here is a Shrine to Ondra named Teo Ramunga. Having any character make a Religion check of 8 allows you to identify it as dedicated to Ondra.

    You can desecrate it if you choose. If Xoti is in the party, then you will lose a lot of influence with her.

    You can choose to pray at it. If it is during the night time, or early morning, you can pray and rest for 8 hours and then leave without further incident. You will gain Ngati's Blessing (+2 Constitution), but any other until Rest bonuses will expire.

    If it is around the afternoon, a group of Huana will verbally accost you. You can attack them if you wish. If you kill them, there won't be any further opportunity to interact with Teo Ramunga and it will be gone from the map.

    There are possibilites to resolve matters amicably with the Huana. The Watcher can personally sing an Ondrite dirge, or make either a Diplomacy check or Intimidate check (both 8) to convince them to leave the party alone.

    An alternative path is to let a party member speak for the Watcher. Tekehu always succeeds in convincing the Huana of the party's good intentions. Eder can make a Religion check of 5. Xoti can make one of 7. Either Maia or Pallegina can make an Intimidate check of 8. Any one of Aloth, Fassina, Konstanten, Mirke or Ydwin can make a Diplomacy check of 7. A companion you choose can make two attempts at the skill check.

    One failed check from you, or two failed checks from a companion will result in a fight.

    If you managed to placate them, you can pray alongside them. Praying at the Shrine alongside the Huana also bestows Ngati's Blessing (+2 Constitution), but without the 8 hours rest and without expiring any until Rest bonuses you may have in place.

    Whether you prayed while the Huana were absent, or if they accosted you to begin with, you can return to the Shrine for the Blessing whenever you want thereafter.

  9. Here is Raoa o Hara. The scripted interaction features Xaurips having Grubs fight each other for entertainment.

    You can approach openly, which opens up several options. The obvious one is to attack them and the Grubs. They'll leave behind an Ivory Wurm Figurine, Rune Powder, Razorgill Dust and a Superb Xaurip Quarterstaff among other items.

    You can make an Intimidate check of 13 to scare them away. They'll leave behind the specifically mentioned items above and some coins.

    A Sleight of Hand check of 9 or a Diplomacy check of 13 can convince them to offer you the Ivory Wurm Figurine to leave without further hostilities. You can at that point instead decide to attack them if you want.

    A Ranger can make a Diplomacy check of 10 to ask if his or her Animal Companion can join in the sport. Going easy on the Grubs results in the System Shock Injury (-2 Perception, -3 Shocking Armor Rating). Attacking the Grubs so as to earn Aggressive disposition means no negative consequence.

    You can also make a Stealth check of 8 to sneak up on them instead of approaching them openly. If you fail the Stealth check, everyone in the party can make an Athletics check of 11 to run away without a fight.

    Successfully making the Stealth check means the Intimidate check of 13 and openly attacking them will still be available as options. But there's different options available from Stealth as well.

    You can attack them from Stealth mode, which allows you to gain better and closer position on them before attacking.

    You can also make another Stealth check of 10 to avoid them altogether and sneak away.

    A Druid (but not Tekehu) can use Charm Beasts on the Grubs. That will give you some options. Having the Grubs dance or crawl away has no result other than distracting the Xaurips. But that means you can either sneak up on them for the ambush, or having the Stealth check required to get away without a fight lowered to 4. Having the Grubs attack the Xaurips forces the Xaurips to kill their pets, and that means the Grubs won't be in the fight if you attack the Xaurips. The Intimidate check of 13 is also available after using Charm Beasts.

  10. This entrance to leads to #8 in Pahowane.

Amazon.com
Amazon.ca
Amazon.co.uk
Sorcerer's Place is a project run entirely by fans and for fans. Maintaining Sorcerer's Place and a stable environment for all our hosted sites requires a substantial amount of our time and funds on a regular basis, so please consider supporting us to keep the site up & running smoothly. Thank you!

Disable all ads!