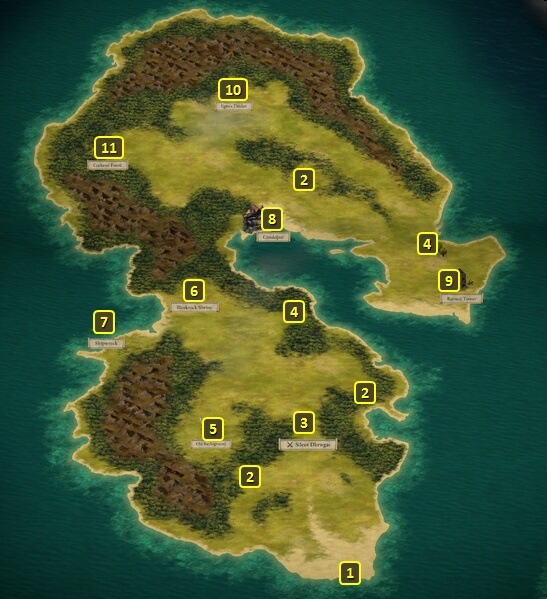
You can obtain Fresh Fruit from
Orchards at these points.
Here is an Old Battleground from which you can obtain some random
items.
Here is Bleakrock Shrine. A Survival check of 7 will reveal that
nobody seems to be around. A Religion check of 15 will identify it as a
shrine to Rikihu, the Huana version of Berath.
You can choose to desecrate the shrine, but there is no tangible benefit
to be obtained from it. Doing so earns approval from Pallegina
if she's in the party, but loses it with Xoti.
If you do it during daytime, a band of Slavers will attack you
immediately. You can do it without incident at night time.
You can pray at the shrine, which will give you Rikihu's Blessing (+2
Resolve). If you pray at day time, a band of Slavers who worship Berath
will accost you. There are various ways to handle the situation.
You can choose an Aggressive option to attack them, which leads to a
battle.
You can get them to leave you be and depart if you make an Intimidate
check of 16. They will attack you if you fail the check.
A Diplomacy check of 12 will also convince them to let you pray and
leave.
If your Watcher is a Priest of Berath, a dialogue option becomes
available that convinces them to leave you be without having to pay any
money or make any skill checks.
You can offer them 2,000cp to let you pray and depart. They'll insist on
upping the fee to 4,000cp. You can talk them down to 3,000cp with a
Streetwise check of 12 that earns Shady reputation. If Serafen
is in the party, you can offer him as substitute payment to the traders.
Doing so earns Cruel and Shady reputation. It also causes Serafen
to leave the party for good as he tries to escape from the slavers. It
will also earn disapproval from Pallegina.
It also means the Slavers leave you to yourselves to pray at the shrine
without any further disturbance.
If you pray at day time with an understanding from the Slavers that
you'll leave after your prayers, you'll gain Rikihu's Blessing without
losing any Resting bonuses you may have in place.
If you pray at night time, the Slavers won't show up. Praying gets
Rikihu's Blessing, and 8 hours will pass that counts as Resting. That
means you lose any previous Resting Bonuses you may have in place.
However, you can also pray at the shrine for Rikihu's Blessing without
limit.
The situation involved with trying to sell Serafen
to the Slavers will result in the Slavers leaving you be at the Shrine.
That also means praying for Rikihu's Blessing will trigger a Rest and
cause any previous Resting bonuses to expire. Praying for Rikihu's Blessing after killing the Slavers will likewise trigger a Rest.
Also keep in mind that Rikihu's Blessing will replace another shrine
blessing you may have in place, like for example Ngati's Blessing from
the shrine at #8 on Neketaka
Island.
Here is a Shipwreck from which you can obtain some random items.
You will arrive in the town of Crookspur
if you dock here on your ship.
You will be able to explore the northern half of the island from here if
you go through the tunnel at #2 in the Sea
Cave.
Here is a Ruined Tower from which you can obtain random items.
Here is Egno's Thicket, which is the equivalent of a Burial Site for
purposes of obtaining random items.
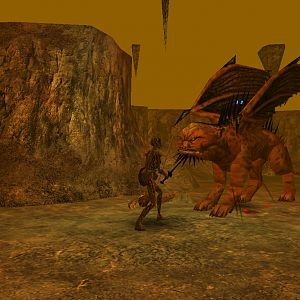
Here is Cockerel Forest, which is
the hiding place of a trio of escaped slaves named Cathwenna, Camoc and
Hadongo. They'll initially be hostile, and signal as much by firing
arrows at your feet.
You can choose to approach cautiously for purposes of starting a fight
with them, but on more favorable terms. Doing so requires every party
member to make an Athletics check of 13 to avoid the Gaping Wound (-25%
Healing received, -15% Maximum Health) Injury. Combat will start however
the checks play out.
You can have a character make a Perception check of 16 to determine
their location. Maia can make the
check automatically for you since Ishiza will do the scouting ahead.
Failing a Stealth check of 13 means party members get both the Gaping
Wound (-25% Healing received, -15% Maximum Health) and Bruised Ribs (-20
Fortitude) Injuries. If you try and fail at the Perception check, a
Cipher in the party (e.g., Serafen
or Ydwin) can determine their
location. Making the Stealth check or using Cipher parties to pinpoint
their location provides you the option of either sneaking up on them in
Stealth mode before starting combat, or sneaking past them altogether
and permanently ending the availability of the Forest on the Island map.
If you kill the escaped slaves and their minions (including Tigers),
Cathwenna will leave behind a Flail called Ball
and Chain.
The Watcher can attempt an Insight check of 10 to get them at least open
to the idea of talking to you. Gaining an audience with them requires the Watcher to then pull off
one of these follow-ups:
A Bluff check of 12.
A Diplomacy check of 14.
An Intimidate check of 16.
A Streetwise check of 14.
Alternatively, you can have one of your companions try to do the follow up for you. Aloth, Eder, Tekehu, Xoti or any of the Sidekicks (e.g., Ydwin) will attempt a Diplomacy check of 14. Maia or Pallegina will attempt an Intimidate check of 16. Serafen will attempt a Bluff check of 12.
If you succeed with both the Insight check and the follow-up, you'll have the opportunity to converse with Cathwenna in the midst of the forest as shown in the screenshot. If you fail either the Insight check or the follow up, you won't have any further opportunities to speak with them. You'll be left with options that involve either fighting them or leaving the forest for good.
Cathwenna, even if you gain an audience with her, will not be willing to reach any understanding with the
Watcher if he or she has a combined Disposition of 2 points in Cruelty
and 2 points in Shady. That would leave you with a choice of either
fighting the escaped slaves or leaving altogether.
If you make the Insight check with her and succeed with a follow-up, you can then converse with her and agree to let her go free without betraying the fact of finding her and where to the Slavers. That earns Benevolent disposition, and she'll voluntarily give you the Ball and Chain.
Sorcerer's
Place is a project run entirely by fans and for fans. Maintaining
Sorcerer's Place and a stable environment for all our hosted sites requires a substantial amount of our time and funds on a regular basis, so please consider supporting us to keep the site up & running smoothly. Thank you!
Supporting Sorcerer's Place
Has Sorcerer's Place been useful? If you'd like to show your appreciation
for our hard work on the site, and help us pay the bills the site generates
every month, please consider helping support SP.
Thank you!

 Here is Cockerel Forest, which is
the hiding place of a trio of escaped slaves named Cathwenna, Camoc and
Hadongo. They'll initially be hostile, and signal as much by firing
arrows at your feet.
Here is Cockerel Forest, which is
the hiding place of a trio of escaped slaves named Cathwenna, Camoc and
Hadongo. They'll initially be hostile, and signal as much by firing
arrows at your feet.