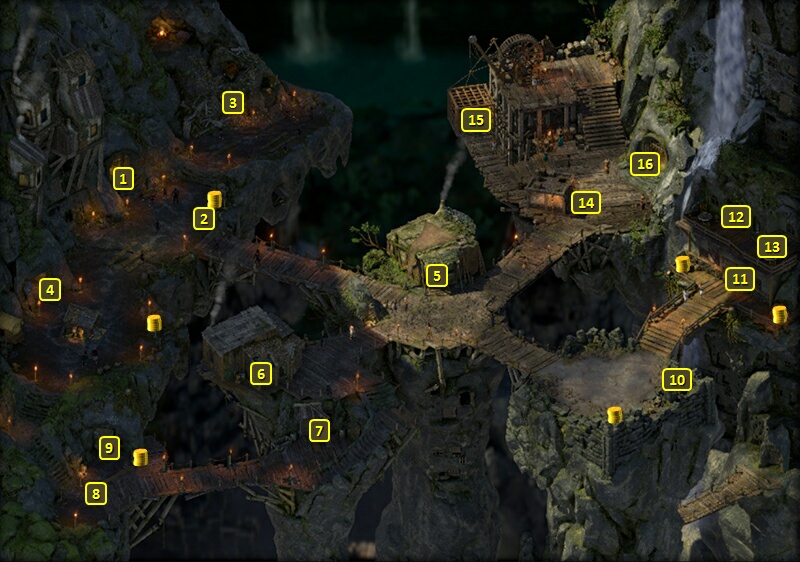
You can give the beggar here money or a Food
item from your stash to earn a little reputation with The Gullet.
She can also indicate that Enoi is the man in the neighborhood to speak
to.
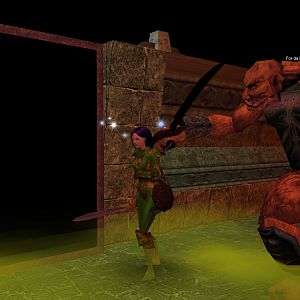
Here is a refuse pile. It's purpose is to stir Tekehu towards a social conscience about just how awful things are for the Roparu should he be in the party.
Here are the Narrows. Clicking on it begins a scripted interaction
whereby you can end at different destinations depending on what paths
you take through the tunnels.
Going Right, Forward, Forward, Right and Forward leads to a
Neighborhood, in which various random encounters are possible.
Going Right, Right and Left leads to the lair of Dereo the Lean. His
guards will try to stop you at the door. Options include:
Killing them, which costs you reputation with the Delver's Row
Criminals. But Dereo is still willing to speak with you.
If you gain at least one point of positive reputation with The
Gullet, a messenger comes and informs you that Dereo would like to
speak to you. You may then indicate that Dereo sent a message to you
to have the guards let you through without a fight.
Showing them the Marked
Suole pickpocketed from Overseer Hitenga at #14.
If you showed the Envoy's
Badge to Ernezzo at #7 in Delver's
Row, you can ask Ernezzo how to find Dereo. You can then
indicate to the guards that Ernezzo sent you.
You can offer Dereo the 600cp from #10 and earn Honest disposition as
well as reputation with the Delver's Row Criminals. Dereo will also let
you keep the 600cp.
Another possible destination is Delver's Row.
You can go Right, then Forward. You'll see a merchant stall.
Discovering the pathway behind the stall without any prior assistance
requires either Watcher-only checks of Streetwise 6 or Perception 18.
You can avoid these checks if either Dereo, or Fyrma who's on the
first floor of The Hole (nearby at #11), previously told you that
the passage is behind the stall.
Taking the passage will cause you to run into a few guards at the
entrance to the Row. You have several options for getting past them:
Attack them. Doing so will result in a reputation loss with the
Delver's Row Criminals.
Pay a toll of 50cp
Make a Bluff check of 3 to convince them that you already paid the
toll to a scarred man
Make a Diplomacy check of 4
Drop Dereo's name either during or after completion of The Cornett's Call
Quest.
Show them the Marked Suole
pickpocketed from Overseer Hitenga at #14.
Go Right and Forward three times in a row. You'll find a dead body.
A Watcher-only Perception check of 14 will reveal that the body is that
of Ulog, and discovery of the Dead
Man's Note. The Note indicates that Ulog had a contact named
Morena. The discovery is potentially relevant to both the Food
for Thought and Goods
and Services Quests.
Biha will be in this house, but not until the All
Aboard Task has been triggered.
Here is the entrance to Enoi's Home. He offers the Food
for Thought Quest.
Here is Thelys' Home. It will have a few random items in its
containers, but nothing else.
Here is a hidden niche with 600cp. It will be easier to find once
you've gotten a certain bit of information during the All
Aboard Task. The money is potentially relevant to
resolving the Task itself.
Arriving here
will result in you witnessing Overseer Hitenga ordering that Botaro be
lowered into the pit below despite Biha's protests. That triggers
the All Aboard Task.
Overseer Hitenga will remain here afterwards, and he remains relevant to
the Task. He can provide permission to enter Old City
Overlook through the lift at #15. A Survival
check of 5, a History check of 3, or 200cp will suffice to convince him.
Hitenga can also be pickpocketed for the Marked
Suole. It is not needfed to complete the All
Aboard Task, but it helps provide background information and also
helps with a possible reputation increase.
Here is the entrance to the Old City
Overlook, but you will need permission from Overseer Hitenga at
#14 first.
Sorcerer's
Place is a project run entirely by fans and for fans. Maintaining
Sorcerer's Place and a stable environment for all our hosted sites requires a substantial amount of our time and funds on a regular basis, so please consider supporting us to keep the site up & running smoothly. Thank you!
Supporting Sorcerer's Place
Has Sorcerer's Place been useful? If you'd like to show your appreciation
for our hard work on the site, and help us pay the bills the site generates
every month, please consider helping support SP.
Thank you!

 Arriving here
will result in you witnessing Overseer Hitenga ordering that Botaro be
lowered into the pit below despite Biha's protests. That triggers
the All Aboard Task.
Arriving here
will result in you witnessing Overseer Hitenga ordering that Botaro be
lowered into the pit below despite Biha's protests. That triggers
the All Aboard Task.