Here is Fassina. Her boyfriend, Bertenno, steals something and flees
out the door. Agreeing to get that item back for her starts the Velvet
Glove, Brass Fist Task.
She also sells a lot of scrolls and magic ingredients. Distinctive items
she has for sale include:
Jernaugh's Careful Calamities
- This particular Grimoire has a unique 6th level spell, Jernaugh's
Equalizing Burst, which can inflict multiple Afflictions on enemies
within a 2.5m radius.
Here is Irfen. He can tell you fortunes for 1cp each, but they amount
to references to things that have already happened to your Watcher
character. Insulting him might result in receiving an Injury from him.
Here is the Critter Cleaver,
a feature that comes with The Forgotten Sanctum DLC. There are
modes for using the Cleaver, each accessible through buttons resembling
dogs on the left side of the panel.
The first mode, which is accessible through the top dog button, allows
you to sacrifice Pets to the Cleaver.
The machine will remember the appearance of any Pet, and any of the
benefits that it provided, that you sacrifice to it. You can sacrifice
as many pets as you like to it.
The second mode, accessible through the lower dog button, allows you to
build a custom pet from the Pets you sacrificed. There are two slots on
the right. You can drag one of the sacrificed pets to the Sleeve slot.
The new Pet will take on the appearance of that Pet. You can drag
another Pet to the Bonuses slot. The new Pet will provide the bonuses of
that Pet.
When you're ready to create your new custom pet, and if you have at
least 2,000cp to spend, you can now press the Create Pet button on the
lower right side of the panel. The Cleaver is useful if you want the
benefits of a particular Pet, but want to change its appearance more to
your liking (like a Wurm or an Imp instead of a Cat or Dog for example).
This bookcase has a copy of the Grimoire
of Vaporous Wizardry.
This might be the best Grimoire for a single-class Wizard. It allows a
Wizard to cast three spells from each Spell Level per encounter. The
drawback is that any damage at all to the Wizard will result in an
automatic Interrupt, even if the Wizard has Concentration in place.
There is a known way around it. The idea is to have the Wizard wear Rekvu's Fractured Casque as his or
her helmet, and then inflict an Injury that the Wizard can live with so that
the helmet confers total immunity to any interrupts.
One idea is to place a Flame Wall spell on the ground while nobody else
is around, and have your Wizard run back and forth over it until he or
she is knocked unconscious. The Wizard will rise with a Serious Burn
Injury, which inflicts -3 Burn Armor Rating and -2 Dexterity. That's
pretty tame compared to the penalties imposed by other Injuries. Keep
the Injury on until you're ready to Rest, then rinse and repeat.
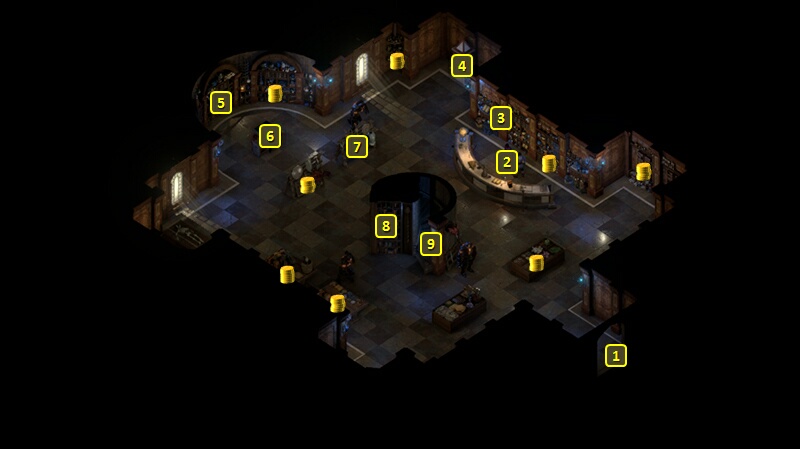
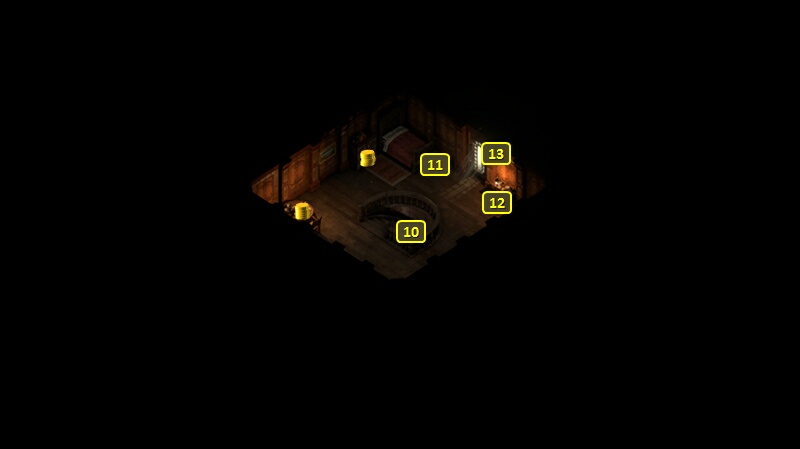
These stairs lead to #10 in the Living Quarters of The Dark Cupboard.
These stairs lead back down to the first level of The Dark Cupboard at
#9.
Clicking on this window starts a scripted interaction. You can select
a character to both expend a Rope and
Grappling Hook and make an Athletics check of 3 to effectively
create a tightrope that will appear at #4 on the map of Periki's
Overlook.
Sorcerer's
Place is a project run entirely by fans and for fans. Maintaining
Sorcerer's Place and a stable environment for all our hosted sites requires a substantial amount of our time and funds on a regular basis, so please consider supporting us to keep the site up & running smoothly. Thank you!
Supporting Sorcerer's Place
Has Sorcerer's Place been useful? If you'd like to show your appreciation
for our hard work on the site, and help us pay the bills the site generates
every month, please consider helping support SP.
Thank you!

 Here is the Critter Cleaver,
a feature that comes with The Forgotten Sanctum DLC. There are
modes for using the Cleaver, each accessible through buttons resembling
dogs on the left side of the panel.
Here is the Critter Cleaver,
a feature that comes with The Forgotten Sanctum DLC. There are
modes for using the Cleaver, each accessible through buttons resembling
dogs on the left side of the panel.