Pillars of Eternity 2 logo


Pillars of Eternity 2 Online Walkthrough by David Milward

INTRO & ABOUT | CHARACTERS | COMBAT AND RULES | ITEMS | SHIPS
Quests | Areas | Mega Bosses
Disable all ads!

Areas: World Map | Deck of Many Things | Maje Island | Fort Deadlight | Neketaka | Kangati Islands | Karatapu Channel | Wakara Reef | Dunnage | Tehiwai Islands | Burning Shoals | West Wakara Reef | Sayuka | Hasongo | Crookspur | Rikihu's Maw | Magran's Teeth | Splintered Reef | Ukaizo
Expansions: Beast of Winter | Forgotten Sanctum | Seeker, Slayer, Survivor

Neketaka Island: Neketaka Island | Neketaka (City) | Pahowane | Pahowane Underground
Queen's Berth: Queen's Berth | The Wild Mare, Main Floor | The Wild Mare, Upper Floor | Vailian Trading Company Headquarters, Main Floor | Vailian Trading Company Headquarters, Upper Floor | Bardatto Estate | Bardatto Vault | Valera Estate
Periki's Overlook: Periki's Overlook | The Dark Cupboard | Luminous Bathhouse, Main Floor | Luminous Bathhouse, Upper Floor | Boiler Room | Arkemyr's Manor, Main Floor | Arkemyr's Manor, Upper Floor | Arkemyr's Bedroom | Arkemyr's Manor, Laboratories | Watershapers Guild | Guild Ruins
Serpent's Crown: Serpent's Crown | Takano's Estate | Kahanga Palace, Main Floor | Kahanga Palace, Upper Floor | Kahanga Palace, Rooftop
The Sacred Stair: The Sacred Stair | Temple of Gaun | The Hanging Sepulchers | Spire of the Soul Seers | Spire of the Soul Seers, Rooftop | Realm of the Beast of Winter
Brass Citadel: Brass Citadel | Imperial Command | Powderhouse
The Gullet: The Gullet | The Hole, Main Floor | The Hole, Upper Floor | Delver's Row | Undercroft
Old City: Old City Overlook | Old City Ruins | Old City

Old City

Old City

  1. This tunnel leads to the Old City Ruins at #11.

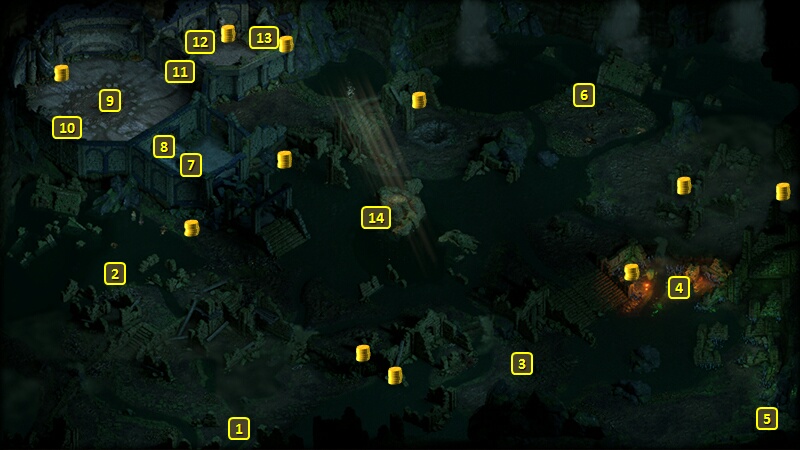
  2. There will a few Flesh Eaters and Flesh Monstrosities here, led by a Harvest Master. They are gathered around a Sigil of Darkness. You may want to lure them away from the Sigil for a fight if you do not have a Sigil of Darkness Wardstone.

  3. There will be several Shades and Shadows, led by a Risen Armsman, to fight here.

  4. There will be Earth Blights and Flame Blights to fight here.

  5. This tunnel leads to the Old City Overlook at #11.

  6. A corpse here will have a Sabre called Min's Fortune, the Corroded Bronze Horn Figurine, and a Hastily Scrawled Note.

    Be warned that taking the items will lead to you getting attacked by a lot of Darguls and Rotghasts led by a Reeking Horror. The Reeking Horror will leave behind Mewnan's Broad Belt after dying.

  7. You can use either the Cornett of Waves or the Cornett of Depths on the Statue of Ondra here to open the door at #8.

  8. This door can be opened by using either the Cornett of Waves or the Cornett of Depths on the Statue of Ondra at #7.

  9. There is a Giant Cave Grub here, which can be really tough for lower-level parties to handle. It can summon Cave Grubs and Cave Grublings to its aid. You can sneak around it along the edges of the room if you prefer.

  10. A hidden niche here has the Cog of Cohh in it.

  11. You can open this door by using both the Cornett of Waves and the Cornett of Depths on it.

  12. This locked and trapped sarcophagus has a Large Shield named Cadhu Scalth in it.

  13. This locked sarcophagus has a Pollaxe named Wahai Poraga in it.

  14. This fallen over vase will have The Adra Pearl in it, but only after an expansion Task called The Seeking Face's Hunt for the Adra Pearl has started. Several Savage Lagufaeth and Poison Nagas will attack once you take it.


Amazon.com
Amazon.ca
Amazon.co.uk
Sorcerer's Place is a project run entirely by fans and for fans. Maintaining Sorcerer's Place and a stable environment for all our hosted sites requires a substantial amount of our time and funds on a regular basis, so please consider supporting us to keep the site up & running smoothly. Thank you!

Disable all ads!