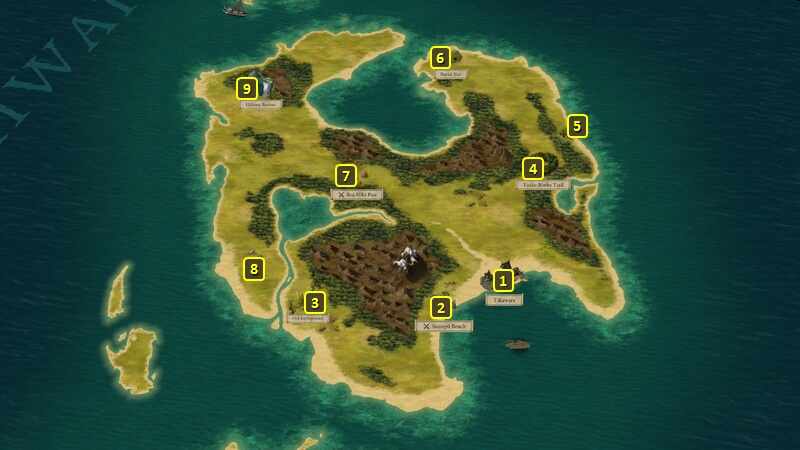
Here is the village of Tikawara, which is
also the initial landing point for the island.
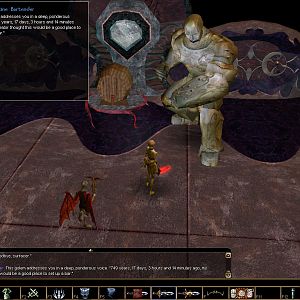
Here is Sunepu Beach, on which resides a rather large Lagufaeth named
Skulking-Terror.
You can use the Athletics option to go forward cautiously. Problem is
that it is likely to lead to the character with the lowest Athletics
rank getting hit with a dart, and that character also getting the Acute
Rash (-5 Fortitude, -3 Corrosive Armor Rating). That can, however, be
averted by having a Ranger in the party. The Ranger's pet will tug at
the Ranger's sleeve, giving an alert to the danger and allowing a
dodging of the dart.
Another exception taking the Athletics option to approach, but
after having rescued the captive Lagufaeth hatchlings in the village of
Tikawara. You can then wait, and
Skulking-Terror will offer you fish. An Insight check of 3 reveals that
it's probably gratitude for setting the hatchlings free. You can either
accept the Hagfish it offers, or
attack it (when it will still be near the Sigil of Atrophy).
You can have a character make a combined Survival 8 and Perception 12
check. Succeeding in both checks allows you to notice a giant Lagufaeth
wearing a skull for a helmet. Not making both checks means that you
don't notice anything in particular, although you'll still have the
Athletics option available.
You can follow up the combined check by having any character make a
Stealth check of 8. If you miss the check, the Lagufaeth will attack you
on the beach, and near a Sigil of Atrophy. It won't leave behind anything
special if you defeat it. If you make the check, a few options become
available:
Make a Stealth check of 10 to bypass the beach and any battle
altogether, which also means no treasure or xp.
Failing the check results in a fight with Skulking-Terror.
Ambush and attack the Lagufaeth from Stealth mode.
Use a spell that uses Shocking Damage to scare it away. It will
leave behind some items, but again nothing special.
Use Gernisc's Beast Lit the Night with his Breath or Yet Its Mate
Was More Feared to scare it away.
Here is an Old Battleground from which you can get a few random items.
Here is the Toaku Biwha
Trail, which is inhabited by a Delemgan and a Dank Spore, along with a
few Sporelings and Lesser Earth Blights.
You can begin with a Stealth check of 5 check to get closer and observe. From
there, you have a few options:
You can make a combined Intellect check of 15 and a Survival check
of 6 to verify that a Delemgan and a Dank Spore are in the glade
ahead. You can also notice that the Dank Spore is feeding on a dead
corpse and is still emitting its luring odor, and that there's a
tome at the base of the Spore.
You can approach them in stealth mode, with a view towards getting
closer to them before combat starts. If you win, the distinctive
item that gets left behind is the Spore-Coated
Grimoire.
You can approach openly, which leads to the same set of options as
if you had approached them openly at the outset.
Approaching them openly leads to several options. Some of them won't be
available if you have a combined 1 point of Cruel disposition and 2
points of Aggressive disposition.
You can attack them at the outset. Doing so, or any of the other
dialogue options, leads to a fight where the Spore-Coated
Grimoire can be obtained as loot.
You can make the combined Intellect check of 15 and a Survival
check of 6 after an open approach as well.
Making an Intimidation check of 7 will force the Delemgan to flee, and
you'll only have to fight the Dank Spore, Sporelings and Lesser
Earth Blights. You still get the Spore-Coated
Grimoire as loot.
Complimenting her as a fine lady in a dark wood, or asking why
she's so demanding won't help or hurt the scripted interaction in
any way.
Asking if she needs help, and then saying you need to leave will
result in her allowing you to leave peacefully. But only if you don't
have the combined Cruel and Aggressive disposition.
Saying you need to leave, but without making a prior offer to
help, or if you have the combined Cruel / Aggressive disposition,
results in her and her minions attacking you.
Asking if she needs help, and then following up with the
compliment that the Dank Spore "smells amazing" leads to her
offering you a mushroom cap. Accepting the offer by eating the
mushroom leads to the Watcher gaining Nature's Resolve (+10
Accuracy, +2 Resolve), which lasts until the next Rest, and the
party leaving the glade peacefully. *NOTE* The Mushroom won't be
offered to a character with the combined Cruel / Aggressive
disposition, so fighting the Delemgan and her minions becomes
inevitable.
Throwing the mushroom away to reject her offer means that she
won't let you leave the glade peacefully, and a fight with her and
her minions becomes inevitable.
Here is an orchard from which you can get some Fresh
Fruit.
Here is an Old Burial Site, from which you can get some random items.
Here is the Boa Hika Pass. There are three ways to start, and all of
them reveal that several Boar have been wounded while being hunted.
One way to start is to approach openly, which reveals a little piglet:
Make a Perception check of 13 to identify the darts wounding the
Boars as coming from Lagufaeth hunters. You will still have some
options open.
Grab the piglet, which is actually the Baby
Boar Pet. Doing so requires a Might check of 10, but you'll be
obliged to fight the Lagufaeth whether or not you made the
Perception check beforehand and even if you try to flee.
Make a Stealth check of 7, either before or after getting the Baby Boar. Doing so allows you to
go into Stealth mode and close in on the Lagufaeth before starting
combat with them. If you made the Stealth check before grabbing the
Baby Boar, you'll lose out on it.
The second way is to make a Stealth check of 5 to sneak forward and
observe:
You can straightaway grab the Baby
Boar and then sneak away without fighting the Lagufaeth.
You can make the Perception check of 13 before grabbing the Baby
Boar, but that means you'll have to fight the Lagufaeth if you
try to get away.
Again, you can make another Stealth check of 7, either before or
after getting the Baby Boar.
Doing so allows you to go into Stealth mode and close in on the
Lagufaeth before starting combat with them. If you made the second
Stealth check before grabbing the Baby
Boar, you'll lose out on it.
A third way to start is to wait and observe, which earns Stoic
disposition. Your options become limited to drawing weapons and
attacking them openly, or making the Stealth check of 7 to sneak up on
them before attacking. You won't get the Baby
Boar.
*NOTE* Any choices based on putting the Boars out of their misery, or
trying to heal them, won't accomplish anything and lead to fighting the
Lagufaeth anyway.
The Lagufaeth are led by Chief Echoing-Strike. The distinctive item he
leaves behind upon dying is a Ring of
Overseeing.
Sorcerer's
Place is a project run entirely by fans and for fans. Maintaining
Sorcerer's Place and a stable environment for all our hosted sites requires a substantial amount of our time and funds on a regular basis, so please consider supporting us to keep the site up & running smoothly. Thank you!
Supporting Sorcerer's Place
Has Sorcerer's Place been useful? If you'd like to show your appreciation
for our hard work on the site, and help us pay the bills the site generates
every month, please consider helping support SP.
Thank you!

 Here is the Toaku Biwha
Trail, which is inhabited by a Delemgan and a Dank Spore, along with a
few Sporelings and Lesser Earth Blights.
Here is the Toaku Biwha
Trail, which is inhabited by a Delemgan and a Dank Spore, along with a
few Sporelings and Lesser Earth Blights.