-

- Forums
- Chatrooms
- Gallery
- Gameplay Videos
- Upload
- Articles
- Mod Reviews
- Shop SP: Games, Movies, Books
|
|
| Pillars of Eternity 2 Video-Based Walkthrough by David Milward |
Ofecchia Channel Islands
Sentinel Hill
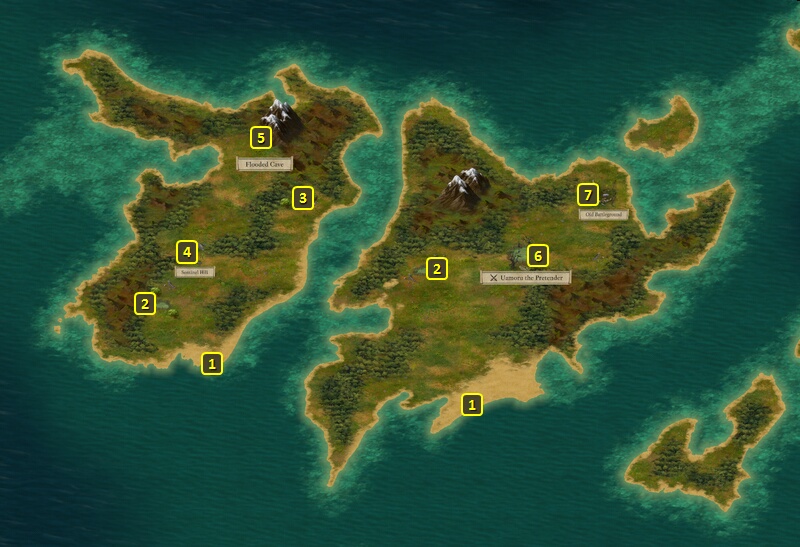
I make a change to my party for the next part. I switch out Aloth for Ydwin. I dock at the point marked #1 on the west island. I collect Water at #2.
I go to Sentinel Hill at #4. I make the Stealth check of 9 to approach the enemies in Stealth Mode.
I home in on the Ancient Wraith, who will soon be joined by several Sirens. The Ancient Wraith teleports away with Ydwin. Ydwin fights it one on one. She periodically uses Borrowed Instinct on it to boost her own Accuracy and Defenses when she's built up enough Focus.
The rest of the party goes to work on the Sirens. I manage to thin the crowd enough to create a gap for another character to squeeze through. Ydwin at the same time has taken a beating over the long haul. So Pallegina rushes up the path with the intention of using Greater Lay on Hands on Ydwin and summoning a pair of Ogres to help out. The fear turned out needless though, as Ydwin actually managed to kill the Ancient Wraith just as Pallegina arrived. It becomes a mop up after that.
I go on to the entrance to the Flooded Cave at #5.
*Evil* Flooded Cave
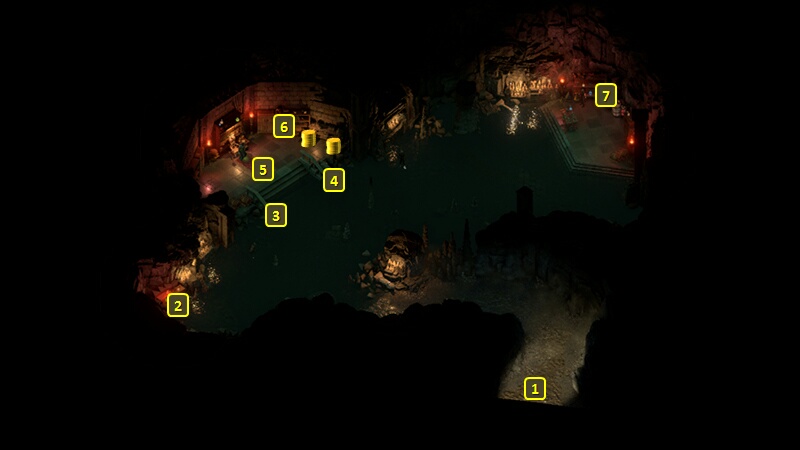
I start at the entrance at #1 on the map of the Flooded Cave.
The cave itself is the abode of the Ancient Lich Battlemage, and his numerous Dargul minions. The evil party outlasts them with the Salvation of Time-Ancestor's Memory loop. I thereafter destroy the Sigils at #3 and #34.
A container at #6 has a Blackwood Log, which I'll need to construct the Blackwood Hull for my ship.
Mirke takes Spell Resistance on her 17th level-up. It improves her resiliency with a straight 10% chance of avoiding the effects of any hostile spell outright.
I leave the island and rename it "Necromon", for purposes of the Mapping the Archipelago: The Burning Shoals Quest. I then return to my ship.
Flooded Cave
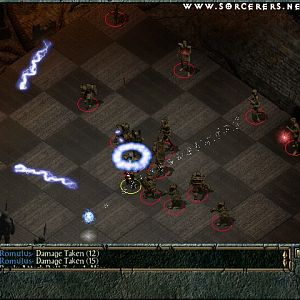
The good party "Waits" until Morning (about 2 hours) and stays in the tunnel leading from #1. Alliria goes on ahead to get the attention of the undead, and then regroups with the party. She spams Fireballs while Mirke spams Stunning Surge. Eder holds a shield wall against the horde, as does Ydwin who uses Borrowed Instinct or Phantom Foes when she's built up enough Focus. Pallegina uses And Evil Turned Away From The Sun every 4 Phrases, and aims it so that the beams catch not only her comrades but will bounce off the wall and to her as well. It keeps the party immunized against the Ancient Lich Battlemage's fear aura.
The crowd gets whittled down. So Mirke switches to her secondary gun set. Alliria tags the Ancient Lich Battlemage with Brand Enemy, then attacks the Lich in Melee along with the rest of the front-line warriors in the party. She uses Blood Sacrifice to constantly keep her Infuse with Vital Essence and Arcane Veil renewed.
I eventually wear down the Lich. It leaves behind the Brawler's Grimoire. Alliria holds onto it, as it will come in handy for The Lost Grimoires Task.
Ydwin takes two abilities on her 16th level-up. One is Amplified Wave. It inflicts Crushing Damage and knocks enemies Prone in a very wide area-of effect, and will likely cover the field during ship battles.
She also takes Improved Critical. It adds 10% Damage to Critical Hits, both for her weapon strikes and her offensive spells.
Eder takes Spell Resistance on his 17th level-up, a passive that provides a 10% chance of avoiding the effects of any spell outright.
I leave the Flooded Cave and rename it "Gelidia" before returning to my ship.
Uamoru the Pretender
I switch out Eder and Ydwin for Serafen and Rekke. I sail east and dock at the point marked #1 on the east island.
I continue north and enter the domain of Uamoru the Pretender at #6. Serafen gains two abilities on his 16th level-up.
One of them is Heart of Fury. It makes a Full Attack against every enemy within his vicinity, and with 25% bonus Damage. It does require the expenditure of 4 Rage. But my willingness to take this ability is encouraged by another ability that can recoup Rage.
The other is Dragon Leap. It upgrades Leap so that it also causes Burning Damage to enemies in a 2.5m radius emanating from the Barbarian outward on impact. I objectively regard it as inferior to Panther's Leap, which causes Raw Damage over time that isn't reduced by Armor. And that actually does resonate with the Raw Damage / bleeding theme of Serafen's build in the Evil party. But I chose Dragon Leap anyway because it fits in with the Fire theme of this build, which includes a weapon that Serafen will find later on as well as another Barbarian ability.
Mirke takes Spell Resistance on her 17th level-up. It provides a 10% chance to avoid the effects of any spell outright.
I move east a little, but keep myself on the west bank of the river. Uamoru's minions include a Dank Spore. Alliria switches to Modwyr and The Eye of Wael to immunize herself against Intellect Afflictions.
She goes on ahead to get the attention of the enemies. The party takes down the Lion Companion and Elder Panthers. Alliria bombards the Pwgra and Menpwgra and Uamoru (who's a Nature Godlike Ranger) with Ninagauth's Shadowflame. She also summons a Phantom, which will itself have Modwyr and The Eye of Wael as weapons. She and Mirke eventually take down the Pwgra, the Menpwgra and then Uamoru.
That leaves only the Dank Spore. Alliria leaves the rest of the party to face the Dank Spore, and with no fear for herself of becoming Dominated. She summons a Phantom again, and together they wear down the Spore.
Uamoru leaves behind a Hunting Bow called Aamiina's Legacy. It is an interesting possibility for a Dwarven-ranged character. Its chance to inflict Dazed (or Stunned with the Ongitok Angunisag enchantment) doubles when used by a Dwarf. And the Rapid Shot modal of Hunting Bows can, assuming you can find ways to negate the Accuracy penalty, mean multiple shots that by the law of averages are bound to Daze or Stun their targets. It can be a good choice for some builds, but it didn't fit into any of my plans.
Rekke takes two abilities on his 16th level-up. One of them is Clean Sweep. It upgrades Clear Out so that the Primary Attack will hit and Prone all enemies in a complete 360 circle around the Fighter. And that can often come into play during the intensely crowded ship battles.
He also takes Toughened Fury. A Critical Hit against the Fighter has a 10% chance of recouping +1 Discipline for the Fighter. Rekke taking Deflection penalties on himself by wearing the Sandals of the Water Lily and using the Vulnerable Thrust modal of an Estoc is meant to maximize the use of this passive. Maximizing the potential for recouping Discipline in turn maximizes his potential to use his activated abilities. And I don't mind if receiving multiple Critical Hits leads to getting knocked unconscious during ship battles, as he won't suffer Injuries as a ship combatant. It will also trigger Unbreakable, and massive explosive damage to nearby enemies through other items that he's wearing.
Woedica's Strangling Grasp
I go on ahead to the Old Battleground at #7. I get a pair of gloves called Woedica's Strangling Grasp. Serafen wears them for the rest of the game. They provide +2 to Might. And they also provide +2 Burning Armor Rating, which fits in with the Armor-heavy theme of Serafen's build.
I thereafter return to my ship.
*Evil* Woedica's Strangling Grasp
Zarathos gets Woedica's Strangling Grasp in the evil party. The key benefit is that the +2 bonus to Might is one of the items that helps him reach the maximum Might score of 35.
He gives the Gauntlets of Ogre Might he had been wearing to Serafen. Gauntlets of Accuracy may strictly speaking have been preferable. But other characters in my opinion had better claims on those Gauntlets of Accuracy that were available. That is to say I felt Accuracy was more integral to the class abilities of other characters. So Serafen gets these gloves more or less by default.
Hohonu Lagoon
I switch out Mirke and Pallegina for Eder and Konstanten. I want my party members to all have good Athletics scores to avoid Injuries during the next encounter.
I sail to the Hohonu Lagoon at #36 on the World Map, which involves an encounter with a large sea creature. Eder makes a Survival check of 7 to reveal that it is a large and horned carnivorous whale known as a Qilutaalik.
All further options lead to the whale attacking the ship, getting its horns lodged in the ship, and your ship itself sustaining at least 15 points damage. All of my party members make Athletics checks of 6 to avoid getting Injured. The choices at the start of the encounter are: