-

- Forums
- Chatrooms
- Gallery
- Gameplay Videos
- Upload
- Articles
- Mod Reviews
- Shop SP: Games, Movies, Books
|
|
| Pillars of Eternity 2 Video-Based Walkthrough by David Milward |
The Hanging Sepulchers
*Evil* The Eel's Coil
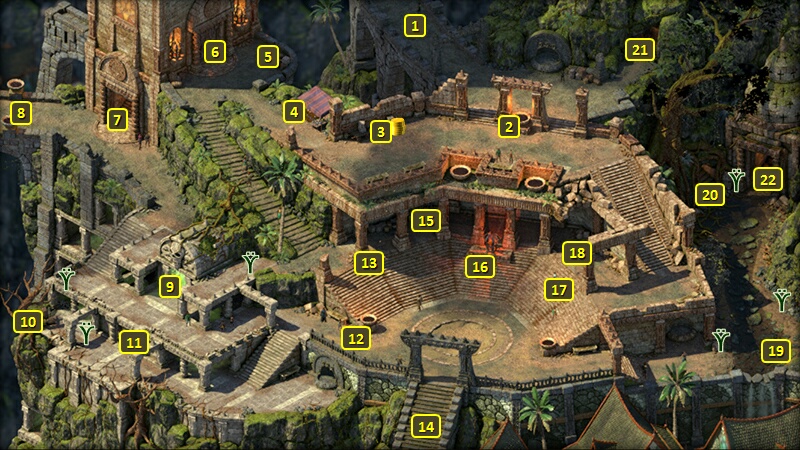
I show this part from the perspective of the evil party, since it's more meaningful for Zarathos as a Death Godlike. I go from #7 on the map of The Sacred Stair to #9 to enter the Temple of Berath.
I speak at length with High Priest Kosu, who gives me The Eel's Coil in order to access the Temple of Berath. Kosu takes a particular interest in Zarathos being a Death Godlike.
I go to the sealed door at #11, and use The Eel's Coil to open it.
*Evil* Gauntlets of Discipline
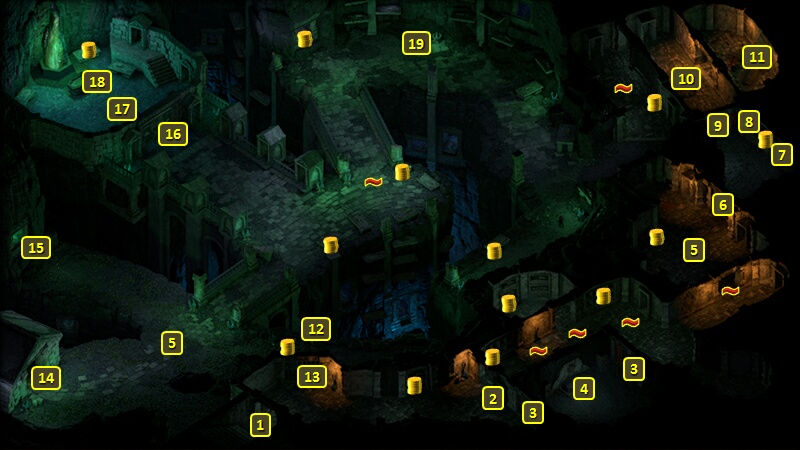
The evil party starts off at #1 on the map of The Hanging Sepulchers.
Tekehu gains several abilities on his 13th level-up.
He gains Cool Wind Washes Over The Tribe automatically as a Stormspeaker. The wind can both push enemies away at least 3m and restore Health to party members. It's a card that can come into play in the right circumstances.
He gains Ocean Burst automatically as a Watershaper. It inflicts 50-62 Crushing Damage in a 2.5m Radius and at 8m range. So it does provide an offensive option with decent range.
I select Seven Nights She Waited While the White Winds Wept. It's a useful Offensive Invocation in its own right when hordes of enemies surround the party from all sides. There's the additional point that all of the bolts together amount to multiple Empowered Powers, and that makes it a trigger for multiple Tier-3 Inspirations for Tekehu when I get the Least Unstable Coil for him much later on.
I also select Relentless Storm, which is a key spell that I've been waiting for. Hits enemies in a 5m radius around the caster with bolts of electricity that both inflict Shocking Damage and briefly Stun (-5 Might, Cannot Engage, Cannot take any actions, -4 Penetration) their targets, every 3 sec for 15 sec. Offensive damage and crowd-control rolled into one.
I press the button at #2 to open the door at #3, and collect some treasure at #4. It includes Gauntlets of Discipline.
I send Ydwin ahead in Stealth mode to disarm some traps in the corridor north of #4. I then gang up on and take out a Risen Soldier.
Gauntlets of Discipline
Pallegina takes two abilities on her 13th level-up. One of them is Rapid Casting, which will help her cast her Chanter Invocations a little faster.
She also takes Practiced Healer. It will increase the Healing provided by abilities such as Ancient Memory and Exalted Endurance, as well as those provided by several of her items.
Rekke will get the Gauntlets of Discipline in the good party. His build depends heavily on the use of activated abilities, so an item that adds +2 Discipline is very welcome.
*Evil* Azure Blade
I enter the room at #5 for a tough fight. It includes a few Luminous Revenants, three Risen Armsmen, a couple of Risen Champions, a Risen Priest, and a Risen Mage. The Risen Armsmen are the greatest threats, as they can inflict devastating single-target damage with ranged weapon attacks.
I start off with having Tekehu cast Nature's Balm to improve the party's resiliency to start the battle. I rush the party towards the southwest party of the room, with a view towards ganging up on and taking out one of the Armsmen. I position Mirke more towards the northwest corner of the room. The idea is that she gains the attention of the other two Armsmen as the tank. She also activates both Vigorous Defense and The Wall modal of her Large Shield, so as to reduce damage from any missile fire by half.
Zarathos activates Swift Flurry, and begins attacking the Armsman. Xoti casts Holy Meditation. She then for the rest of the battle joins in melee combat, but using Restore or Holy Radiance for healing when needed.
Tekehu begins an extended sequence of Moonwell as a buff, Relentless Storm, Chill Fog and Nature's Mark.
Ydwin uses Amplified Wave whenever she builds up enough Focus for it. Knocking enemies en masse with Crushing Damage not only brings them closer to death, but also reduces the attacks they can get in on party members. Tekehu helps matters along with Offensive Invocations whenever he has enough Phrases for it.
Zarathos and Xoti scope out which of the Risen (other than the Champions) are closest to death, with a view towards finishing them off. It ends up playing out in a sequence of the Priest and then the other Armsmen.
Tekehu by around that point has been taking a beating with having the Risen Champions on top of him. So Xoti uses Withdraw on him.
One of the Risen Champions gets locked down by Mirke, which is just fine. I gang up on the one that's attacking Ydwin.
Once he's gone, I take out the Mage, and then finally gang up on the remaining Revenant and Champion.
A niche at #8 has a Sapphire and a Stiletto called the Azure Blade.
Konstanten will soon get the Azure Blade as the main weapon for the rest of the game. I enchant it with the "Cloak and Dagger" power, which will provide +15 Accuracy as long as 3 allies or more are within 2m of the wielder. That means it will be active for Konstanten during the crowded mob fights that take place during ship battles. And more Accuracy means more Critical Hits, and that in turn means faster accumulation of Phrases for a Skald. The "Wrong Place, Wrong Time" power would have left the Accuracy bonus at +10 but also provided a 25% chance of Interrupt on Hit. That choice would have been more meaningful for a core party member who I would bring along for fights against bosses.
I also add the "Refreshing Finale" power to Sasha's Singing Scimitar. The Refreshing Finale enchantment will, upon using an Empowered Chanter Invocation, immediately restore 3 Chanter Phrases and 1 Empower Point. It is literally the only opportunity to use Empowered Attacks as once per Encounter abilities without having to Rest. That makes it the easy choice over Encore, at least for purposes of a no Rest run. And Tekehu will acquire other items that have powers that trigger on using an Empowered Attack, which makes his weapon a linchpin albeit very late in the game.
*Evil* Eulogy to Yseyr - The Vigil
I inch towards the room at #10. I do a little divide and conquer, and draw a Dargul Marksman and a few Rotghasts away south and kill them.
I continue forward and find a Wraith. It teleports Mirke and itself away to the south. The wraith will be joined in by a couple of Rotghast Ravagers. The rest of the party rushes south, takes out the Rotghasts, and helps Mirke out against the Wraith.
A sarcophagus at #11 has the Eulogy to Yseyr - The Vigil, which is needed for the Eulogy for the Dead Quest.
Ydwin acquires two abilities on her 13th level-up. One of them is Ancestor's Memory. It allows her to put the Brilliant (+5 Intellect, +1 Power Levels, +1 Class Resource every 6 sec) on an ally. And that ally is typically Xoti. This is part of the foundation for how the evil party conducts battles during later stages of the game. The other foundation being Salvation of Time once Xoti gets it. It's simple and every bit as broken as it sounds. Once Xoti has Ancestor's Memory cast on her, she can prolong its duration with castings of Salvation of Time. And Ancestor's Memory will, especially if you can isolate Xoti's 6th-level spells as the only Priest Class Resource that needs to be recouped, replenish her 6th level spell slots. And that means Salvation of Time can be cast more times, which in turn means more extension of Ancestor's Memory. It's an endless self-regenerating loop that not only ensures Ancestor's Memory and Salvation of Time remain in play the whole battle, but every other beneficial effect or buff in place for all other party members will also get extended endlessly as long as they are in the area-of-effect of Salvation of Time.
She also takes The Empty Soul, which adds +10 to Accuracy for Cipher spells that target Will, which includes Puppet Master, Borrowed Instinct and Silent Scream.
*Evil* Eulogy to Yseyr - The Gate
I make my way towards the southwest portion, collecting treasure and disarming the odd trap or two along the way. I fight a large number of undead near the southwest corner. I keep my party at a bottleneck with Tekehu and Ydwin safely behind a wall formed by the other party members. I wipe out the horde rather routinely.
Now I go through the door at #14 to enter a mausoleum. Ydwin disarms a few traps at the west end.
A hidden niche at the west end has a Robe called Effigy's Husk. Ydwin wears it for the rest of the game. As a cloth armor it does not impose a Recovery Time penalty, which is always welcome for a spellcaster. I enchant it to provide resistance against Perception Afflictions, as Accuracy is important to Ydwin. I also enchant it so that all enemies within 5m suffer a -75% penalty to Healing Received, but only when Ydwin is herself at 25% Health or less. There will be battles where I have Xoti put a Barring Death's Door on everyone, and have that immunity to death for everyone extended endlessly through castings of Salvation of Time. And that concept makes me considerably more willing to use items whose power depends on the user being close to death. The robe's power will truly make itself felt if Ydwin is brought near death but actually has little to fear on account of an infinite Barring Death's Door.
A sarcophagus at the west end has the Eulogy to Yseyr - The Gate. Grabbing it causes a few Risen undead to appear, but they are few and I easily overpower them.
Yseyr the Berathian
The good party goes northeast to the door at #16. The door will have a skeleton to each side of it. The skeletons act as seals on the door itself.
I click on the skeleton to the right after reading the name "Faydwen" from the Eulogy to Yseyr - The
Vigil. I then select the "Lady of the Vigil" dialogue option, which causes the skeleton to break its seal on the door.
Now I click on the skeleton to the left after reading the name "Borthwn" from the Eulogy to Yseyr - The
Gate. You'll be able to select the "Lord of ..." dialogue option. Having both skeletons break their seals on the door will now open the door itself.
Alliria goes through the door and then speaks to Yseyr himself at #17. His initial inclination is to attack, but either a History check of 6 or a Diplomacy check of 6 (which Alliria makes) will get the foot in the door for a more peaceful resolution.
He willingly answers questions about his conflict with Lucia Rivan, and the sword that was at the heart of that conflict, and that will help complete the Symbols of Death Quest.
Alliria also asks his permission to use the sword. He's hesitant. Either a Perception check of 20, a dialogue option based on the Watcher being a Death Godlike, or a Religion check of 8 (which Alliria does), followed by a promise to return the sword to him when you're done with it, convinces him to give the Engoliero do Espirs. It's an Estoc but will at this point be a Quest Item and will remain so until you complete the Principi Quest called A Dance With Death.
He also grants permission to take the last Eulogy needed for the Quest if you ask for it. The Eulogy to Yseyr - The Sword will be in the sarcophagus at #18, whether you first killed Yseyr or he gave you permission to take it.
I go south and use the lever at #12, which opens the door at #13. I leave The Hanging Sepulchers through the entrance at #1 to return to The Sacred Stair.
*Evil* Yseyr the Berathian
Zarathos of course prefers to be more violent about things. I back Tekehu and Ydwin into the southwest corner of the chamber. Mirke and Xoti form part of a wall around them. Zarathos goes on ahead and verbally provokes Yseyr the Berathian into attacking. He then regroups to complete the wall around my spellcasters.
The trio that make up the wall attack anyone in reach. But Xoti does start with Holy Meditation, and then Devotions of the Faithful once enough enemies show up. She also unleashes a Scroll of Wilting Wind.
Ydwin will tend to use Amplified Wave when a whole horde of undead is surrounding the party, or Silent Scream (which inflicts Raw Damage) when enemies are bunched in closer against the party. She once in a while casts Ancestor's Memory on Tekehu to help renew his spells.
Tekehu starts off with Nature's Balm and Moonwell. Most of the enemies haven't closed in yet, so he summons an Ondra's Whip as a distraction. Once the horde shows up in earnest, he unleashes offensive spells like Chill Fog, Relentless Storm, and then Nature's Mark. He follows that up with an Empowered Seven Nights She Wept, which thanks to the now properly enchanted Sasha's Singing Scimitar, immediately recoups three Phrases and restores the Empower Point. He immediately follows that up with The Skies Opened.
But as previously mentioned, Ydwin occasionally puts Ancestor's Memory on him. So it helps him periodically put up a new Nature's Balm, or a new Moonwell, or a new Relentless Storm, which makes a real difference for a long battle like this. He also occasionally tosses a Cinder Bomb when he can catch enough enemies with one.
I did make a mistake, which was that I had Ydwin cast Disintegration on a Risen Mage who was protected by Arcane Reflection. And the danger that gets realized is that Ydwin finds herself under the effects of Disintegration. I had Xoti bail her out with Withdraw.
I eventually manage to wipe out everyone besides Yseyr, but it's still a tough battle. Xoti had to dip into her Scrolls of Minor Healing, and even so I just managed to land the last blow on him before he could take out party members who were themselves close to no Health.
I likewise collect Engoliero Do Espirs and the Eulogy to Yseyr - The Sword and leave.
*Evil* Eulogy for the Dead
First, I go to the district exit at #14 on the map of The Sacred Stair. I temporarily switch Eder in, who gains two abilities on his 13th level-up. One of them is Mob Stance. I had been keeping Cleaving Stance active for him this whole time, with the key point that he'll make a Full Attack on all enemies surrounding him whenever he scores a killing blow. Mob Stance upgrades Cleaving Stance so that his Recovery Time is reduced by 5% for each enemy that is within his Melee Attack range.
He also takes Deep Wounds, which is a passive that causes 20% of the initial damage from a weapon attack to be added as extra Raw Damage over time. It's the easy choice whenever any Rogue character reaches this stage in his or her development.
I now bring in Aloth, Maia, Rekke and Konstanten. I equip Konstanten with the Azure Blade that I found earlier.
I return to the Temple of Berath at #9 and give the Eulogies to High Priest Kasu to complete Eulogy for the Dead Quest. I get 11,000xp as a reward plus a couple of items.
One of them is the Ruata Walking Cloak, but I have no use for it.
The other is a Girdle of Mortal Protection, which Aloth wears for the rest of the game. The +2 bonus to Constitution, and 15% chance to reduce Critical Hits to Hits, will improve his resiliency somewhat.
I reassemble the core party and return to the ship.
Eulogy for the Dead
I bring in Xoti, Fassina, Rekke and Konstanten for the good party.
Rekke takes Reaping the Whirlwind on his 12th level-up. It adds +1 Discipline for a character build that will use activated abilities very often.
I then go to the Temple of Berath to complete the Quest. Konstanten takes Savage Defiance on his 12th level-up. The Robust Inspiration both boosts Armor Rating by +2 and provides Health regeneration during its duration, so it will improve his survivability when he uses it.
Xoti takes two abilities on her 13th level-up. One of them is The Dichotomous Soul. It summons two replicas of herself, one made of fire and the other of ice. They inherit her armor and accessories, but use unarmed attacks with one scoring bonus Burning Damage and the other scoring bonus Freezing Damage. And that means I'll definitely have these summons during ship combat.
The other is Heartbeat Drumming. It provides a 25% chance of an extra attack upon scoring a Critical Hit. Xoti by this point has everything she needs to be effective in what I need her for, so this amounts to sugar on top.
She also wears the Girdle of Mortal Protection. The +2 bonus to Constitution, and 15% chance to reduce Critical Hits to Hits, will likewise improve her resiliency and survivability.
I go on another shopping trip to The Dark Cupboard and Cuitztli's, reassemble my core party, and then return to the ship.
The West Wakara Reef is my next destination.