-

- Forums
- Chatrooms
- Gallery
- Gameplay Videos
- Upload
- Articles
- Mod Reviews
- Shop SP: Games, Movies, Books
|
|
| Pillars of Eternity 2 Video-Based Walkthrough by David Milward |
Delver's Row
*Evil* Cornett of Waves
Now I go directly to Dereo's Lair from the city map, and show him the Cornett of Waves. He directs me to take it through Delver's Row, the Undercroft, and then into Old City. I also ask him for directions to Delver's Row.
Mirke advances to her 12th level. She takes Weapon Specialization, which will increase her damage with a Rapier by 10%.
I leave and return to The Narrows. I go right and right, and then make a Perception check at the Merchant Stall. I can make the check automatically now that I've received directions, and thereby enter Delver's Row.
Tekehu reaches his 12th level upon arrival. He takes Hail Storm. It's an option for casting area-of-effect damage on a group of foes, like archers or spellcasters, who are a considerable distance away.
*Evil* Drowner's Lung Medicine
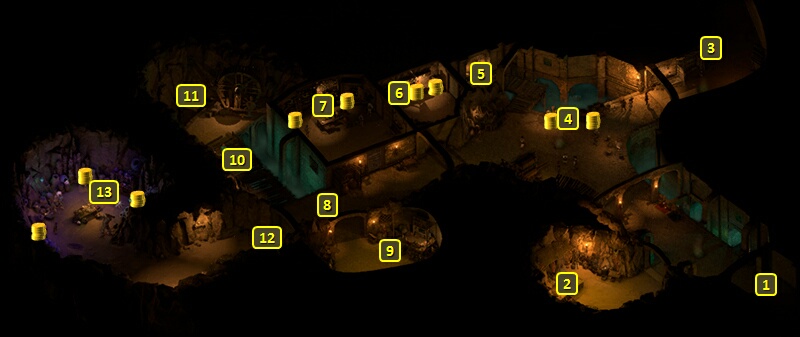
I start off at #1 on the map of Delver's Row. I buy some plants and ingredients and such from Enarat at #2.
There are a number of ways to go about obtaining the Drowner's Lung Medicine.
Ernezzo and his crew are at #7. You can either buy it from him for 800cp. An alternative is to get it without paying the fee, but only if you first kill the Spindle Man and his minions at #12. Doing do will also earn positive reputation with the Delver's Row Criminals.
An alternative is to share your memories of Ernezzo's request with the Spindle Man. The Spindle Man in turn will reveal the location of the Drowner's Lung Medicine at #6.
It also asks you to kill Ernezzo instead. If you do, you will lose reputation with each of Ernezzo and his men that you kill, but you will gain a 10% discount of items in the Spindle Man's shop.
If you want to lessen the risk, and possibly the extent of reputation loss as well, some of Ernezzo's men will be absent during night time hours as they go off drinking.
Another pathway is to hire Rust at #3 to take out either Ernezzo for 300cp or the Spindle Man for 600cp. Your chosen target, along with his minions, will be dead once 26 hours have elapsed.
As an aside, Rust himself presents an interesting opportunity to obtain a very powerful Stiletto called Rust's Poignard. Actually getting it from him is quite involved.
You can start by force attacking him. Keep in mind that even by himself he's a real threat to outright kill one or more of your squishier characters by himself. So you may want to keep them well at a distance before even starting.
Also, you can't kill him here and now. He'll teleport to the exit from Delver's Row once you've reduced him to 25% or less Health. If you want his weapon, you'll have to leave through the exit at #1.
Clicking on the exit leads to a scripted interaction whereby you can give chase, or always have the option to leave the Narrows or return to Delver's Row. The first part of pursuing him involves getting past some abandoned merchant stalls as an obstacle. Either a combined Dexterity check of 14 and Athletics check of 5, or a combined Might check of 15 and Athletics check of 7, can keep you in pursuit without injury. Failing the checks or trying to circumvent the stalls without trying the checks is likely to result in injury and losing his trail.
Rust will next put up a smoke cloud to try and lose you. Either a wind spell (e.g., Winter Wind) or making a Perception check of 14 can keep you on his trail.
Now you need to go forward, and then right. After that you'll have a choice of either letting him go or chasing him down.
If you chase him down, you'll have to fight him and a few of his Thug friends. You can loot Rust's Poignard from his body should you win. You can click on any exit from the battleground to either leave the Narrows or return to Delver's Row.
I did not pursue this opportunity in either playthrough, because it seemed I always got Injured somehow or couldn't make my way further. So it just seemed like too much of a hassle to bother.
All I did was go to #5 where I made a Perception check that revealed a hidden button. Pressing the button opens the door to the left.
I obtain the Drowner's Lung Medicine from the room at #6, as well as an Arquebus called The Red Hand and three Rubies.
The Red Hand is arguably the most powerful single-target ranged weapon in the game, as it hits twice and can knock its target back. It would be a natural weapon of choice for Maia if she were a core party member instead of a ship combatant. But I prioritize Ydwin for items that provide Ranged Attack bonuses. I therefore set up Maia with the workable alternative of using the Dragon's Dowry in combination with the Ring of Focused Flame.
I open the next door leading to #7, where Ernezzo keeps shop. But I have no interest in any armor or weapons he sells. Ydwin picks a chest in the room for the xp. I leave the room thereafter.
Dead Godlike Pirate
The good party continues on to #8, where they find the dead body of a Moon Godlike. Alliria uses her Watcher powers to read its soul, and learns that Godlike pirates kidnapped Giacolo and have carried him off to Dunnage. This event progresses Pallegina's personal Quest, The Man of Chimes. Pallegina is of course resolute on looking for Giacolo in Dunnage.
The Spindle Man
Now I go west and speak to the Spindle Man at #13. The good party buys two items of interest from him.
One of them is Zandethus' Dragon-Scaled Grimoire. It takes over as Alliria's primary Grimoire. It has Fireball, which can serve as the offensive spam spell during daylight hours. It also provides Flame Shield and Llengrath's Safeguard as buffs. The key point is that it provides a unique 7th-tier spell that can only be used through the Grimoire, Zandethus' Draconic Fury. It adds +15% Slashing Damage and 15% Burning Damage to the caster's Melee Attacks for at least 30 sec. It adds +15% Slashing Damage and 15% Burning Damage to the caster's Melee Attacks for at least 30 sec. And any enemy who Grazes or Hits her with Melee Attacks has a chance of Terrifying the target. She'll still use Ninagauth's Teachings when she wants to spam Ninagauth's Shadowflame during nighttime hours.
I also purchase a Ring of Regeneration. I briefly leave Delver's Row and return to the Gullet. I go to the exit near the entrance to The Narrows. I briefly switch in Serafen and have him equip the Ring for the rest of the game. Any warrior who isn't packing a shield is going to take damage, so equipping this ring is a natural choice. I put my core party back together and then return to Delver's Row.
*Evil* The Spindle Man
Eder gets the Ring of Regeneration in the evil party. It's a given that a warrior using a two-handed weapon will himself get hit plenty, so any bit of regeneration will help.
I buy the Whitewitch Mask for Aloth. The key point is to add +1 to his Illusion Power Levels, and most of his spells will be Illusions.
I also buy an Amulet called Sisyfo's Stone for Serafen. The key reason being that it will impose a -2% Action Speed penalty on the attacker whenever the wearer is Hit in melee combat. That will also stack with a similar penalty imposed by an armor that I'll find later on. And both of these together fit into the broader theme of packing as much negative consequence as possible for an attacker who scores a Critical Hit on Serafen.
Imuani
Now I go to the room at #9 and purchase two items from Imuani.
One of them is a Belt called The Undying Burden, which Eder wears for the rest of the game. It provides +2 Constitution, which is always welcome for a front-line warrior. It provides Damage Reduction that increases as the wearer gets closer to getting knocked Unconscious, with the bonus maxing out at 10%. It is yet another item that provides a stacking bonus to Damage Reduction, which ties in with the overall theme of Eder's build.
The other one is a helmet called Rekvu's Fractured Casque, which Aloth wears for the rest of the game. It provides complete immunity to getting Interrupted as long as the wearer has at least one Injury. And I had Aloth trip a trap in the first level of the Engwithan Waystation to give himself Wrenched Knee, which gives him a barely noticeable penalty to Stride and nothing else. The helmet therefore lets him call on the extra spell castings provided by the Grimoire of Vaporous Wizardry when he needs it, while immune to its drawback of any Damage at all causing an Interrupt on the user.
*Evil* Imuani
Zarathos purchases The Undying Burden for himself, and for somewhat different reasons. The +2 Constitution is welcome for any character who dishes out and takes damage on the front lines. He'll often tease the edge of getting knocked unconscious owing to the particulars of his build, so improving his survivability to a degree as he gets closer and closer to that can be helpful. And it can buy time for Xoti to put a Barring Death's Door on him during later stages of the game.
Both the good party and the evil party now go down the lift at #11 to enter the Undercroft.