-

- Forums
- Chatrooms
- Gallery
- Gameplay Videos
- Upload
- Articles
- Mod Reviews
- Shop SP: Games, Movies, Books
|
|
| Pillars of Eternity 2 Video-Based Walkthrough by David Milward |
The Hole
Fyrna
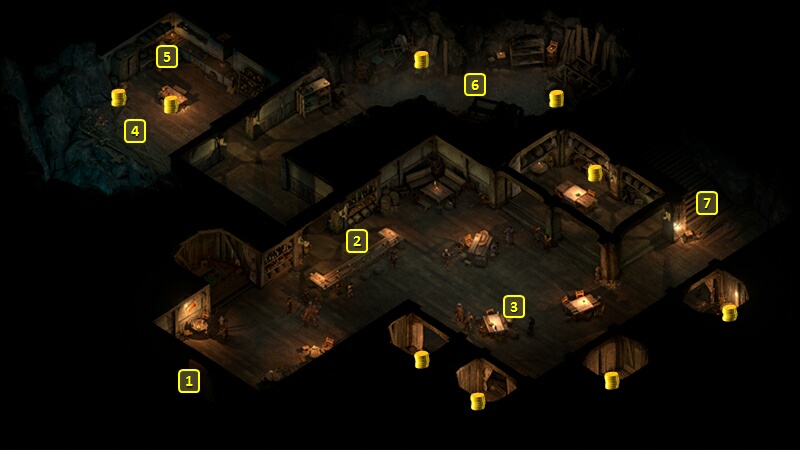
I start off at #1 on the map of the first floor of The Hole. I speak to the keeper, an Orlan named Fyrna, at #2.
She doesn't know anything about Pallegina's friend, Giacolo.
She can provide information that can make reaching Delver's Row easier. If you have at least one point of positive reputation with The Gullet and ask her how to reach the Row, then she'll give you directions to reach Delver's Row through the Narrows straightaway.
Otherwise, you would have to either make a Streetwise check of 2, or give her 250cp (or 100cp if you make a Diplomacy check of 3).
A different branch of possibilities opens up if you previously received The Envoy's Badge from Prince Aruihi to start the Trade Secrets Quest. You will have an option to flash the Badge to Fyrma. From then on you can:
Baer and Persa
I go west. There's a Pet pig named Onyx at #4. There's an Ogre cook named Birta who can act as a Crew Member, but I'm not interested.
Now I put Mirke into Stealth mode, and send her on ahead towards #6. She approaches conspirators just close enough to listen in on several conspirators, led by Baer and Persa, but not too close so as to blow her cover. Just overhearing the discussion provides information that will progress the Quest called A Sinking Feeling.
*Evil* Baer and Persa
Zarathos prefers to just slaughter Baer and the others. They leave behind the Vault Schematics after they're killed, which likewise helps progress the Quest called A Sinking Feeling. He also murders Persa in cold blood when she's by herself and terrified in a corner.
Seduzo
Now I speak to Seduzo at #3. She'll explain that she called the guards on Botaro because she was skeptical that he could afford passage, and because the Marked Suole he showed her made her afraid of crossing the Principi.
The simplest way to gain passage for Biha and at least two of her children is to pay her 300cp.
You can also coerce her into providing passage for free by threatening to expose her to the Royal Deadfire Company for conducting unsanctioned business in The Gullet. Options include:
Giacolo's Laboratory
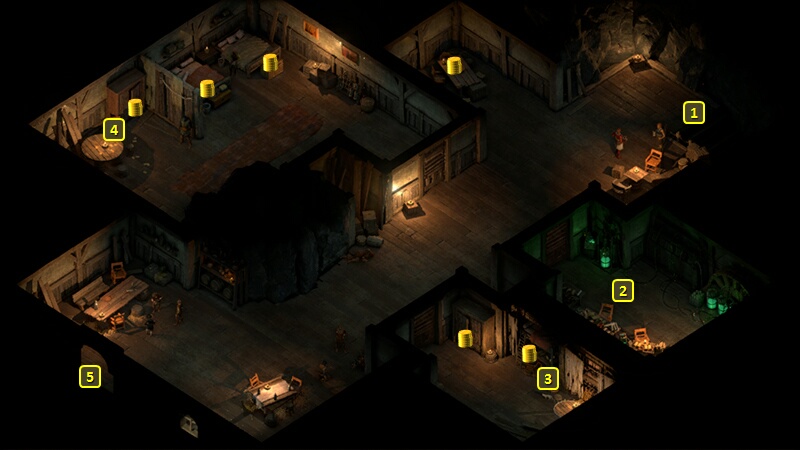
That brings me to #1 on the map of the second floor. I go to #2, which is the site of what had been Giacolo's Laboratory. To simply come here with Pallegina in the party, so that she notes Giacolo's absence, will progress her personal Quest, The Man of Chimes. I make a point of emphasizing that finding Giacolo is important in my reply to Pallegina so as to earn positive reputation with her.
Eder takes Armored Grace on his 12th level-up. It reduces his Recovery Time by 25%.
Orron
Now I speak to Orron at #4. Alliria makes an Intellect check of 14 to trick Orron into giving up his berths on Seduzo's ship. A payment of 1,200cp would have worked as well. I thereafter go back down the stairs at #1.
*Evil* Orron
Zarathos starts with the Clever option to move the cup. He follows up with the Cruel option to provoke Orron and his band into attacking. I had Tekehu and Ydwin tucked in the corner against the walls beforehand to keep them at a safe distance from melee combat. I otherwise win with standard methods.
All Aboard
Now I am back at #7 on the map of the main floor of The Hole. I speak with Seduzo again at #3, and inform her that Orron has abandoned his berths on her ship. I leave out the door at #1 afterwards.
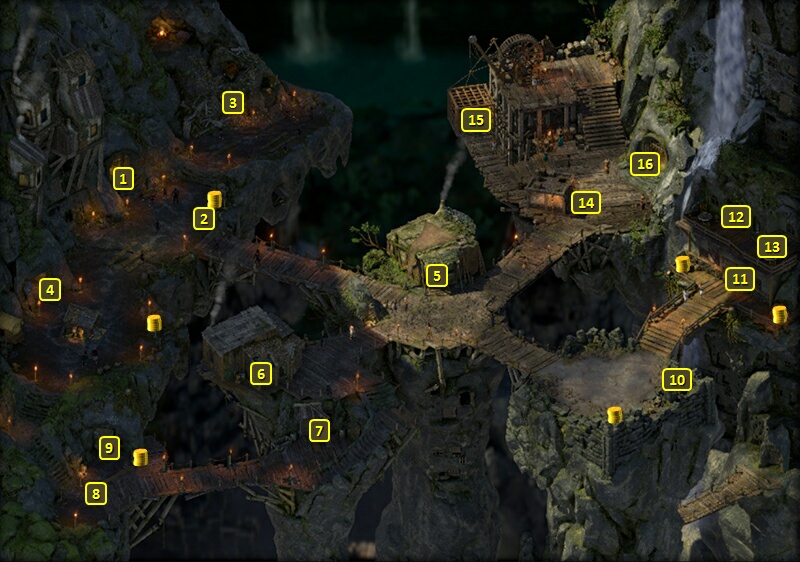
I am now at #11 on the map of The Gullet. I go southwest, and get accosted by some local thugs. I choose to fight them. It's a pretty easy battle, although I have Mirke turn off her Powder Burns modal to avoid any of the bystanders from turning hostile.
I next enter Biha's house at #5. Offering her the 600cp that Botaro had hidden results in a minor gain of positive reputation with The Gullet, but she won't take it.
I then inform her that there's room for all her children on Seduzo's ship. That results in a major gain of positive reputation with The Gullet, and 3,000+ xp to complete the All Aboard Task.
Dereo the Lean
I step out the door and a messenger speaks to me, giving me instructions on reaching Dereo the Lean in the Narrows.
I go the entrance to the Narrows, at #4. Following the instructions means going right, right and left during the scripted interaction. The guards initially block my way. There are some options that do not involve killing them: