-

- Forums
- Chatrooms
- Gallery
- Gameplay Videos
- Upload
- Articles
- Mod Reviews
- Shop SP: Games, Movies, Books
|
|
| Pillars of Eternity 2 Video-Based Walkthrough by David Milward |
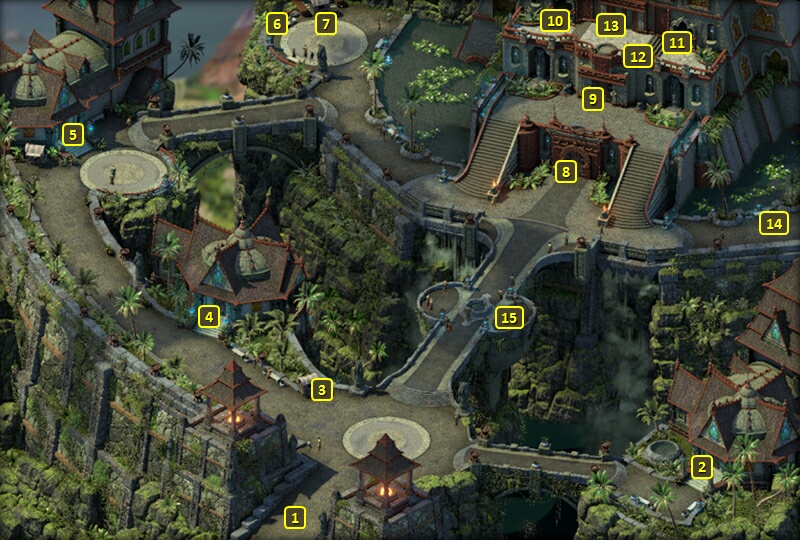
Serpent's Crown
Pearlescent Rhomboid Helstone
Zarathos prefers to just slaughter Baer and the others. He also murders Persa in cold blood when she'd by herself and terrified in a corner.
*Evil* Pearlescent Rhomboid Helstone
The evil party buys up crafting ingredients at The Dark Cupboard and Cuitzli's. I briefly switch out Ydwin or Maia before I leave. I got a Ruby from my previous fight against the Cutthroats. So now I can upgrade her Dragon's Dowry. I chose the more damaging but unsafer Volatile Runelock over the less damaging but safer Stable Runelock. She's a ship combatant who won't take any injuries if she's knocked unconscious during ship combat, so I don't mind going with the riskier power.
I switch Ydwin back in and travel to Serpent's Crown.
I buy gemstones from Una at #3. I buy the Pearlescent Rhomboid Helstone for Mirke. The Helstone confers one of six random defensive benefits at the start of each fight: Concentration, +1 Armor Rating, +3 all Defenses, -5% Damage Taken, additional +10% chance to reflect spells. Any of them would help her in her tanking role.
Takano
The good party waits until just before Morning, and then travels to Serpent's Crown. I buy gems from Uno at #3, and then enter Takano's Estate through the door at #2.
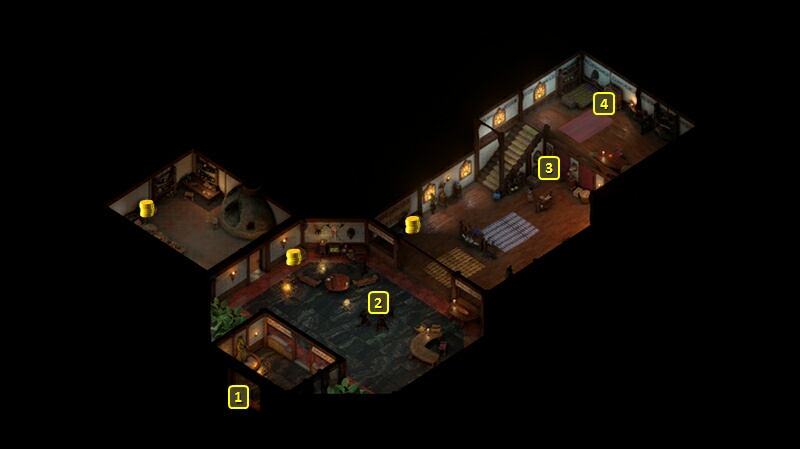
I start off at #1 on the map of Takano's Estate. Takano will himself be at #2. There's a number of ways to get the Cornett of Waves from him:
*Evil* Takano
Zarathos chooses Aggressive replies that leads to a fight, and slaughtering Takano and all his servants. Note how Ydwin sometimes doesn't have to worry about melee attacks if she can raise her Defenses with Borrowed Insinct. Healing buffs from Tekehu help on that point as well.
I grab the Cornett of Waves out of the chest at #16, and leave.
*NOTE* The other benefit is that my reputation with the Huana has plummeted after this attack, and that means a high-level Huana ship is now going to appear on the World Map. And it has a shield that I want for Mirke.
Lady Epero
Now I go west and across to the other side of Serpent's Crown, and enter through the door at #5.
I am now in Lady Epero's Estate, and start combat with her and her minions in order to collect the Bounty on her. My passive healing and Defenses help me get through it, though there is the odd worry when her Wizard manages to use Form of the Helpless Beast on a party member. Those moments oblige me to use healing powers like White Flames and Greater Lay on Hands until the transformation effect wears off. I otherwise manage to outlast the opposition.
Nungata
I speak to Nungata at #6, and accept a Bounty on Beina.
I go east and enter the Kahanga Palace through the door at #8.
Food for the Roparu
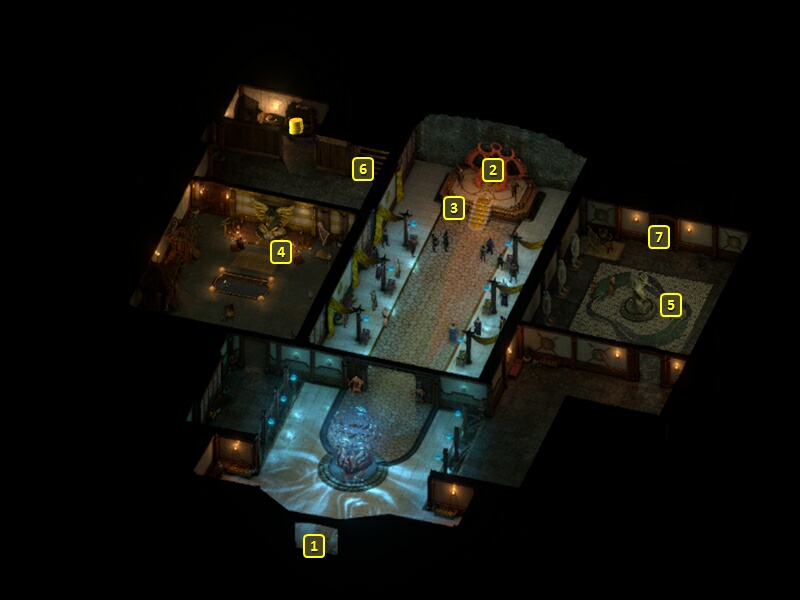
That brings me to #1 on the map of the main floor of the Kahanga Palace.
I speak to Prince Aruihi at #2, and bring up the starving Roparu in The Gullet. I eventually use a Streetwise check of 4 (or an Intimidate check of 5) to convince him to increase the Huana food allowances to the Roparu, although it results in a moderate loss of reputation with the Huana. I could have avoided the reputation loss until after I had completed the Trade Secrets Quest. But I do it now figuring I can afford the hit against reputation with the Huana, and ultimately to minimize my having to travel around through city districts multiple times over.
And that can happen with more complicated pathways for the Food for Thought Quest. The evil party will call on the Principi to make good the shortfall, and I'll show that fairly soon. The other possibility is to partner up with the Dawnstars, first by speaking to Pitli in The Gullet and then to High Priestess Saewyn in The Sacred Stair, but they themselves will require partnering up with the Huana or the Principi. So I just do it now and get this part of the Quest over with.
Mirke takes Thundering Blows on her 12th level-up. It provides the Tenacious (+5 Might, +2 Penetration) Inspiration for 12 seconds. I activate it along with Lightning Strikes only once I reach 10 Wounds, with the point of maximizing the duration of both buffs. I then renew both Buffs after about 20 seconds, and when ideally Enduring Dance brings her Wounds back up to 10.
Aloth takes Rapid Recovery on his 12th level-up. It increases the Health regeneration of Constant Recovery from +5 Health every 3 sec to +7 Health every 3 sec.
I thereafter leave through the door at #1 and then leave Serpent's Crown through the exit east of the Palace door (at #14).
Ateira
Going anywhere on the map of Neketaka with the Cornett of Waves in my possession results in an encounter with Ateira, who Dereo the Lean originally hired. I could dissuade her against a fight with the following options: