-

- Forums
- Chatrooms
- Gallery
- Gameplay Videos
- Upload
- Articles
- Mod Reviews
- Shop SP: Games, Movies, Books
|
|
| Pillars of Eternity 2 Video-Based Walkthrough by David Milward |
Return to The Gullet
Griffin's Blade
I briefly bring in Serafen, and have him take Tough on his 12th level-up. More Health is always good for any Melee character, especially one that's inevitably going to get struck multiple times.
I switch Pallegina back in and attempt to travel directly to Dereo's Lair from the map of Neketaka. I end up in an encounter involving two of my Crew Members wanting to rob a noble lost in the city street. Alliria uses the Passionate reply to convince the Crew Members to return to ship. Other options would have earned Aggressive or Shady disposition.
Alliria speaks to the noble with a Diplomatic option, and then has Mirke make a Streetwise check to give the noble directions to Queen's Berth.
I again attempt to travel to Dereo's Lair. This time I get the Griffin's Blade encounter. I tell the Huana girl to run away to earn Benevolent disposition. I then have Eder make an Athletics check for a minor gain in positive reputation with Neketaka.
Unlike the evil party, I actually do make a point of keeping the Huana girl, Kusi, alive. Alliria stays near her and uses White Flames whenever it's necessary to replenish her Health. I afterwards turn down Kusi's offer of Griffin's Blade in order to earn more Benevolent disposition.
*Evil* The Cornett's Call
I briefly switch in Serafen to equip him with the Duskfall, which replaces the Whispers of Yenwood.
I add two enchantments to the sword. One is Drawing Cut. Since Serafen's build is obviously about attack over defense, it's an easy choice over the more defense-oriented Drawing Parry. Heart Seeking is also an easy choice over Flesh Seeking, since almost any Barbarian build aims to score Critical Hits whenever possible.
I next purchase more crafting ingredients from The Dark Cupboard and Cuitztli's in Periki's Overlook.
I then travel directly to Dereo's Lair in The Gullet. I inform him of discovering the mosaic of Ukaizo in Old City. He rewards me with 800xp, and a Blunderbuss called Kitchen Stove to complete The Cornett's Call Quest. Zarathos makes a Streetwise check of 4 to get an extra 200cp. A Diplomacy check of 4 would have worked too, but that wasn't my preference for my evil protagonist.
Xoti advances to her 13th level. She gains Wicked Briars automatically, but never uses it.
She takes Enervating Blows as one of two abilities on level-up. Her role at higher levels becomes more of putting up buffs and keeping up those buffs indefinitely. But she will still sneak in a Melee Attack every once in a while in between castings of Salvation of Time. A Critical Hit will put the Weakened (-5 Constitution, -50% Healing Received) Affliction on the target.
She also takes Rapid Casting, which adds +10% Action Speed when casting spells. It's always a desirable passive for any spellcaster, but especially so for Xoti. I eventually want her at the point where she can put her buffs up quickly, and then start spitting out Salvations of Time non-stop while enjoying the Brilliant (+5 Intellect, +1 Power Levels, +1 Class Resource every 6 sec) Inspiration courtesy of Ydwin. And I want her to both be able to keep churning out the Salvations of Time as quickly as possible, but also at times be able to sneak in another spell in between Salvations of Time. The more Action Speed and the less Recovery Time she has, the better. Truly and literally.
The Cornett's Call
The equivalent video for the good party. I bring in Xoti, who will soon get a useful item for herself, as well as Fassina, Rekke and Konstanten who have less xp.
Xoti takes Flagellant's Path on her 12th level up. It allows her to make a Full Attack against a single target up to 10m away. And it inflicts Crushing Damage on any enemies in a line in between the Monk's starting point and the target enemy's location. It provides an option that spends Mortification for her computer A.I. to use during ship battles.
She also equips Kitchen Stove as a secondary weapon for the rest of the game. One of the key abilities of a single-class Monk is Resonant Touch, which allows a Monk to add Resonance to a creature on each strike landed on that creature. The Monk may unleash that Resonance at a time of his or her own choosing, resulting in 15 points of Raw Damage per Resonance. It is a game changer against very powerful bosses. This Blunderbuss, launching 6 projectiles with each attack, and with a -15% reduction of Recovery Time, is already the best weapon there is for a Monk to build up Resonance with. And that Recovery Time reduction is increased to -25% once I add the Frantic Reload enchantment.
*Evil* Harsh Medicine
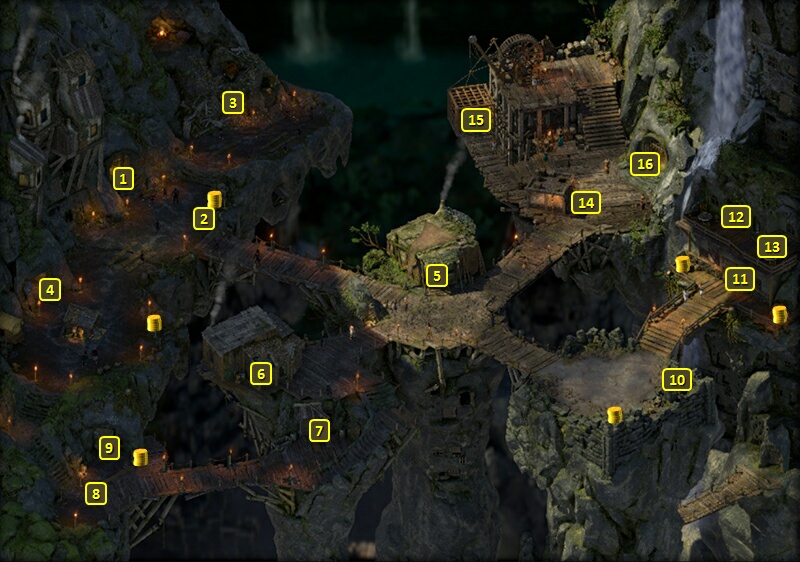
I enter Pitli's Sanctuary at #9, and then give Pitli the Drowner's Lung Medicine, although I get 60cp for insisting on compensation for my efforts. I thereby complete the Harsh Medicine Quest.
My other rewards include major gains of reputation with both The Gullet and the Children of the Dawnstars, as well as a ring called Halgot's Warmth. Xoti wears it for the rest of the game. The +2 Burning Armor Rating is certainly welcome. The real point is the +1 bonus to Priest Restoration spell Power Levels, which will make her use of Restore spells that much more effective.
Rekke takes Rapid Recovery on his 12th level-up. That means Constant Recovery will now regenerate 7 health per 3 sec.
Harsh Medicine
The equivalent video for the good party. Fassina takes Spell Shaping on her 12th level-up. It gives her the option of either expanding the area-of-effect of her spells in exchange for a penalty to Power Levels, or shrinking the area-of-effect in exchange for a bonus to Power Levels. It's a sensible choice as her build is dependent on bonuses to Power Levels for certain types of spells, especially if the computer A.I. uses the shrink option during ship combats. And if a small area-of-effect means less likely to hit allies, so much the better.
*Evil* Food for Thought
Zarathos enters Enoi's home at #6. He reports the new arrangement with the Principi to complete the Food for Thought Quest, and gains 6,000+ xp and a major gain of reputation in The Gullet as rewards.
Konstanten takes Spell Resistance on his 12th level-up. A 10% chance to avoid being affected by any spell outright is a good passive to take, so long as you otherwise have room for it in the character build.
I reassemble my core party, with the one difference that Ydwin is temporarily subbed out for Aloth. There's a couple of reasons why which will become apparent soon.
I "Wait" until just before Morning, and then travel to Serpent's Crown. I buy some gems from Una.
The Sacred Stair is next.