-

- Forums
- Chatrooms
- Gallery
- Gameplay Videos
- Upload
- Articles
- Mod Reviews
- Shop SP: Games, Movies, Books
|
|
| Pillars of Eternity 2 Video-Based Walkthrough by David Milward |
Old City Overlook
*Evil* Degnos' Body
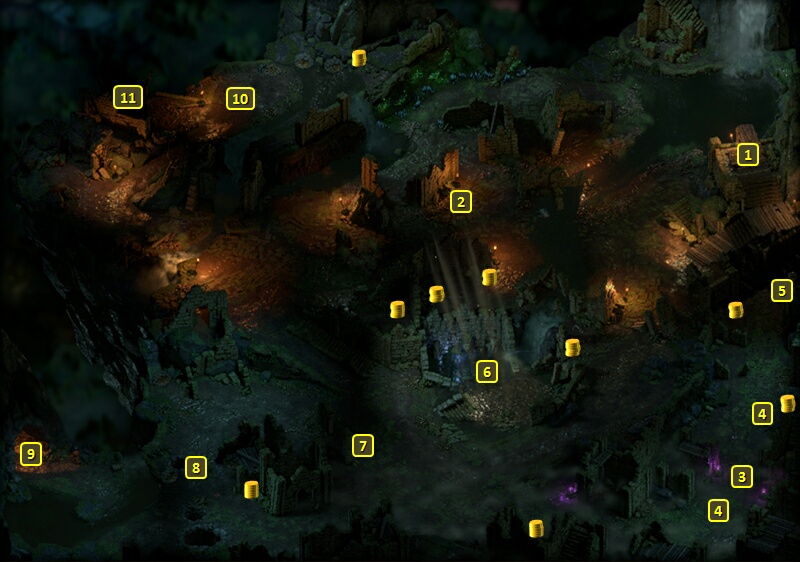
I show the next battle from the evil party's perspective. I start off at #9 on the map of the Overlook. I go ahead and defeat several Cave Grubs and Cave Grublings at #8. Note again how Zarathos uses his secondary weapon set that includes Kapana Taga and a War Hammer against enemies that have high Crushing Armor Rating.
Degnos' body is at #7, a consequence of having betrayed him during the Sealed Fate Task.
Skuldraks
I go to #10 and kill off a few Skuldraks. I then smash a couple of nearby Grub Burrows.
I return to the center of the Overlook after that.
Cornett of Depths
Now I go to #6. Clicking on the pool begins a scripted interaction that is potentially helpful for purposes of The Cornett's Call Quest. A Survival check of 6 will note that the bones seem suspicious. A Perception check of 13 detects faint echoes from within the pool.
Alliria dives into the pool. She makes an Athletics check of 14 and then a Constitution check of 16 to avoid getting the Fatigued injury.
The end result is that she gains the Cornett of Depths. Several Risen undead now attack. They include a
Risen Wizard, a pair of Skeleton Sorcerers, several Skeleton Brigands and Warriors, and a Skeletal Champion (i.e., Paladin). She regroups with the party. My passive healing powers plus summons are sufficient to wear them down.
The Lone Survivor
Now I go towards the southeast corner. There will be a couple of Sigils of Nightmares at points marked #4, but the party is protected by a Sigil of Nightmares Wardstone.
A group of Phantoms and Shadows, led by a pair of Wraiths, attack me once I near #3. Each of the Wraiths teleports away, each taking a high-Defenses character with them, Eder and Pallegina. But I don't mind regrouping them so that all of the party is continually regenerated by my passive healing auras. I take out the Phantoms and Shadows first, and then the Wraiths. I thereafter destroy the Sigils of Nightmares.
I find the Lone Survivor at #5. I recommend not seeing him until you've thoroughly cleared both the Overlook and the Ruins of any monsters. He himself has only 1 Health, and it will be much easier to lead him out of his predicament alive if you've emptied the two areas completely. He will reward the party afterwards if he makes it out alive.
I speak to him a bit and indicate that I've cleared out the caves to the west. He departs and I leave the Overlook through the tunnel at #9.
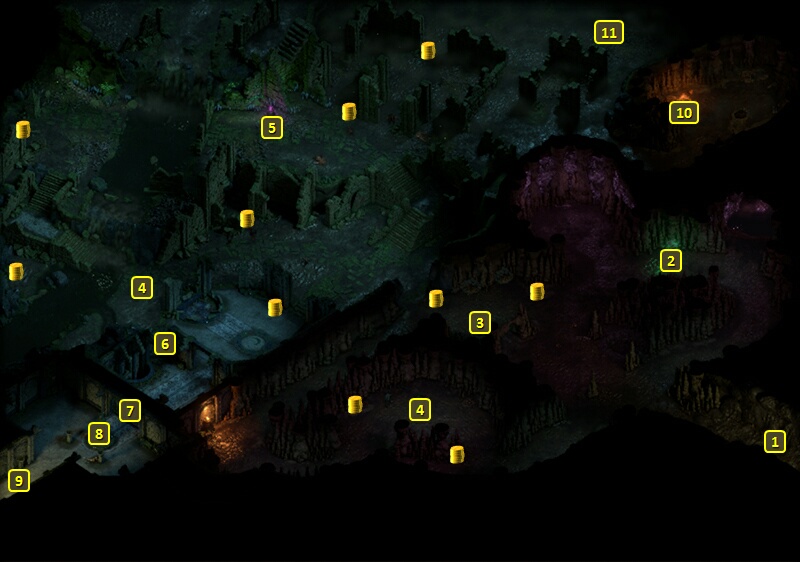
That brings me to #1 on the map of the Old City Ruins. I speak to him again, and indicate to him that I've cleared out the temple ruins of any monsters. He then leaves Old City alive, and promises to reward me should I see him again in Port Maje.
Now I go north and through the exit at #11. It leads to Old City.