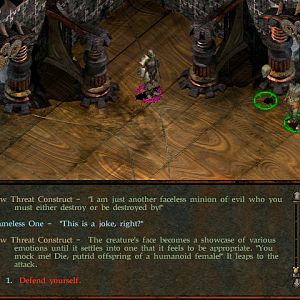
Complete the To Hunt a God quest, and then
board your newly repaired ship to access the World
Map. Captain Furrante's Ship will home in on you. It doesn't
matter what you try during the scripted interaction. He's going to board
you.
He'll give you the quest called Blow
the Man Down, which involves somehow dealing with Captain Benweth.
Captain Furrante loans you the services of his best shiphunter, Serafen,
who can now join your party.
And Serafen joining your
party triggers this quest.
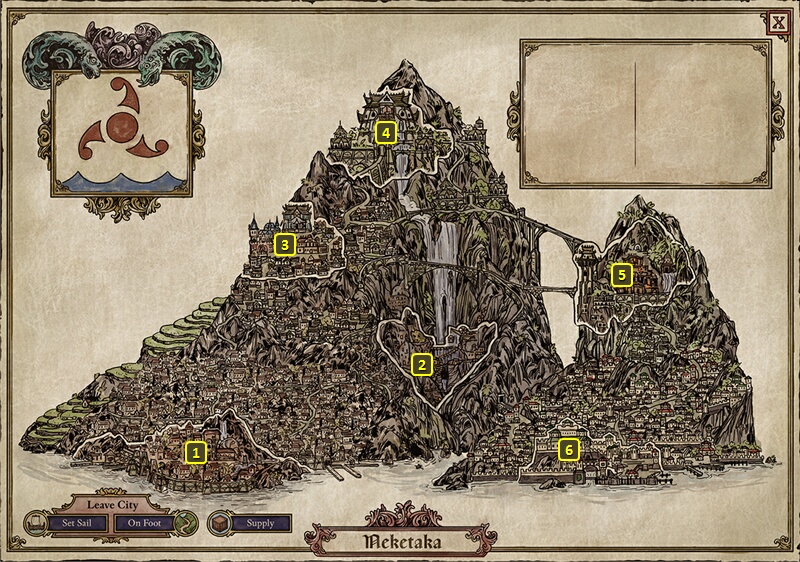
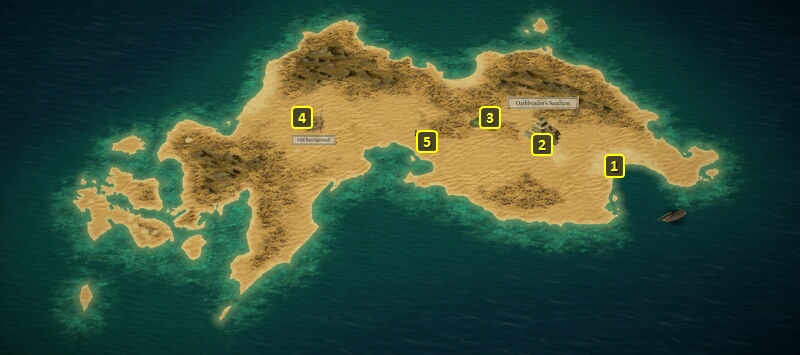
Fort Deadlight
is at #4 on the World Map. Clicking
on it the first time prompts a scripted interaction, where it becomes a
question of how to make your initial entry.
The safest and most reliable way is to sail your ship up to dock with
your ship donning Principi colors. You can get the colors either by
defeating any of the Enemy Ships
that carry the colors and taking them, being given them by Dereo the
Lean after completing The
Cornett's Call Quest for him, or by stealing it from Mad Morena's
quarters in the Undercroft.
Another way is possible is you have a Spyglass.
Wait until nightfall, although that results in any resting bonuses you
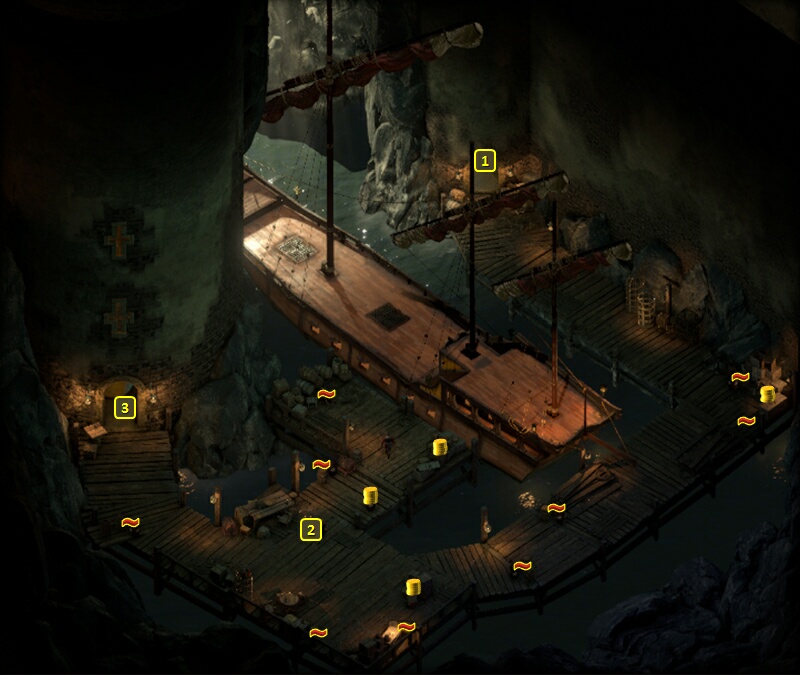
might have expiring. You now end up at #13 in Fort
Deadlight. Click on #14, and use a Rope
and Grappling Hook along with an Athletics check of 3 to scale up
the wall to the window. You will end up at the Deadlight
Dungeon at #3.
A third way is to make a frontal attack. That means sustaining some
significant damage to your ship and its sails, even with a sturdy ship
like a Galleon or a Junk.
It also means committing yourself to literally slaughtering everyone in
the Fort to complete the Quest, including a prospective sidekick named Mirke.
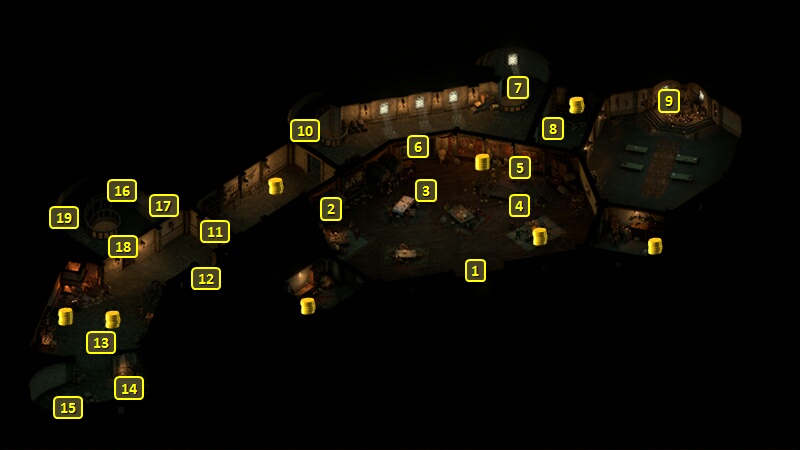
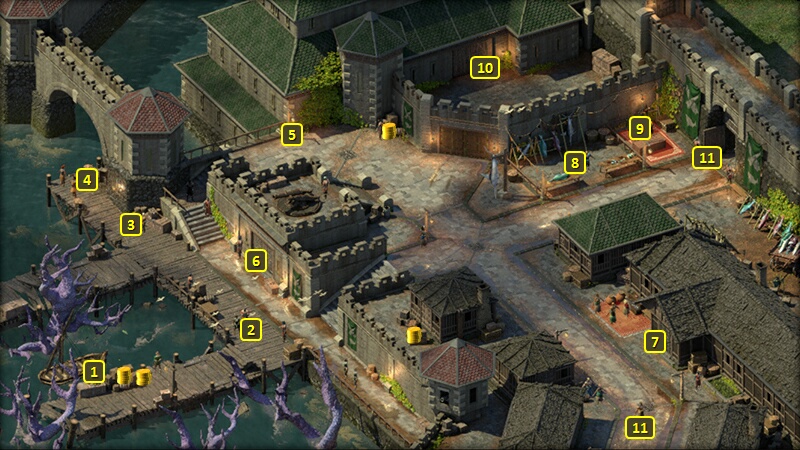
You'll start off at #1 on the map of Fort
Deadlight. Serafen
will want to talk to you once you get to #6 or close enough.
He's concerned about a former acquaintance named Remaro, whom he feels
has fallen under undeserved condemnation from the Principi. He would
like to find out more about Remaro's whereabouts.
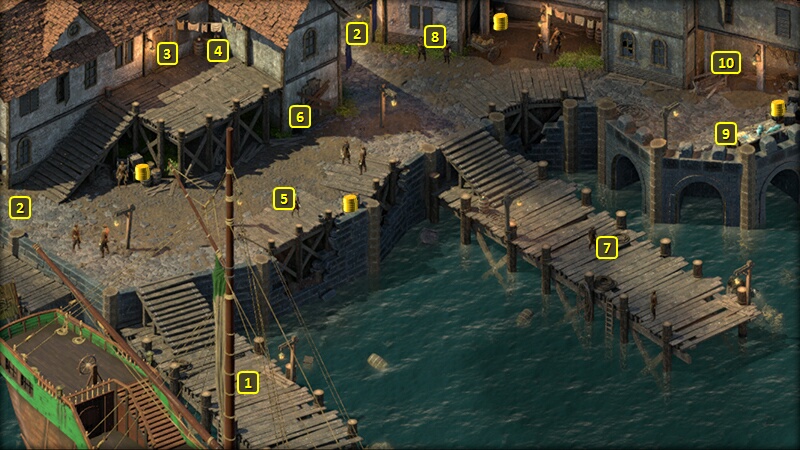
Serafen will want to talk to
you again. Siryi the Siren could perhaps offer some helpful information.
But he warns you that she won't be happy to see him, since he was
intimate with her and left her soon after.
Siryi the Siren will be at #4. She has a mouthful and then some for Serafen, but she's nonetheless
willing to explain that Remaro left a chest in his personal quarters in
the northeast corner of the Court. Any of the available background or
skill checks aren't needed to get the clue from her, but they affect the
specifics of her responses.
Remaro's quarters are on the other side of the locked door at #6.
Trying to unlock and get through the door in plain sight of the nearby
guards will provoke everyone in the Court to become hostile, including Mirke who will have been at #3.
The safest and immediate way is to make your way to the Deadlight
Dungeon, the entrance to which is at #9 on the map of Fort
Deadlight.
You can send a character with Stealth to go northeast and northwest past
the guards in the northeast powder room, and then open the door at #10
from the other side. The whole party can then make their way to the
stairs at #11.
Note that if Mirke sent you
here to find a Special Stew for a party as part of the Blow
the Man Down Quest, a few guards will blow by you and in the
process leave the doors at #5 and #10 open for you.
The stairs at #11 lead to #7 on the map of the Deadlight
Court, on the other side of the door at #6.
The chest at #8 prompts a search by Serafen,
who finds a letter to him from Remaro. The letter indicates that Udyne
may know something of Remaro's current whereabouts.
Trying to take the letter away from Serafen
will lose reputation with him, while respecting his privacy will win
reputation with him.
You'll now need to travel to Neketaka,
which is at #15 on the World Map. You
initially start off in the Queen's
Berth district.
Travelling from Queen's Berth
to another district with Serafen
in your party will result in an encounter with a Principi captain named
Malnaj. She's very interested in tracking down Remaro himself, with a
view towards punishing him as a Principi traitor. What you say won't
result in a battle, and won't affect your reputation with the Principi,
although the response based on "insult Serafen and you insult me" will
gain reputation with Serafen.
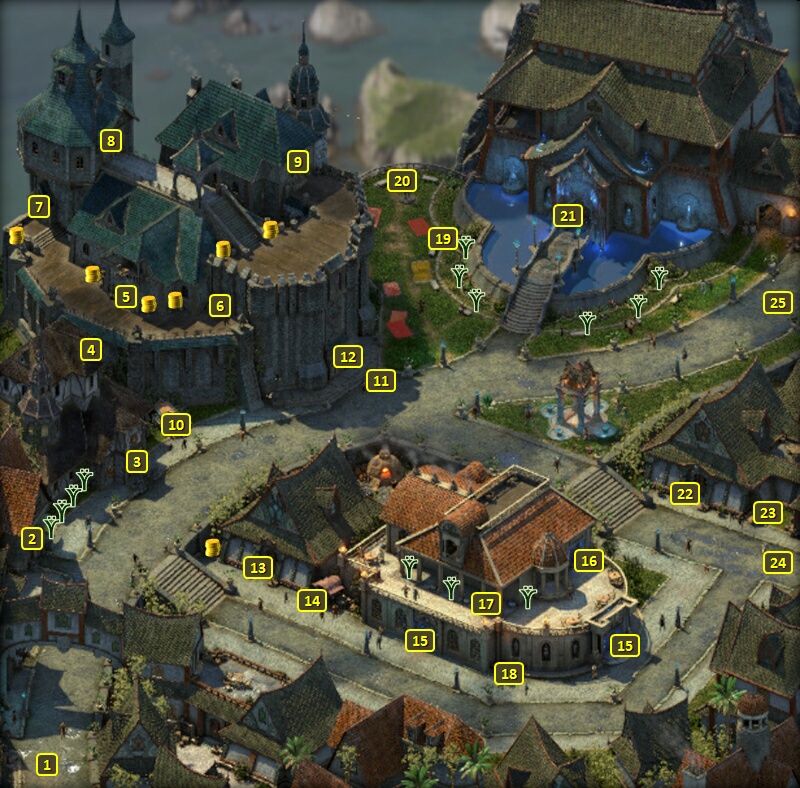
You'll be at one of the doors marked #1 on the map of the Luminous
Bathhouse. Speak to Udyne at #4, who will relate that Remaro has
gone off to Sayuka.
Verbally agreeing with Serafen
that you need to go to Sayuka as soon as possible will earn reputation
with him.
Remaro will be waiting at #5. Now question Remaro as to why
he fled from Fort Deadlight. Having completed the Symbols
of Death Quest for Captain Furrante will enable dialogue options
that can get him to reveal that he was a party to slaving prior to his
mutiny. An Insight check of 10 will help in that regard too.
Serafen will feel hurt if the
revelation of Remaro's slaving past comes out. But whether that past
comes out or not, Serafen
will remain adamant about not bringing Remaro in to the Principi. He
will not budge from that position. You can try an Intimidate check of 5
and a Streetwise check of 7, but they only elicit different verbal
responses with the same position. The Intimidate check will actually
lose reputation with him. It becomes a choice between letting Remaro go
and keeping Serafen in the
party, or attacking Remaro only for Serafen
to leave the party for good and attack you alongside Remaro.
Killing Remaro causes the Quest to fail, and results in a diminished xp
reward. If you do that, be sure to collect Remaro's
Head if you killed him.
If you let Remaro go peacefully, he'll give you a Blunderbuss called Fire in the Hole. And if
you have 2 points of positive reputation with Serafen,
he'll speak to you and offer you a hat called Fair
Favor as a gift.
Malnaj will now confront you on her ship the next time you leave Sayuka
by ship. There is always the option to attack her and her crew
throughout the conversation. And she herself is willing to start a
battle if she concludes that you're lying to her about Remaro's fate and
location. She and her mates will leave behind plenty of Fine and
Exceptional gear should you win.
You'll have a dialogue option that invokes the good graces of the
Principi's governing council if you have at least 2 points of positive
reputation with the Principi. However, it needs to be backed up with a
combined Intimidate check of 10 and Streetwise check of 10. Meeting all
of those conditions will convince her to leave you be.
You can indicate that Remaro is dead, followed by making a combined
Diplomacy check of 8 and Streetwise check of 5. It also requires giving
her 2,000cp as a share of the bounty. Failing the spot checks, or Serafen
being in the party, again causes her to attack you.
You can choose a dialogue option that earns Clever disposition, followed
by a Bluff check of 8 to convince Malnaj that Remaro has escaped.
Failing the spot check, or Serafen
being in the party, causes Malnaj to not believe you and attack.
If you do manage to use Bluff on Malnaj to convince her that Remaro is long gone, about five days of in-game time will elapse before
she sends you an Unsigned
Missive. The Missive itself is a plea to help her from being
stranded on an island "southwest of Neketaka."
Her "Call to Help" will be at #5 on the map of the Sanctum
Island. It goes without saying that you'll have to fight her and
the rest of her crew now that she's figured out that she was tricked.
Having Remaro's Head
opens up different possibilities. The options previously described will
still be available, including sharing the bounty. Throwing the head at
Malnaj's feet amounts to forfeiting any bounty to her, and she'll gladly
leave with the head to claim her reward. That earns moderate reputation
with the Principi.
You can attack her, or use the dialogue option that invokes the
authority of the Principi council, if you want to keep Remaro's
Head. You can then sail to Dunnage
at #8 on the World Map. Enter Lifter's
Refuge once you get there.
Sorcerer's
Place is a project run entirely by fans and for fans. Maintaining
Sorcerer's Place and a stable environment for all our hosted sites requires a substantial amount of our time and funds on a regular basis, so please consider supporting us to keep the site up & running smoothly. Thank you!
Supporting Sorcerer's Place
Has Sorcerer's Place been useful? If you'd like to show your appreciation
for our hard work on the site, and help us pay the bills the site generates
every month, please consider helping support SP.
Thank you!

 Complete the To Hunt a God quest, and then
board your newly repaired ship to access the World
Map. Captain Furrante's Ship will home in on you. It doesn't
matter what you try during the scripted interaction. He's going to board
you.
Complete the To Hunt a God quest, and then
board your newly repaired ship to access the World
Map. Captain Furrante's Ship will home in on you. It doesn't
matter what you try during the scripted interaction. He's going to board
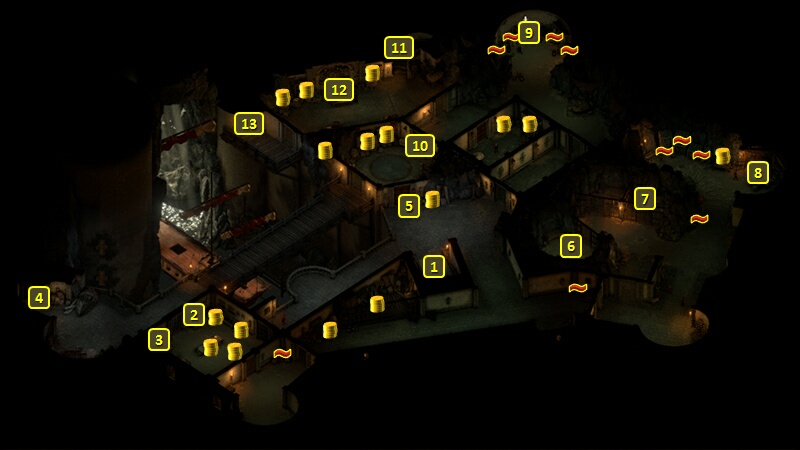
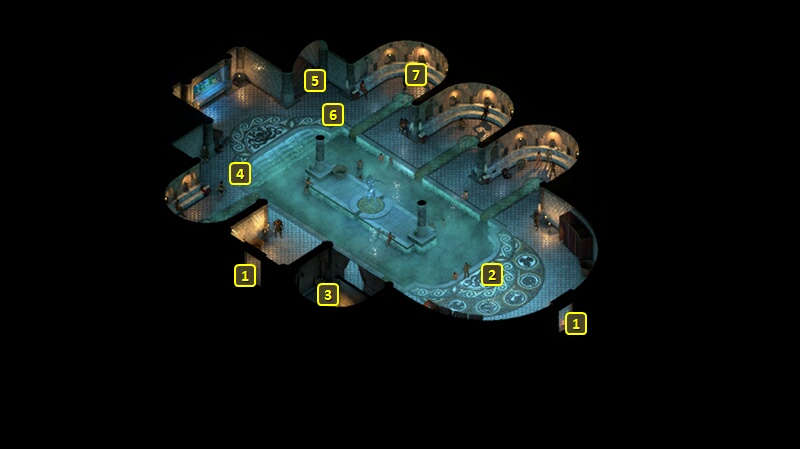
you. You'll start off at #1 on the map of
Sayuka.
You'll start off at #1 on the map of
Sayuka.