-

- Forums
- Chatrooms
- Gallery
- Gameplay Videos
- Upload
- Articles
- Mod Reviews
- Shop SP: Games, Movies, Books
|
|
| Pillars of Eternity 2 Video-Based Walkthrough by David Milward |
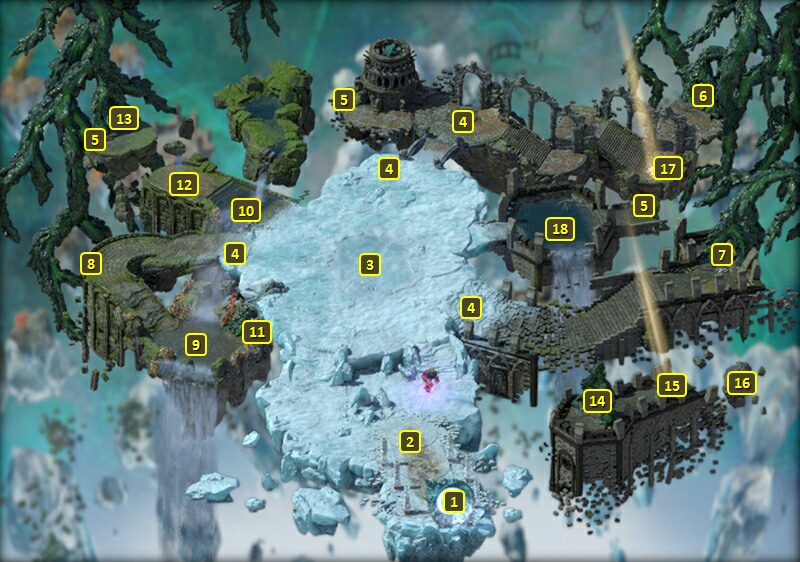
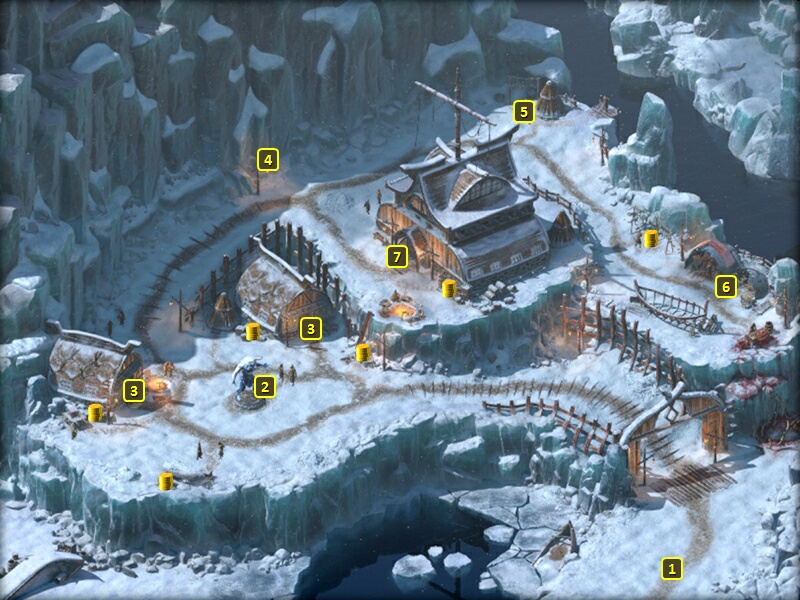
Return to the Shattered Passage
*Evil* Void Shards
This part is shown from the point of view of the evil party, as it involves an item that I have and want a companion to use. I am now at #11.
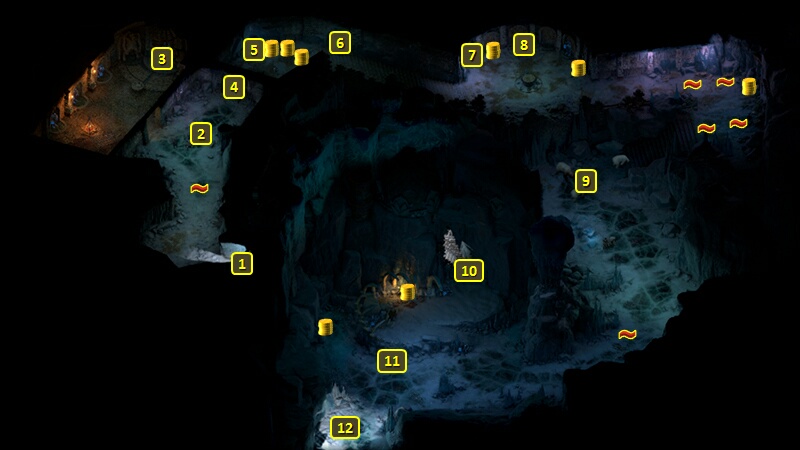
The chests at points marked #5 will each have a Void Shard in them. They can be used to upgrade the Ring called Finality's Claim. Adding one Void Shard to the Ring means all enemies that Engage the wearer and within 1.5m of the wearer suffer a -3% penalty to Action Speed. Two increases the penalty to -5%, and all three increases the penalty to -7%.
I begin by using Kaihoa on the pedestal at #8. That now causes the pool at #10 to drain and the pool at #9 to fill up.
Now I go to the Kauru Spirit at #12. She won't allow me to cross the bridge she is working on unless she recognizes me as a Mataru. But now I use Betrayal to pretend to be King Wingauro, and command her to finish the bridge. Pretending to be her Ranga would have worked as well. I go across the bridge and get the Void Shard from the chest.
There is also another chest on the north side, and I get another Void Shard from it.
I go to the light beam portal at #17, and use Waidwen's Sundial to change its settings from "Dusk" to "Dawn". A pedestal now appears. I click on it, and the pool at #18 drains. I go across and get the third Void Shard.
Now I use all three Void Shards to empower Finality's Claim, and leave The Shattered Passage for the time being.
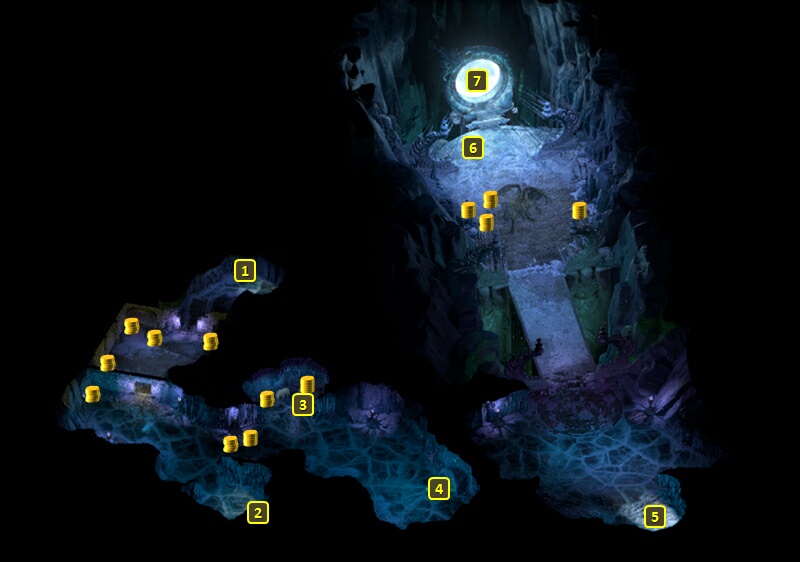
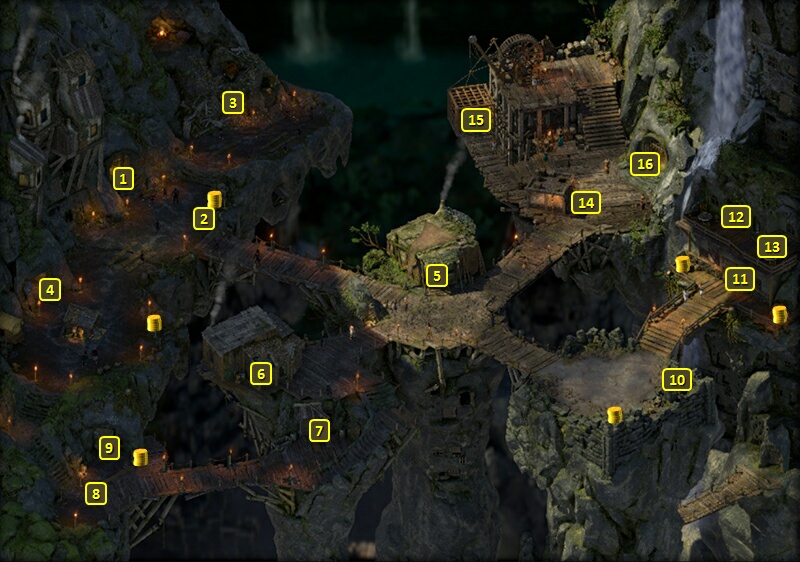
I am now at #7 on the map of the Temple of Decline. Ydwin notes that the Eye of Rymrgand allows items taken from the White Void to continue to exist on Eora. I leave through the entrance at #5.
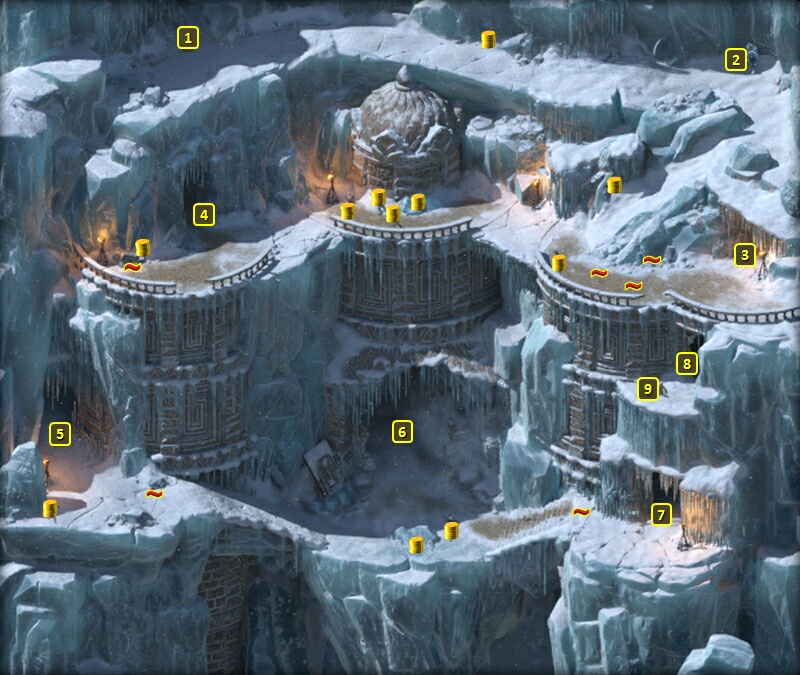
That brings me to #6 on the map of the Rimebound Temple. I go west and through the opening at #5.
That brings me to #2 on the map of the Temple of Decline. I go north and through the door at #1.
And that brings me to #4 on the map of the Rimebound Temple. I go north and west to #1, and climb up the rope to the Outcrop on High.
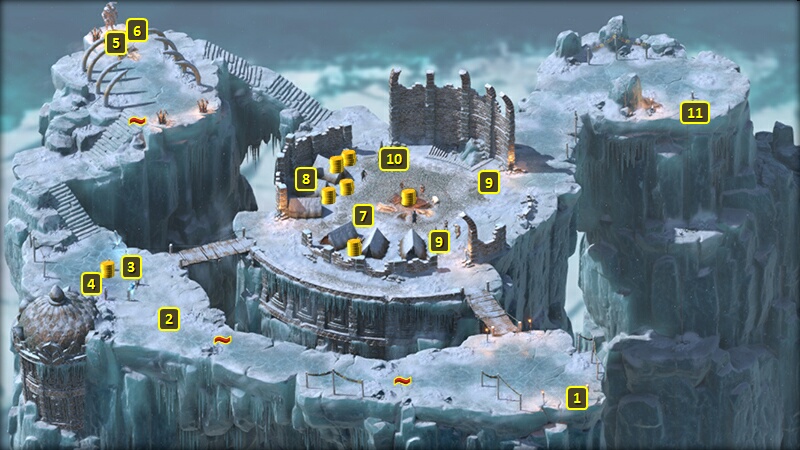
And I go south from #11 on the map of the Outcrop on High to #1. Climbing down the rope brings me back to Harbinger's Watch.
The Last Pilgrimage
The good party is now at #4 on the map of Harbinger's Watch. I stop off at the tavern in Harbinger's Rest to attend to some of my other companions.
I bring in Rekke. He equips two items I brought out of the White Void. One of them is the Horns of the Aurochs. His build is premised on encouraging enemies to score Critical Hits on him. This helmet means his next attack will enjoy a 10% bonus Freezing Damage whenever he's either Hit or Critically Hit. Immunity to Push and Pull effects is sugar on top.
He also equips the Plate Armor called One Dozen Stood. It provides +10 Accuracy and +15% Damage to Disengagement Attacks, and those bonuses will stack with the Overbearing Guard passive when he gets it. I enchant it with Echo of the Godhammer. It will cause Burning Damage to nearby enemies if and when he gets knocked unconscious. And that happens along with the Burning Damage to nearby enemies from the Cape of the Falling Star, and triggering Unbreakable which causes Rekke to revive without Injuries during ship combat. I also enchant it with Hold the Bridge, which provides bonus Engagement as Rekke becomes lower and lower in Health, to a maximum +3. It maximizes the opportunity to inflict Disengagement attacks, which will enjoy bonuses from both the armor itself and from Overbearing Guard.
I bring in other characters for levelling up. Fassina takes Venombloom on her 17th level-up. It creates a field of at least 2.5m radius and lasting at least 8 sec that inflicts 8-12 Raw Damage every 3 sec, inflicts Weakened (-5 Constitution, -50% healing received) every 3 sec, and inflicts Frightened (-5 Resolve, cannot used activated abilities) every 3 sec. It has the Plant keyword, so The Spine of Thicket Green will give it bonus Power Levels.
Ydwin takes Uncanny Luck on her 17th level-up. It adds a 5% chance of avoiding any attack outright, which helps with her tanking role. It also adds a 5% chance to convert a Hit to a Critical Hit, which can help increase the chance of triggering instant Recovery through the Mercy Strike enchantment of Stalker's Patience.
Serafen takes Threatening Presence on his 17th level-up. A passive that immunizes the Barbarian against being Engaged by any enemies that are lower level than himself.
Xoti takes Launching Kick on her 17th level-up. It upgrades Flagellant's Path so that any enemies caught in its path will also be launched up into the air, and then left Prone on the ground.
Xoti also equips The Twin Eels for the rest of the game. Landing a killing blow with it unleashes healing for the wielder and all nearby allies. That ability now benefits from the 50% bonus to healing that comes with The Dawnstar's Blessing she received during her personal Quest, The Lantern of Gaun. It also has a chance to convert Hits to Critical Hits. Both powers scale according to the wielder's Religion skill. Xoti has been pumping that skill on every level-up, in addition to the class bonus for being a Monk, the +2 bonus for using a Luminous Adra Potion, the +1 bonus from Heaven's Cacophony, and the +2 bonus for The Dawnstar's Blessing. I also have her use the Savage Attack modal, which increases Damage with Great Swords by 50%. That does result in a -15 Accuracy penalty, but I figure the chance to convert Hits to Critical Hits from the weapon itself, and another item I'll soon get for her, will help overcome that.
Fjord
I am now at #25 on the World Map. I sail northwest and attack a Crookspur Captain.
I sail north. I board a Huana Master Captain as I arrive at Neketaka at #17.
I sell off my excess loot, although I keep the Wintertide Bulwark as I still need it to obtain a Soulbound upgrade for the Guardian's Plate.
I buy gems from Una at Serpent's Crown, and from there I travel directly to The Dark Cupboard.
I go to the Critter Cleaver at #6 on the map of the first level of The Dark Cupboard. I create a new Pet for Eder, one that has the skin of the Snow Bear Cub named Fjord but provides the bonuses of Socrates, +10 Health on kill for Eder personally and +3 Deflection for the whole party.
I buy up crafting ingredients from both the Imp in The Dark Cupboard and from Cuitztli's, and then leave Periki's Overlook.
Adrenaline Rush
The good party now travels to The Gullet.
I arrive at #16 on the map of The Gullet. I go down the lift at #15 to Old City Overlook. I can use the lift to come back up because I'm on good terms with the Huana. Note that I avoided travelling directly to Old City Overlook because that meant the lift might not have been available.
I arrive at #1 on the map of Old City Overlook. I go a little northwest. Recall that Mirke needs to get hit with 100 Afflictions to obtain the next upgrade for the Guardian's Plate. So all she does is walk back and forth across the stagnant pools to get the Sickened Affliction 100 times. The upgrade for Guardian's Plate is Adrenaline Rush. It's a once per Rest power that temporarily gives the wearer both bonus Action Speed and the Weakened (-5 Constitution, -50% healing received) Affliction. It's a stepping stone to the last upgrade, which requires all of Rynhaedr's equipment in my inventory.
I go back up the lift at #1 to return to The Gullet.
Battered Dog Figurine
That brings me back to #15 on the map of the Gullet. I go to the exit at #16.
It is while attempting to return to my ship that the good party now gets the encounter with Diaonne and his band of Cutthroats. It's much easier now that the party is high level. I get the Battered Dog Figurine, and then return to the ship.
Now I am at #17 on the World Map. I sail a little east and attack a Vailian Master Captain in naval combat. It's a Dhow that starts closing in on me, so I turn starboard and get off some grapeshot with my Vailian Hullbreakers while I can. I take out four of their crew and then force a boarding, where I wipe them out.
I continue to sail south until I return to Harbinger's Watch at #25. I return to The Shattered Passage the same way I had left it.
*Evil* The Last Pilgrimage
The evil party stays in Harbinger's Watch, and visits Harbinger's Rest. Eder takes Spell Resistance on his 17th level-up, which provides a 10% chance to avoid the effects of any spell outright.
Aloth takes Martial Caster on his 17th level-up. It helps him summon Kalakoth's Minor Blights a little faster.
Aloth equips Current's Rush in his main-hand for the rest of the game. The goal and preference is for Aloth to be using Kalakoth's Minor Blights as his main-hand weapon. But the computer AI for ship battles can be unpredictable or unreliable. So this Scepter provides a worthy stand-in that can itself sometimes unleash area-of-effect attacks until he gets around to summoning his Blights. And it also takes advantage of the Destructive Channeling modal, same as the The Eye of Wael. I enchant it with High Tide, which gives the area-of-effect attack the ability to Immobilize (-5 Dexterity, cannot move). And that can improve the chances of Death Blows coming into play.
Maia takes Concussive Tranquilizer on her 17th level-up. It upgrades Concussive Shot so that it not only Interrupts on Graze, but it also reduces the duration of the target's beneficial effects by 30 sec. Can be really useful against the enemy spellcasters who regularly show up during ship battles.
Serafen takes Panther's Leap on his 17th level-up. It upgrades Leap so that affected targets take Raw Damage over time. I find it preferable to Dragon's Leap, because the Burning Damage can be substantially reduced by Burning Armor.
He also wears the Horns of the Aurochs for the rest of the game, and for the same reasons as Rekke does in the good party.
He also wears Finality's Claim for the rest of the game. The ring itself has a 25% chance of reflecting any elemental attack back on the attacker, which makes it a pretty worthwhile ring as it is. Recall that I upgraded it with three Void Shards so that all enemies that Engage the wearer and are within 1.5m of the wearer suffer a -7% penalty to Action Speed. The point there is that it will stack with the Action Speed penalty imposed by Sisyfo's Stone whenever he's Hit, and the Recovery Time penalty imposed by Magnera's Chain when he's Critically Hit (when I do get that armor that is). I don't mind encouraging Critical Hits against Serafen when enemies get around to attacking him, but there's nothing wrong with improving his relative survivability by reducing how often those Critical Hits occur either.
Now I go over to Harbinger Brythe. Zarathos has different possibilities available since he helped Ehrys become a Rime Construct. One is to make a Bluff check of 10 to convince Brythe that Ehrys is now dead.
Brythe will become distraught when Zarathos instead admits that he helped Ehrys become a Construct. Either a Bluff check of 14 or a combined History check of 12 and Metaphysics check of 11 can convince Brythe not to seek out Ehrys.
But Zarathos does neither, and says nothing to stop Brythe from seeking out see Ehrys.
I return to Harbinger's Retreat, reassemble my core party, and return to The Shattered Passage more or less the way I came but with one difference.
I see Brythe's dead body at #6 after she has been killed by Ehrys as a Rime Construct who remains nearby. I continue on through the Eastern Cavern and return to The Shattered Passage.
Frostfall
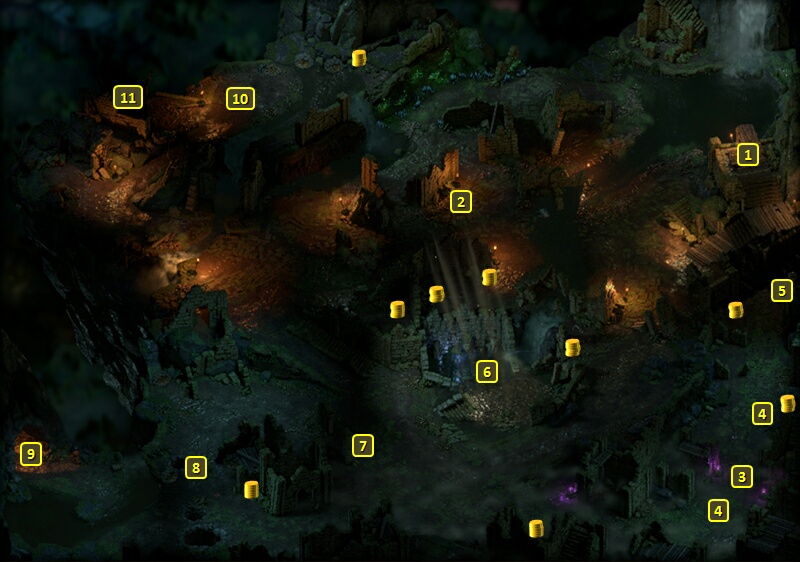
I am now back at #1 on the map of The Shattered Passage. I go through the portal at #13 to teleport to the portal at #14.
I use Waidwen's Sundial at #15 to change the setting to Dawn, and repair the bridge that leads east. I easily defeat a few Shambling Souls after that.
A Glamfellen Soul will be at #15. I could obtain the Mace called Frostfall from her by attacking her. But Alliria uses Betrayal to pretend to be the Glamfellen's lover, and then using the Benevolent dialogue option that pretends to lead her to safety.
Getting the Mace itself means I now have all four of Rynhaedr's items in my inventory. And that completes the last upgrade for the Guardian's Plate, Plagued Strength. It provides 1 Health every 6 sec, and +2 to Constitution, Dexterity and Might whenever the wearer is Afflicted. And that will be always when Mirke is using the Powdered Burns modal for her Blunderbuss. The +2 Dexterity will go some way to reducing the Reload Time for her guns, while the +2 Might will increase the Damage.
Aloth now uses Frostfall as his main weapon for the rest of the game. It will inflict Freezing Damage if the target's Freezing Armor Rating is lower than its Crushing Armor Rating. It also has a chance to give a nearby enemy a random tier-1 Affliction if the wielder himself gets an Affliction. I enchant it with Dispersed Suffering. A killing blow on an enemy, whether by weapon or by spell, will cause any negative effects on nearby enemies to increase in their duration by 20%. That makes it an easy choice over Chaos Strike, which is a once per Rest power. I also enchant it with Encroaching Frost. Any attack by the wielder, whether by weapon or by spell, has a 10% chance on a Critical Hit to Freeze the target for at least 4 sec. Freeze is a unique form of paralysis that won't be blocked by either Dexterity Inspirations or Resistance to Dexterity Afflictions. The way to get the most out of this power is to use spells that hit multiple enemies and multiple times over their duration. That means the cloud and wall spells, as well as others like Ninagauth's Freezing Pillar. That makes me prefer it over Shattering Head, which can only trigger on a weapon attack.
Now I head to the way down at #3. Rynhaedr shares a few final words with me, and I jump down to The White Void to confront Neriscyrlas.