-

- Forums
- Chatrooms
- Gallery
- Gameplay Videos
- Upload
- Articles
- Mod Reviews
- Shop SP: Games, Movies, Books
|
|
| Pillars of Eternity 2 Video-Based Walkthrough by David Milward |
Crookspur | Ori O Koiki | Fampyr Island |
Fampyr Island (Good)
Bounty on Rock-Stomper Rodul
I start off at #54 on the World Map. I sail south and board a Principi Master Captain. The fight is still enough of a challenge that I need to fully buff up, but I outlast them in the end.
Now I sail to Dunnage at #9 on the World Map. I switch in Serafen, Ydwin, Rekke and Konstanten as the characters with the least amount of xp just before I enter Dunnage.
I start off at #1 on the map of Lifter's Refuge. Ydwin gains two abilities on her 19th level-up. One of them is Ancestor's Memory. I won't object if the computer AI has her use it to replenish a party member's resources during ship battles.
She also takes Deathblows. It adds 50% Damage to her weapon attacks to targets that have two or more Afflictions. She'll impose one of those Afflictions herself with Persistent Distraction. Other ship combatants will add that second Affliction. For example, if Konstanten is nearby by then his The Long Night's Drink Birthed the Revenge of Morning phrase will bring the Weakened Affliction, and his attacks buffed by Spirit Frenzy will bring the Staggered Affliction.
I speak to Udita at #5 on the map of Lifter's Refuge, and receive a moderate gain of reputation with the Principi, 5,000cp and 12,000+xp as reward for the Bounty on Rock-Stomper Rodul.
Serafen gains two abilities on his 19th level-up. One of them is Blood Surge, a passive that has a 25% chance to replenish a single point of Rage whenever the Barbarian lands a killing blow. It's pretty much obligatory for any single-class Barbarian.
He also takes Prestige. The +1 bonus to Power Levels will enhance his use of Carnage and Dragon Leap.
I thereafter buy rare food ingredients from Jacob Harker in King's Coffin and Birna in the Radiant Court, as well as gems from Dimessa in the Treasure Trove. I then return to my ship.
A Shrewd Proposition
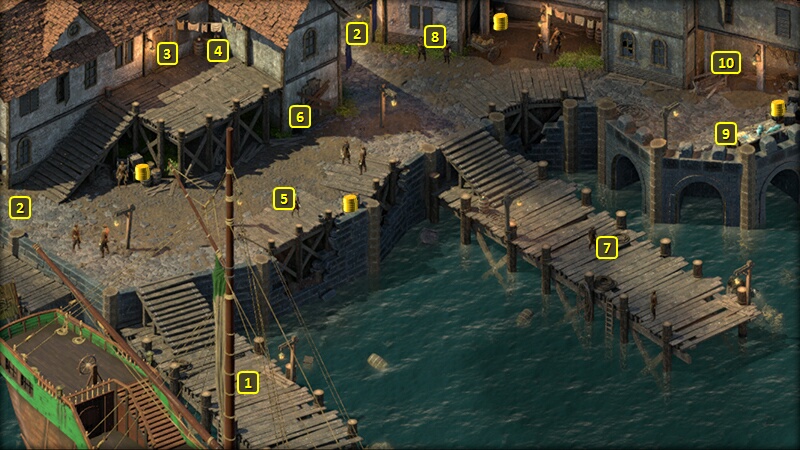
Now I sail southeast to Fort Deadfire at #4.
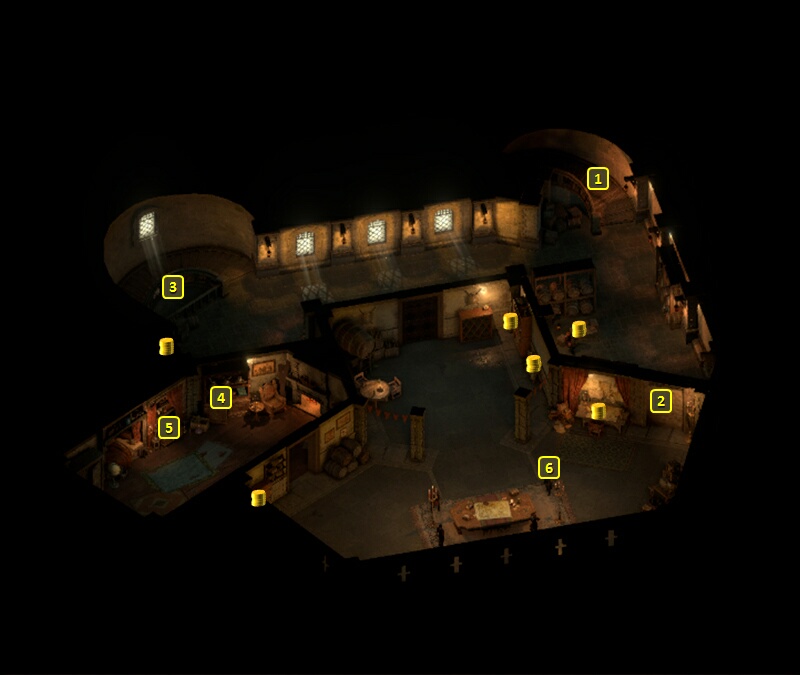
I arrive at #1 on the map of Fort Deadlight. I speak to First Mate Mabori to gain an audience with Captain Aeldys.
Now I speak to Captain Aeldys at #6 on the map of the Deadlight Donjon. I get a major gain of positive reputation with the Principi, 2,500cp, 20,000+ xp and the Blackblade's Hood as rewards for completing the Quest called A Shrewd Proposition. The hood has interesting possibilities, but I have different helmets or hats in mind for my characters.
Rekke gains two abilities on his 19th level-up. One of them is Unrelenting. It upgrades Unbreakable so that he gains +3 Discipline when he revives after getting knocked unconscious.
He also selects Take the Hit. He uses it differently than Eder does, as he can't reduce the Damage in the same ways. If he uses it, it will mean absorbing the full brunt of Damage from attacks on other characters during ship combat. But if it increases the odds of him getting knocked unconscious, triggering explosions from his other items that will Damage enemies, and triggering Unrelenting, then I won't object.
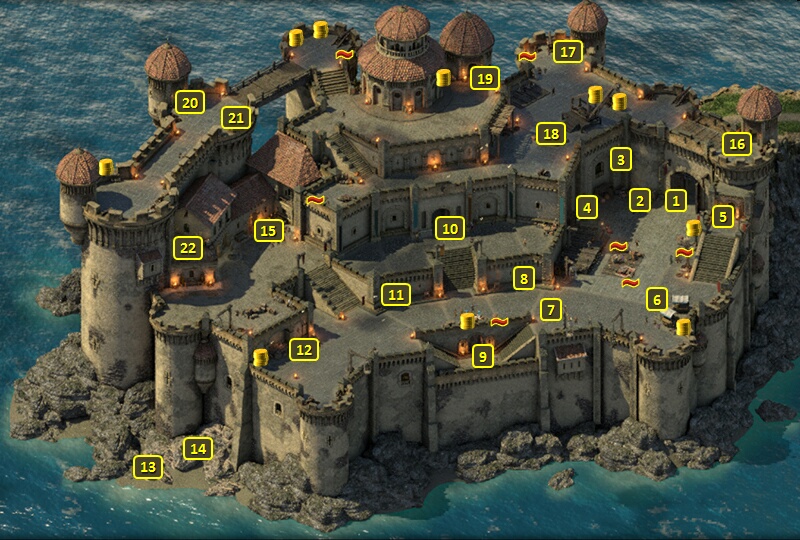
I go out the door at #1.
That brings me to the door at #19 on the map of Fort Deadlight. I go west, south and east along the ramparts until I reach the door at #16. It brings me to the door at #5, and from there I go to #1 and return to my ship.
I reassemble my good party and sail north. I attack a Royal Deadfire Company Master Captain along the way. It starts at nearly 400m and I have the initiative, so I turn portside to aim my Iron Thunderers and Haeferic's Nose at the enemy ship. It puts Flooding on me during its first volley, which will sink my ship if unattended to. But I first get off my own volley, as I had just done a Hold Position for an Accuracy bonus and I don't want that to go to waste. It is after I get off my first volley that I use the "Report" option to get rid of the Flooding. I then proceed to sink the enemy Junk in short order, partly because my subsequent volleys inflicted several adverse conditions (e.g., Loose Cargo, Fire on Deck, Man Overboard) so as to cripple it.
I continue north, and board another Royal Deadfire Company Master Captain and a Royal Deadfire Company Expert Captain along the way.
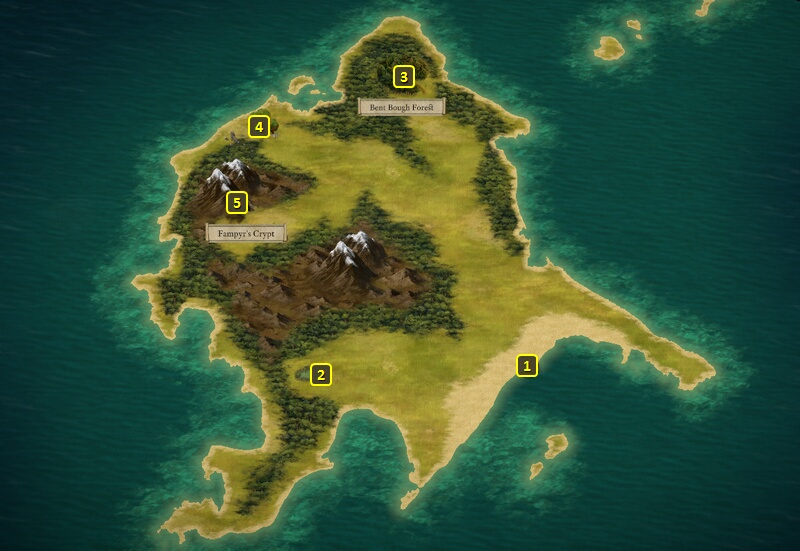
I make my way to Fampyr Island at #51 on the World Map.
Bent Bough Forest
I collect some Water at #2 and some Fresh Fruit at #4 and then go to the Bent Bough Forest at #3.
The scripted interaction begins with seeing an altar. If you investigate the ground around the altar, along with a Survival check of 17, you'll discover the Waterlogged Journal. The scripted interaction ends for the time being. You won't be able to do anything more with this area for now. The Journal itself mentions a word that is suggestive of "Arkemyr", and also mentions the "Sanguine Harvest".
If you wish, you can go see Arkemyr in his Arkemyr's Manor if you want to make sense of it. He'll mention that a book he keeps makes reference to it. Go to Arkemyr's Bedroom. The bookcase at #3 has a book titled, "The Cult of the Sanguine Harvest", which indicates a sacrifice that takes place on the 16th day of each month.
But I didn't bother with any of that. By the way, this is why I did the Cruel Cargo Quest first. It was the 14th day of the month by the time I got here. Now I just needed to "Wait" a little until the 16th day of the month and then enter the forest. Also, Alliria switches to Modwyr and The Eye of Wael. I'll soon be fighting against Fampyrs, who can Dominate party members with their gaze.
I enter the forest again, and observe the ritual. I attack the Cultists once it's clear they're about to sacrifice a Kith victim.
The intended victim, Winking Audr, is in danger of dying in this fight so I conduct it with a view towards keeping her alive. I send Aloth and Eder a little north to make a partial shield wall in front of her. It is only once they are in position that they put up their buffs.
Mirke starts hitting them right away with Confounding Blinds and Stunning Surges.
Pallegina starts with The Prisoners Turned On Their Captors, and uses it whenever she can, to keep the party protected against the Afflictions that can be caused by the enemies' spells.
Alliria sets up her buffs, and keeps them going with Wall of Draining. She also uses abilities like Death Ring and Sacred Immolation with a view towards wiping out the enemies as quickly as possible and keeping Winking Audr alive. Aloth likewise switches to his Grimoire of Vaporous Wizardry and frequently uses spells like Call to Slumber and Gaze of the Adragan to minimize the enemies' attacks and maximize the chances of keeping Winking Audr alive.
It eventually comes off. I already have the Crew that I want, so I don't need Winking Audr alive. But I give her 100cp to send her on her way and earn Benevolent disposition.
Mirke takes Uncanny Luck on her 20th level-up. It provides a 5% chance to avoid any attack. The real point is that the 5% chance to convert a Hit to a Critical Hit improves the chances of replenishing Mortification when she uses Stunning Surge.
Eder takes Weapon Mastery on his 20th level-up. It adds another 5% bonus to Damage with weapons.
Cave of Threshing
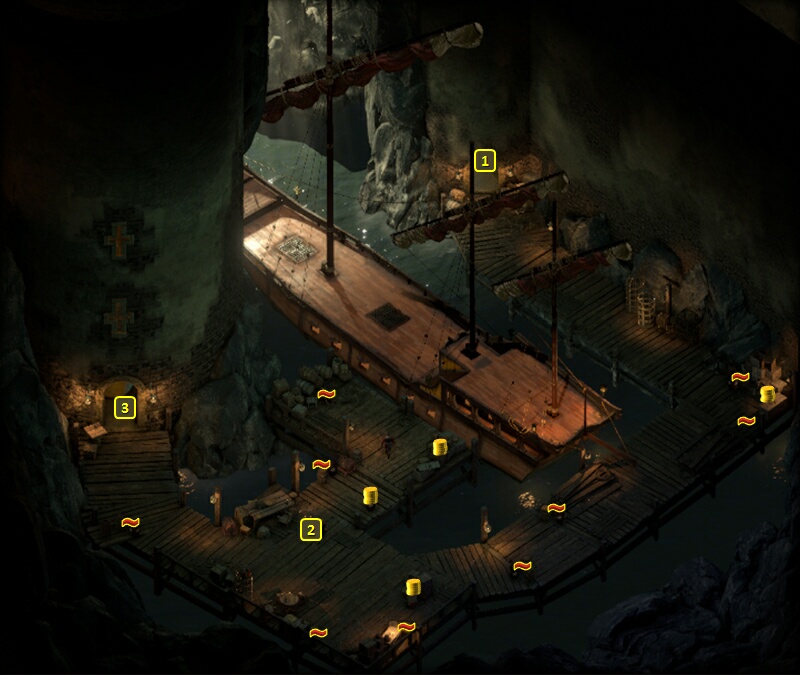
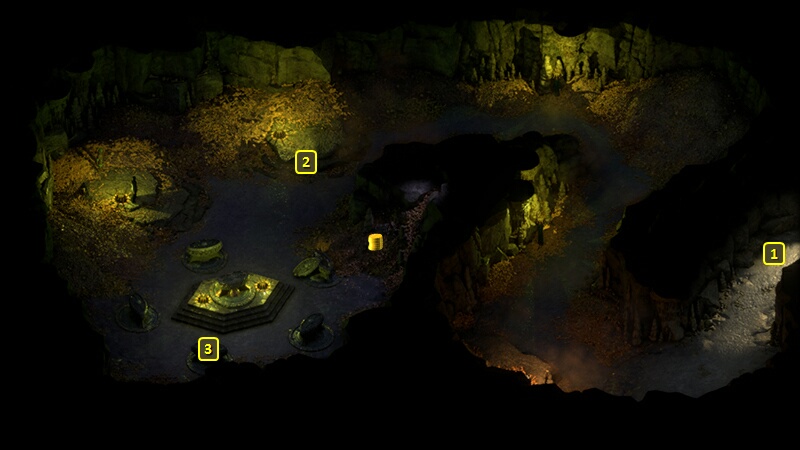
Now I enter the Cave of Threshing at #5.
I start off at #1 on the map of the Cave of Threshing. I follow the tunnel and approach the main area at #2, where I have to fight Ancient Fampyrs. A key danger is their gaze that can Dominate. But Alliria, with her Aegis of Loyalty passive, just needs to tap her Dominated ally with Modwyr the odd time it happens. It takes a while, but I do eventually outlast them and take them down one at a time using familiar tactics.
A sarcophagus at #3 has a Cloak called The Giftbearer's Cloth. Aloth wears it for the rest of the game. It adds an extra each of weapon slots and quick-item slots for the wearer's inventory screen. Recall that Aloth's build is based on making Wizard's Double and Ironskin last as long as possible. That includes maximizing all Defenses and chances of reducing Hits to Grazes, as Grazes will not eliminate Wizard's Double or wear down Ironskin. But the concept requires a recognition that attacks that roll a Hit against Fortitude and Reflexes and Will can bring the defenses down. This cloak is perfect for the build as it adds +5 to all Defenses besides Deflection, and scales to add an additional +1 for every point in the History skill of the wearer.
This is one of the islands I needed to explore for purposes of the Mapping the Archipelago: Razai Passage Quest. I leave the cave, rename the island to "Malefia", and return to my ship.
Now it's time to explore Outcast's Respite.