-

- Forums
- Chatrooms
- Gallery
- Gameplay Videos
- Upload
- Articles
- Mod Reviews
- Shop SP: Games, Movies, Books
|
|
| Pillars of Eternity 2 Video-Based Walkthrough by David Milward |
Brass Citadel
*Evil* Sealed Royal Deadfire Company Missives
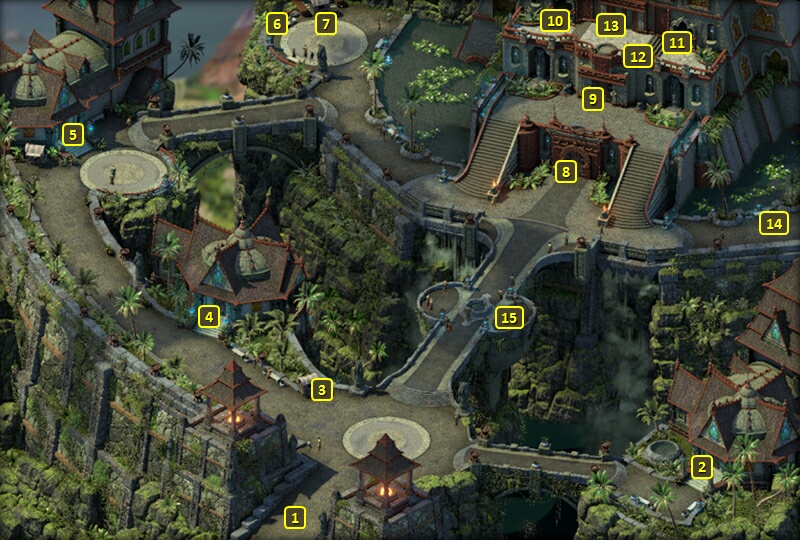
I arrive at the south end of Serpent's Crown. Maia wants to speak to Zarathos, now that he's had at least one point of positive reputation with her for some time. She has some Sealed Royal Deadfire Company Missives that she needs to deliver, one to a contact in Port Maje, and one to another contact in Tikawara. I agree to the request.
I purchase some gems from Una, and then leave for the Brass Citadel.
*Evil* Dragon's Dowry
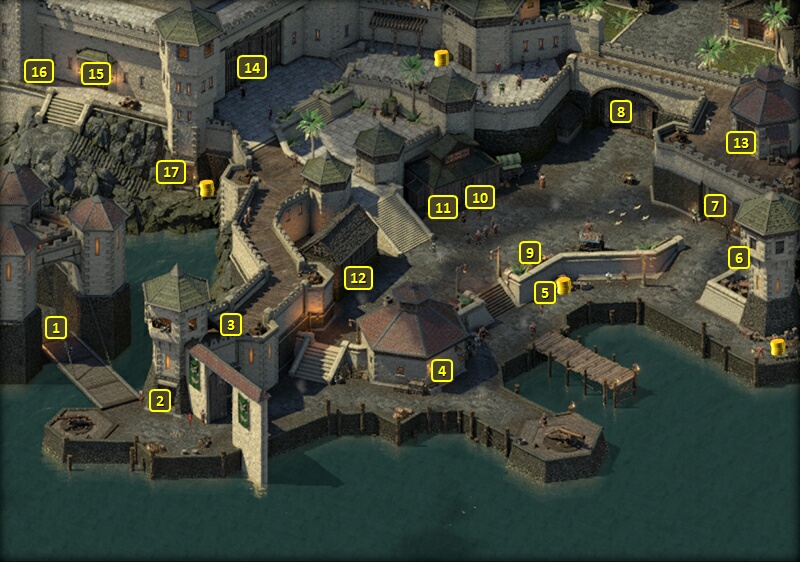
I start off at #1 on the map of the Brass Citadel. I enter Uno's Gunsmithy through the door at #4.
I purchase an Arquebus named Dragon's Dowry for Maia. It will be her weapon for the rest of the game. It will enjoy a +10 boost to Accuracy on account of her wearing the Ring of Focused Flame, since the gun itself is considered a Fire attack. I would prefer The Red Hand, which hits its target with two shots each attack, and the Ring of the Marksman for Maia if she was a core party member. But this setup is good enough for someone who participates primarily in ship combat. The other benefit of this gun is its bonus Burning Damage. That presents a risk of some damage to Maia herself whenever she attacks. But again I can live with that for a ship combatant.
He also buys a Sparkcracker. It's part of a heist plan. Ydwin next picks the locks on all the chests, and goes into hiding. She can steal the Exceptional Blunderbuss from the chest near the north corner, and the items in the nearby barrel. But the chest near Uno himself will be impossible to pilfer without playing a trick first.
And that trick is for another party member to toss the Sparkcracker to the south side of the shop. Everyone, including Uno himself, will gather towards the harmless explosion. That gives Ydwin her window to sneak to the chest and lift a Pistol called Scordeo's Trophy. It doesn't fit into any of my long-term plans, but I will sell it for some cash.
*Evil* Harapo Epic
I travel along the ramparts, and then reach the door to the Imperial Command at #14. It is at this point that Zarathos now gives the Harapo Epic to Tumara to complete The Archmage's Vault Quest. And of course the Imp comes by to deliver Arkemyr's message.
Ydwin has enough experience to reach her 9th level and select two new abilities. One of them is Borrowed Instinct. It inflicts -8 penalties to both Intellect and Perception. The real point is that the Cipher herself gains +20 bonuses to both Accuracy and all Defenses. It can't be extended through Salvation of Time, since it ends once the target's penalties end. So I may have to periodically renew it. On that point, whichever enemy has the weakest Will should be the target, so as to provide the longest lasting bonuses to the Cipher. I tend to use it as a primer before using other offensive powers.
The other one is Tactical Meld. It provides both the Cipher and an ally of her choosing the Aware Inspiration, and +3 Engagement. I tend to use it on Zarathos. Neither Barbarian nor Monk has any class abilities that provide Perception Inspirations. And Accuracy is important to both a Barbarian / Monk and a Cipher, so this power is an optimal way to get the Perception boost for both. The bonus Engagement isn't meaningful for a Cipher who spends most of her time with missile attacks or psionic powers at range. But boosting Engagement for Zarathos will boost the power of his Reckless Brigandine armor when he gets it, as well as his secondary weapon set. And this power can be extended by Salvation of Time.
Rekke gets Bloodlust on his 9th level-up. The +20% Action Speed for 10 seconds after landing a killing blow again makes it a standard choice for many Barbarians.
*Evil* Emeini
I now go to #11. It is at this point that I recruit Emeini as a spare Crew Member. I don't have enough reputation with Neketaka itself for it. But Maia vouches for Zarathos, on the basis of the latter having positive reputation with her. And that convinces Emeini to join my ship.
Emeini is probably the best spare Crew Member in the game. She's the only one with five skill ranks, three in Cannoneer, one in Deckhand, and one in Helmsman, which allows her to sub into at least three roles should the need for any of them arise.
Bounty on Assila Wave-Skipper
The good party does things in a reverse-order kind of way. I travel directly to the Fleet Master's Office. I then collect 1,500cp and 4,200+ xp for the Bounty on Assila Wave-Skipper. I also accept the Bounty on Radulf.
Serafen takes two abilities on his 9th level-up. One of them is Barbaric Smash. It will completely recoup the Rage cost for using Barbaric Blow should it also be a killing blow. Bloodthirst, which also erases Recovery for a brief period of time following a killing blow, makes Crushing Blow redundant. That makes Barbaric Smash the easy choice.
The other is Interrupting Blows. It has a 50% chance of causing an Interrupt on a Critical Hit, which makes it another staple for Barbarians.
I step out the door, which leaves me at #10 on the map of the Brass Citadel.
*Evil* The evil party does as well, but after having recruited Emeini.
*Evil* Orlan Pedder
The evil party now visits the Orlan Peddler at #9, and buy two items from her.
One is the Ring of Greater Regeneration for Zarathos. Taking damage during battles is going to be a given, considering his build. So this ring certainly commends itself, moreso because his own Might and the Dawnstar's Blessing will increase the Health regeneration every 6 sec provided by the ring.
The other item I purchase is a pair of Gauntlets of Ogre Might. I switch in Eder and Konstanten. Eder gets the Gauntlets of Ogre Might. They put him that much closer to his targeted Might score of 25, whereupon he can use Amra at its full power from the very start of ship battles.
Eder takes Backstab on his 9th level-up. It allows him to score double-damage when he's Invisible. And he can go Invisible often either through the use of his own Escape / Shadow Step abilities, or once per Encounter through the Slippers of the Assassin after landing a killing blow.
Konstanten takes two abilities on his 9th level-up. One of them is Seven Nights She Waited While the White Winds Wept. It's an Offensive Invocation that launches seven bolts of ice from the Chanter that inflict Freezing Damage only on enemies.
He also takes Rapid Casting. Some of his Offensive Invocations do have significant casting times, so taking this passive is certainly advisable.
Now I bring my core party back together, with the only difference being that Ydwin will temporarily sit out for Maia. I return to my ship.
Orlan Pedder
Fassina gets the Gauntlets of Ogre Might in the good party. The +2 bonus to Might will augment both her damaging spells and her healing spells.
I go the exit at #8, and put together the core party with the caveat that I replace Aloth with Ydwin for the time being.
Pallegina gets the Ring of Greater Regeneration. It heals 3 Health per 6 sec. And that 3 Health will get boosted by her bonuses to Might and to Healing. It helps to improve her own personal resiliency.
Scordeo's Trophy
The good party goes west and goes through the door at #4 to enter Udo's Gunsmithy. They don't buy anything from the shop, but they use the same process as the evil party to score Scordeo's Trophy. Mirke uses it as her main-hand gun for the rest of the game. The benefit of having a Pistol in the main-hand and a Blunderbuss in the off-hand is that both will fire at the longer range of the Pistol when both are used during a Full Attack. And the bread and butter Full Attack is going to be Stunning Surge. The stacking -5% reduction of Recovery Time through Opening Shot initially only applies to Melee Weapons. Adding the Opening Barrage enchantment means that stacking reduction of Recovery Time will now also apply to Ranged Weapons as well. And that stacking reduction of Recovery Time will stack with the reduced Recovery Time of her Streetfighter passive. She also adds the Penetrating Critical enchantment so that her gunfire can damage even heavily armored targets.
The good party now returns to its ship, and sets sail for the western island of the Wakara Reef.