-

- Forums
- Chatrooms
- Gallery
- Gameplay Videos
- Upload
- Articles
- Mod Reviews
- Shop SP: Games, Movies, Books
|
|
| Pillars of Eternity 2 Video-Based Walkthrough by David Milward |
The Champion of the Hunt
*Evil* Battle Royale
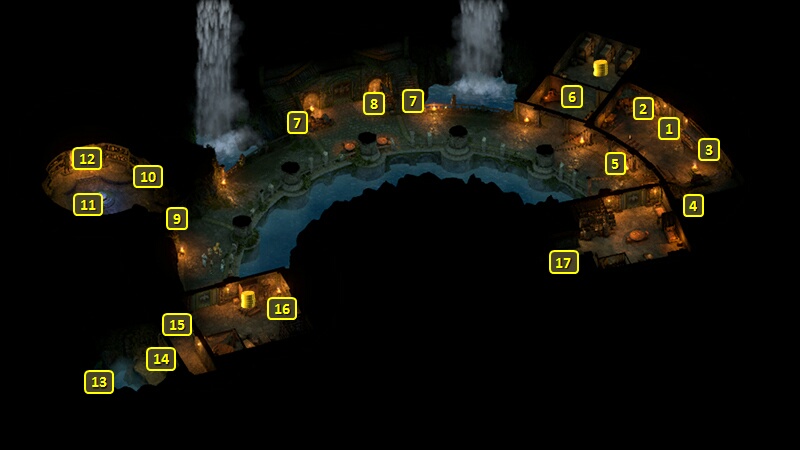
I click on the Pool of Memories at #11 on the map of the Temple of Taomowhai, and choose to start the Battle Royale. It initially starts off as a battle in The Crucible against two other groups who have become Champions of the other Faces.
So if you completed The Seeking Face, you'll be up against The Dragonstalkers and The Band of the Bear. If you completed The Surviving Face you'll be up against The Quiet Five and The Dragonstalkers. The evil party completed The Slaying Face, so they're up against The Quiet Five and The Band of the Bear.
But a complication emerges when the ground starts to quake, and the arena itself starts to flood. Two ropes are available.
Rather than stay in the water, you can instead go for one of the ropes to reach the elevated platform. The other two groups will be racing you for each of the ropes. You can:
Battle Royale
I made some preparations before I clicked on the pool to start the Battle Royale. Alliria switches to the Iron-Clasped Grimoire, Modwyr and The Eye of Wael. She also equips Concelhaut's Skull as her Pet for the time being. Mirke readies her secondary gun set.
The good party chooses to stay on the ground without going for the ropes, which leads to a fight against the Krovix of the Deep and several Arc Grubs. Remember the Giant Grub from Old City? A difference is the Krovix and the Arc Grubs can score some extra Shocking Damage as well. Also, any characters that cannot individually make an Athletics check of 2 will get the System Shock (-3 Shocking Armor Rating, -2 Perception) Injury.
The party lets the Arc Grubs come to them, and works on them one at a time. Alliria tags the Krovix with Brand Enemy, and then follows up with Infuse with Vital Essence and Blood Sacrifice. She then sets multiple Concelhaut's Crushing Dooms on the Krovix, replenishing her 7th-tier spell slot with Blood Sacrifice every time. The Krovix is unable to do anything, and eventually falls. I simply mop up on the Arc Grubs that are left.
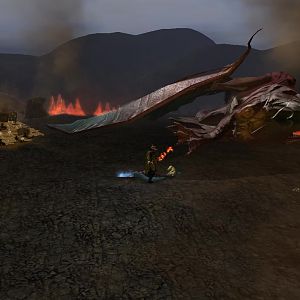
A dying Drake will now crash towards the good party. I can avoid Injury with an Athletics check of 8 to dodge it, or blast it with a spell like Crackling Bolt or Chain Lightning. Alliria blocks it with Arcane Veil.
The other two groups will in the meantime have fought on a platform that was elevated by the erupting water. Whichever group was victorious between them will now come down a rope to challenge you. You can:
*Evil* The Champion of the Hunt
Zarathos crafts a few Potions of Ascension for himself. The +2 Power Levels will enhance even more his Unarmed Fists and Carnage, and they'll get extended endlessly by Salvation of Time. I'm at the point where this can come in handy during a few upcoming battles.
I go to Domenga at #6 and switch out Mirke and Ydwin for Serafen and Konstanten for the time being. The reason being that having the latter two in the party provides some possible options for the next part.
Zarathos has a rather extended conversation with Konstanten about the nature of the island.
Now I speak to Humaire again. The reward she would normally give is the Champion's Helm for a Watcher who isn't a Godlike. But as Zarathos is a Death Godlike, she instead gives him the Champion's Cape as the reward. He wears it for what's left of the game. It offers a 10% chance of Riposte on an enemy Attack that Misses the wearer's Deflection. But that's irrelevant to Zarathos' build. The real benefit is the bonuses to Action Speed and Damage that are integral to his build, and will stack with similar bonuses provided by other items and his class abilities. The Cape's bonuses are dependent on Zarathos being Engaged by enemies.
The party then travels to Toamowhai's Den through the Pool of Memories.
Eruke
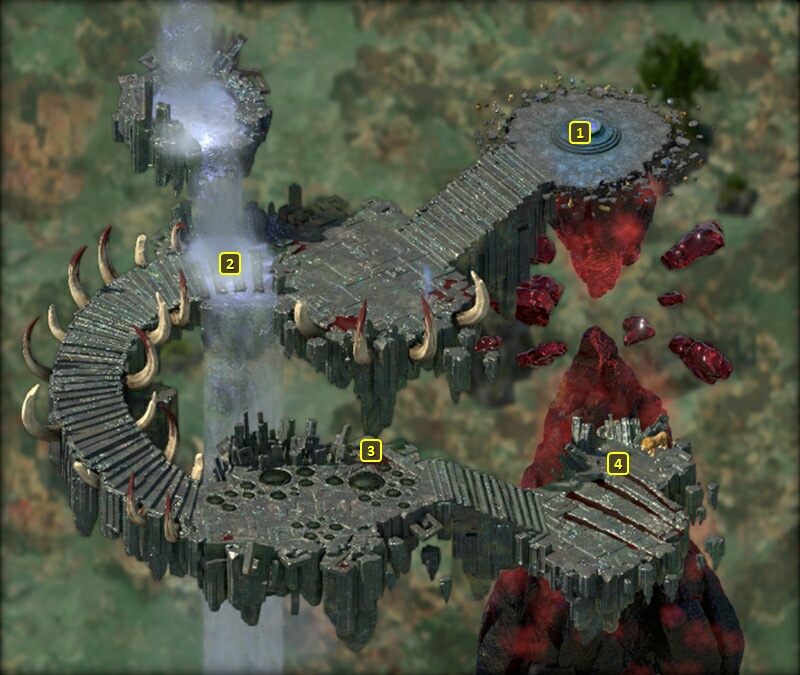
I start off at #1 on the map of Toamowhai's Den. I go to #2 and speak with the spirit of Eruke the Surviving Face. She explains that Whehami the Slaying Face seeks to escape from the Den, and it now becomes the Watcher's job to stop him.
The possibilities that are shown here reflect having completed The Slaying Face Quest. There are different possibilities involved with having completed either The Seeking Face Quest or The Surviving Face. They involve the revelation that all three of the Faces share the same soul, and / or revealing Aexica's manipulations to Whehami. If you're interested in learning more about the details, see the link for The Champion of the Hunt.
I showed this particular part from the perspective of the good party because I thought the dialogue option of showing sympathy for the butchered pig would be something Alliria would do, but Zarathos wouldn't.
*Evil* Aexica
And here is where Zarathos speaks to Aexica at #3.
*Evil* Whehami
I go ahead to #4 to confront the spirit of Whehami. The goal is to obtain from him the Tooth of Toamowhai, either willingly or by force.
Conversing with Whehami at length reveals that he desires to escape from the Den, and he drops the hint that he sees taking over your body as the way to do it. Also be sure to ask him about the Tooth of Toamowhai.
You can actually take him up on his offer, over the protests of your companions. If you actually see that through, Whehami takes over your body, you become the eternal custodian of The Crucible, and the game will end then and there.
But there are alternatives to yourself that Whehami will find acceptable. Speak again to Aexica if you're interested in one of those possibilities. You need to ask her the questions about whether Whehami leaving in another body is even possible, and also why a Watcher is needed for what he has in mind. Be sure to get the answer from Aexica along the lines of "Nature hates to leave a vacuum behind." That's when you can propose a specific alternative to him. You may need to do another back and forth between Whehami and Aexica till you get the answer that you need from Aexica.
You can offer up Konstanten if he is in the party. He will be EXTREMELY angry if you do, and the other companions will likewise express disapproval. It also earns Cruel disposition.
You can also offer Muatu instead, again over the vehement objections of Companions. Whehami will agree only if you chose at least twice beforehand to use the soul essence in The Crucible to empower Muatu's Head. This can be done at least at the conclusion of The Rite of Passage, at the conclusion of one of the Faces' Quests, or after the Battle Royale challenge during this Quest. Whahemi will give you the Tooth of Toamowhai and let you leave willingly, but you lose Muatu's Head and earn Cruel disposition in the process.
You can also suggest the giant that Galawain has on its way to The Crucible. Whehami will like the possibility, but won't consider it possible without his axe. If you earned the Slayer's Claw by becoming his Champion, you can show it to him. He'll then agree to your terms, give you the Tooth of Toamowhai, and return you to The Crucible.
The other route to persuading him to voluntarily give up the Tooth of Toamowhai is to make an Intimidate check of 22 against him. Zarathos makes a different Intimidate check of 16 as he had completed The Slaying Face to become Whehami's Champion.
That puts Zarathos in a position to demand that Whehami willingly surrender the Tooth of Toamowhai and does so (although he still had the option to attack Whehami anyway). He then uses the Tooth of Toamowhai to repair the adra that allows souls to pass from The Crucible to The Beyond.
Zarathos leaves Toamowhai's Den. He also severs the connection between The Crucible and The Beyond on his way out. *Good* Alliria leaves the connection restored on her way out.
The Tooth of Toamowhai is another of three items that can be used to assemble a powerful Amulet called the Crown of the Exiled Queen.
The Hunter Hunted
Engari speaks to Alliria at the Pool of Memories, and informs her that Humaire is defending The Crucible against an enormous monster that has arrived.
Alliria readies the Iron-Clasped Grimoire, Modwyr and The Eye of Wael. I exit through the door at #16 to enter The Crucible.
An enormous crocodile-like monster called the Porokoa will show up, along with several Lesser Porokoa. Galawain briefly taunts Alliria before leaving her to the fight.
The Porokoa itself has 3,000+ Health. Its roar can Terrify multiple party members. And it can occasionally regurgitate bile that will both inflict Corrosive Damage and Stun multiple party members. Its tail slap can also Stun any characters that try to Flank it. It leaves behind a Porokoa Eye.
However, Alliria renders it helpless and kills it with multiple Concelhaut's Crushing Dooms. Pallegina also uses And Evil Turned Away From The Sun to nullify the Terror roars.
I now have the same choices about what to do with the soul energy of the slain Porokoa. Alliria absorbs the essence into herself to gain a Culmination Stone.
Any of the choices completes the Quest, and earns a reward of 10,000+ xp. The good party is brought back to the Pool of Memories, and is congratulated by both Humaire and Engari.
I use the Culmination Stone to raise Eder's Pukestabber from Superb to Legendary.
I speak to Domenga at #6, and briefly bring in Fassina. I use the Porokoa Eye to raise The Spine of Thicket Green from Superb to Legendary. Doing it this way avoids having to hope for and then spend Adra Ban.
*Evil* The Hunter Hunted
The evil party manages to outlast it with the Salvation of Time-Ancestor's Memory Loop, along with Barring Death's Door on everyone and some persistence. Zarathos also used a Potion of Ascension to give himself +2 Power Levels for the duration of the fight. He destroys the Porokoa's soul to gain the maximized version of Rymrgand's Gift that provides a bonus +8 Accuracy vs. Vessels.
I afterwards use the Porokoa Eye to raise the quality of Ydwin's War Bow, Saint Omaku's Mercy, from Superb to Legendary. And again, doing it this way avoids having to hope for and then spend Adra Ban.
Both the good and the evil parties now begin a series of fights against the Beasts of the Slayer.