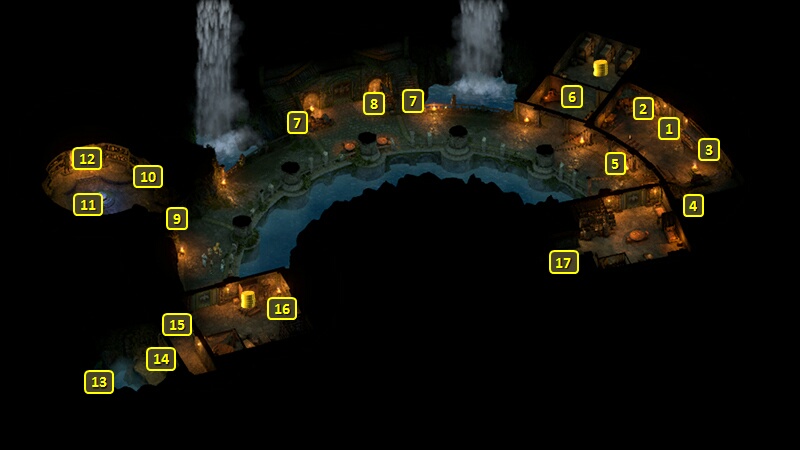
Click on the Pool of Memories at #11 of the Temple of Toamowhai. Your next challenge is the Battle Royale. Accepting it brings you to The Crucible.
It initially starts off as a battle against two other groups that have become Champions of the other Faces. So if you completed The Seeking Face, you'll be up against The Dragonstalkers and The Band of the Bear. If you completed The Slaying Face, you'll be up against The Quiet Five and The Band of the Bear. If you completed The Surviving Face you'll be up against The Quiet Five and The Dragonstalkers.
But a complication emerges when the ground starts to quake, and the arena itself starts to flood. The center of the arena starts to rise up. Two rappelling ropes are connected to it, giving you the option to climb up to the now elevated central platform. You could choose to stay, which leads to a fight against the Krovix of the Deep and several Arc Grubs. Remember the Giant Grub from Old City? A difference is the Krovix and the Arc Grubs can score some extra Shocking Damage as well. Also, any characters that cannot individually make an Athletics check of 2 will get the System Shock (-3 Shocking Armor Rating, -2 Perception) Injury.
If you beat the Krovix, a dying Drake will crash towards you. You can avoid Injury with an Athletics check of 8 to dodge it, or block it with a spell like Arcane Veil, or blast it with a spell like Crackling Bolt or Chain Lightning.
The other two groups will in the meantime have fought on the platform that was elevated by the erupting water. Whichever group was victorious between them will now come down a rope to challenge you. You can:
Let them down without incident, which earns both Honest and Diplomatic disposition.
You can use a spell like Chill Fog or Slicken to weaken their hold on the rope. That means some of them will have Injuries when the battle against them starts. It also earns both Cruel and Shady disposition, and approval from any Companions who approve of Lighthearted actions.
You can use a wind spell like Cleansing Wind or Winter Wind to blow some of them off the rope and cause Injuries before the battle starts. It earns Aggressive disposition.
You can swagger and strut to earn both Clever and Passionate disposition, although I don't think that accomplishes anything.
You can instead go for one of the ropes to reach the elevated platform. The other two groups will be racing you for each of the ropes. You can:
Try to swim ahead of the group going for the same rope as you. You need to make an Athletics check of 10, otherwise the Watcher will end up with Fatigue (-5 Accuracy, -10 all Defenses, -15% Maximum Health) and end up having to fight the Krovix of the Deep and the Arc Grubs, and then the surviving group afterwards.
Use a Water- or Frost-based spell on the group going for the same rope as you. If the group is The Dragonstalkers, they'll be able to counter with a Fire-based spell, forcing you to choose another option.
Use a magical summons to hold them up.
Use any spell that can apply an Intellect Affliction, like the Cipher's Puppet Master or Ringleader, to sow division in the rival group.
The other group will have made it to the other rope. You can use a Hail Storm or Slicken spell on the rope, or simply climb up. Either way you need to make an Athletics check of 8 to climb up your rope to reach the elevated platform without falling, getting the Concussion (-20 Will) Injury, and having to fight the Krovix of the Deep and the Arc Grubs.
You will have to fight one of the groups, which will make it to the top despite your best efforts. After that, that same Drake described above will attack you. You can:
Try to avoid its attacks. If anyone in the party can't make a Dexterity check of 13, they will receive the Serious Burn (-2 Dexterity, -3 Burning Armor Rating) Injury. It also means you'll have to choose another action.
Everyone in the party can carefully climb down if they all make an Athletics check of 7. There may be a risk of Serious Burn for characters who can't make the check.
A Paladin with the Abjuration ability can blast it apart.
A Cipher with a Resolve of at least 12 can use Amplified Wave to drive it away.
Use a Rope and Grappling Hook and a Perception check of 14 to catch it. You can then either hold it in place or stake it in place with a Hammer and Chisel. The former requires an undetermined level of Might to be successful, while the latter requires a very high Mechanics check. Once fully entrapped you can either kill it, paralyze it, or let it go. The former two choices cause you to fall down, and at least the Watcher will have the Concussion (-20 Will) Injury. The latter exposes the party members to the same risk of Serious Burn unless everyone can make a Dexterity check of 13. The party will fall down, and the Watcher will get both the Concussion and Wrenched Knee (-25% Stride) Injuries.
Win both fights, and you'll again have choices about what to do with the accumulating soul essence in the arena. They're the same choices you had at the end of The Rite of Passage and The Crucible:
You can attempt to send the souls back to the Wheel, but something will block that attempt.
Return the energy to the Crucible and the wildlife of Kazuwari. The Watcher gains a passive ability, Galawain's Gift (+2 Accuracy vs. Beasts). If you previously had this Gift from The Rite of Passage and/or The Crucible, then the Accuracy vs. Beasts bonus will stack with any attained during the prior Quests.
Destroy the soul energy. The Watcher gains a passive ability, Rymrgand's Gift (+2 Accuracy vs. Vessels). If you previously had this Gift from The Rite of Passage and/or The Crucible, then the Accuracy vs. Vessels bonus will stack with any attained during the prior Quests.
Channel it into Muatu, which is apparently supposed to make the summoning of Muatu's Head more powerful.
You can channel it into yourself to gain a Culmination Stone. You can use it to upgrade the enchantment of any armor, weapon or shield from Superb to Legendary.
You will be returned to #16 in the Temple of Toamowhai after making your choice.
Speak to Humaire near the Pool of Memories at #11. She'll reward you with 10,000+ xp, as well as the Champion's Helm if your Watcher character is NOT a Godlike, or with the Champion's Cape instead if the Watcher is a Godlike.
She now also wants you to commune with the three Faces through the Pool of Memories. Doing so is necessary to progress through to the end of the expansion.
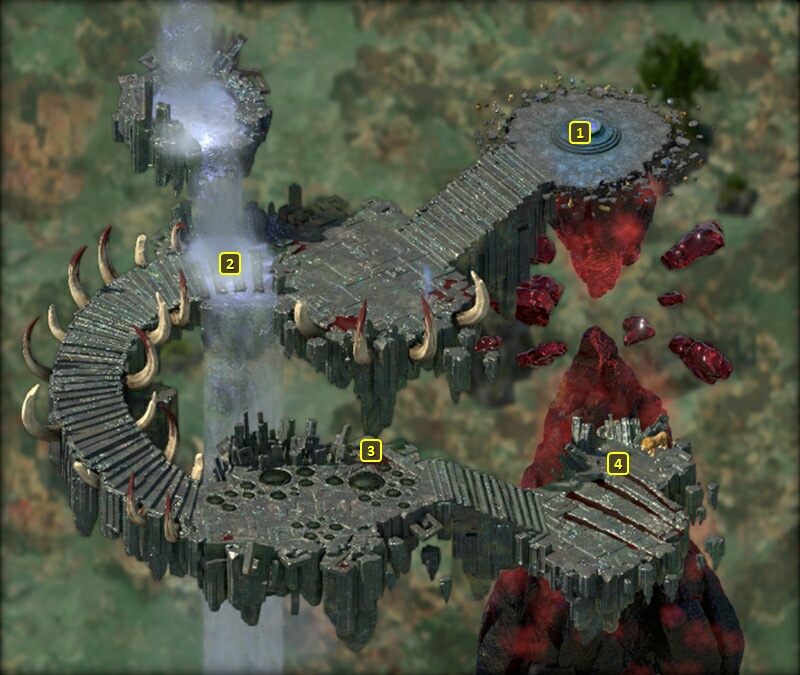
You'll start off at #1 on the map of Toamowhai's Den. The spirit of Eruke, the Survivor's Face, will be at #2. She'll indicate that Whehami, the Slayer's Face, has blocked the souls of those dying in The Crucible from reaching the Wheel. She would like you to stop him.
The spirit of Aexica, the Seeker's Face, will be at #3. The spirit of Whehami, the Slayer's Face, will be at #4. You will see past memories of Whehami defeating various creatures in his past mortal lives when you first approach him.
The objective is to leave Toamowhai's Den after obtaining the Tooth of Toamowhai from Whehami and using it to repair the flow of souls from The Crucible to the Wheel. There are multiple pathways to that objective, some that involve fighting your way past one or two of the Face spirits, and others that involve gaining their willing cooperation.
The most straightforward way is to speak to all three Faces in succession, and then attack Whehami to conclude your dialogue with him. Aexica will join Whehami against you shortly the battle begins. He'll leave behind the Tooth of Toamowhai, and then you can use it to repair the flow of souls and leave.
You can also get Whehami to give you the Tooth of Toamowhai willingly and let you leave if you can make an Intimidate check of 22 against him. A different Intimidate check of 16 becomes available if you completed The Slaying Face to become his Champion.
Conversing with Whehami at length reveals that he desires to escape from the Den, and he drops the hint that he sees taking over your body as the way to do it. Also be sure to ask him about the Tooth of Toamowhai.
You can actually take him up on his offer, over the protests of your companions. If you actually see that through, Whehami takes over your body, you become the eternal custodian of The Crucible, and the game will end then and there.
But there are alternatives to yourself that Whehami will find acceptable. Speak again to Aexica if you're interested in one of those possibilities. You need to ask her the questions about whether Whehami leaving in another body is even possible, and also why a Watcher is needed for what he has in mind. Be sure to get the answer from Aexica along the lines of "Nature hates to leave a vacuum behind." That's when you can propose a specific alternative to him. You may need another back and forth between Whehami and Aexica till you get the answer that you need from Aexica.
You can offer up Konstanten if he is in the party. He will be EXTREMELY angry if you do, and the other companions will likewise express disapproval. It also earns Cruel disposition.
You can also offer Muatu instead, again over the vehement objections of Companions. Whehami will agree only if you chose at least twice beforehand to use the soul essence in The Crucible to empower Muatu's Head. This can be done at least at the conclusion of The Rite of Passage, at the conclusion of one of the Faces' Quests, or after the Battle Royale challenge during this Quest. Whehami will give you the Tooth of Toamowhai and let you leave willingly, but you lose Muatu's Head and earn Cruel disposition in the process.
You can also suggest the giant reptile that Galawain is sending towards The Crucible. Whehami will like the possibility, but won't consider it possible without his axe. If you earned the Slayer's Claw by becoming his Champion, you can show it to him. He'll then agree to your terms, give you the Tooth of Toamowhai, and return you to The Crucible.
Different possibilities open up if you completed The Seeking Face to become The Seeker's Champion.
Part of the groundwork must be laid when you speak to Aexica for the first time. You must select the dialogue option of whether Whehami was the first to attempt escape when it first comes up, as it won't be available again thereafter. She'll reveal that they were the original three Faces, and have been since. There have been no other Faces. An Insight check of 18 will reveal her unrest at remaining inside the Den, which itself helps to open up options.
Now speak to Whehami. Asking him about the visions you previously saw of his past lives will convince him to remember his past lives in The Crucible as a Watcher. Also ask him about his plan to escape the Den. End the conversation by indicating you want more time to think about things.
Now speak to Eruke again. Question her at length about the origins of the Faces, and other spirits in the Den. A Metaphysics check of 12 will at some point become available. You can convince Aexica and Whehami to abandon their plans willingly if you can make that check. There are other options that are still available if you can't make the check, but they involve fighting one or both of Aexica and Whehami.
If you ask Aexica about Whehami's plan to escape, after having discussed it with Whehami, an Insight check of 18 also reveals her discontent at remaining in the Den.
If you had made either of the Insight checks about Aexica wanting to leave the Den, you can now ask Whehami about it. He will be in denial, as he assumes that Aexica cherishes mastery over the Den as her pet project.
Now speak to Aexica to accomplish two objectives. One is to get her to confess to manipulating Whehami into obstructing the flow of souls back to the Wheel by trying to escape, with the hopes that she could escape as well. This is accomplished only by initially confronting her with your insight, followed by the "Do your champion the courtesy ..." option that demands she tells the truth.
The other objective is get her to willingly give up her hopes of leaving the Den. This is accomplished by bringing up that all three Faces are different parts of the same soul after having made the Metaphysics check of 12 with Eruke, and then making a Diplomacy check of 20 to seal the deal. Now speak to Whehami again, and relay Aexica's confession and her desire to make things right again. He'll willingly let you leave after repairing the flow of souls and giving you the Tooth of Toamowhai.
If you can't make use of the knowledge of the Faces sharing the same soul by making the Metaphysics check of 12 with Eruke, you can still obtain the confession from Aexica as described above. Relay the confession to Whehami. He will become angry, and demand that you attack and kill Aexica. Do so, return to Whehami, and he'll let you leave after repairing the flow of souls and giving you the Tooth of Toamowhai.
A similar pathway exists if you completed The Surviving Face to become The Survivor's Champion.
The processes are almost exactly the same as those for uncovering Aexica's manipulations of Whehami described above. Speak to Aexica, and open by telling her that Whehami intends to escape. Select the dialogue option that asks Aexica if Whehami was the first to attempt escape, when that option first comes up. But a difference here is that you do not need to make any Insight checks. Then speak to Whehami to confirm his desire to escape, learn about the Tooth of Toamowhai, and his awareness that he is a Watcher who has had past lives as a combatant in The Crucible.
Now speak at length with Eruke, and make that same Metaphysics check of 12. This time you don't need to speak to Aexica again. You can go straight to Whehami, and pursue all the dialogue options that press him for his awareness that he shares the same soul as Eruke and Aexica. He will eventually relent, although the text for one of the replies is missing. That means he'll give you the Tooth of Toamowhai and let you leave willingly.
You can either simply return to your body after leaving the Den, or use the Tooth of Toamowhai to again cut The Crucible off from the Beyond, which implies a negative slide once you get your endgame epilogues.
Leaving the Den completes this Quest and begins The Hunter Hunted Quest.
Sorcerer's
Place is a project run entirely by fans and for fans. Maintaining
Sorcerer's Place and a stable environment for all our hosted sites requires a substantial amount of our time and funds on a regular basis, so please consider supporting us to keep the site up & running smoothly. Thank you!
Supporting Sorcerer's Place
Has Sorcerer's Place been useful? If you'd like to show your appreciation
for our hard work on the site, and help us pay the bills the site generates
every month, please consider helping support SP.
Thank you!