Pillars of Eternity 2 logo


Pillars of Eternity 2 Online Walkthrough by David Milward

INTRO & ABOUT | CHARACTERS | COMBAT AND RULES | ITEMS | SHIPS
Quests | Areas | Mega Bosses
Disable all ads!

Main Game: Main Quests | Character Quests | Side Quests | Tasks | Bounties
Faction Quests: Huana | Principi | Royal Deadfire Company | Vailian Trading Company
Expansions: Beast of Winter | Forgotten Sanctum | Seeker, Slayer, Survivor

Seeker, Slayer, Survivor Main Quests: The Proving | The Rite of Passage | The Crucible | The Champion of the Hunt | The Hunter Hunted
Seeker's Face Quests: The Seeking Face | The Seeking Face's Hunt for the Adra Pearl | The Seeking Face's Hunt for the Fortuneteller's Ear | The Seeking Face's Hunt for the Haemneg's Handmaiden
Slayer's Face Quests: The Slaying Face | The Slaying Face's Hunt for the Luckless Coin | The Slaying Face's Hunt for the Titan's Heart | The Slaying Face's Hunt for the Hunter's Head
Survivor's Face Quests: The Surviving Face | The Surviving Face's Hunt for the Matron's Skull | The Surviving Face's Hunt for the Uncut Gem | The Surviving Face's Hunt for the Finger of the Exiled Queen
Seeker, Slayer, Survivor Side Quests: Potions of Plenty

Temple of Toamowhai

The Surviving Face

  1. This Quest starts after you have started The Crucible Quest, and have indicated a willingness to Engari at #10 in the Temple of Toamowhai to retrieve an artifact for the Survivor's Face.

    Engari will indicate that the artifact can be found in a place called Tiebe o Waiapu, and then open the door at #12 for you. It provides access to Kazuwari at #7.
  2. Kazuwari

  3. Pingaka Ravine is at #8, which has an unstable bridge that you'll need to cross in order to progress this Quest.

    You can safely cross it without checking on the condition of the bridge itself as long as the Watcher can make a Resolve check of 12 and a Dexterity check of 14, and then everyone in the party can make an assisted Athletics check of 8.

    Examining the bridge offers multiple opportunities to gauge its condition through skill checks. A Survival check of 13 indicates that the rope of the bridge can't hold up much weight. A Stealth check of 15 indicates that the wood is not of the sort that a scout would want to quietly cross over. A Mechanics check of 12 suggests that the bridge can be reinforced.

    Searching for an alternative pathway, after making either a Mechanics check of 14 or a Survival check of 14, indicates that there's no way forward but over the bridge.

    If you attempt to cross without reinforcing the bridge, and after making any skill checks that determine the bridge's condition, you can cross. The difference is that you only need to make the Dexterity and Athletics checks. You won't need to make the Resolve check.

    You can attempt to reinforce the bridge through your own labor. It takes two days, and your party members will end up Fatigued. But you can cross without any more skill checks.

    You can reinforce the bridge with certain spells, like the Wizard's Binding Web or the Druid's Tanglefoot. You can then cross without any more skill checks.

  4. Tiebe o Waiapu is at #11. A red light in the distance will constantly beckon the Watcher onwards. Some of the skill checks during the scripted interaction are easy enough, especially early. But inevitably each party member besides the Watcher is going to end up both Injured and in a situation where he or she has to be left behind. That will be signified by an hourglass symbol and the "busy" designation appearing over that party member's portrait during the scripted interaction. What is also inevitable is that the process will take at least several hours, thus ending any Resting bonuses you may have in place.

    It is only after all members are "busy" and forced to stay behind that the Watcher reaches the final cliff for the scripted interaction. The Watcher can either climb the cliff with a Constitution check of 14, or use a Rope and Grappling Hook with an Athletics check of 6. The latter action reduces the Constitution check needed to climb the cliff to 10.

    Razorback Sow
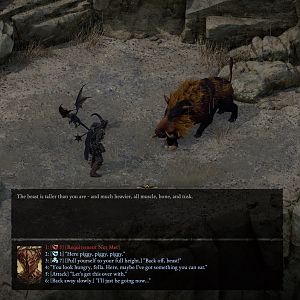
Reaching the top of the cliff leads to an encounter with a Razorback Sow. The objective is to get the Crimson Crystal from it. You can:

    • Attack it off the bat. Your party members will gradually catch up and join you. You can loot it from its dead body afterwards.
    • Make an Intimidate check of 7 to scare it away and leave the Crimson Crystal behind.
    • Make a Diplomacy of 5. You can now pet it, although I don't think that provides any tangible benefit. You can either take the Crimson Crystal from it without struggle, or kill it for the Crimson Crystal and earn Aggressive and Cruel disposition at the same time.
    • Feed it an Orlan's Cradle. You'll again have the same options to pet it, take the Crimson Crystal without incident, or kill it to take the Crimson Crystal and earn Aggressive and Cruel disposition.
    • Try to feed it Pork. Doing so will provoke it into attacking you. You can loot the Crimson Crystal from its body afterwards.
    • Make either an Alchemy check of 6 or a Survival check of 8 to feed it Huana Mahe. The latter option earns Shady disposition. The Sow dies from poisoning, and you can loot its body for the Crimson Crystal.

    You will speak with the spirit of Eruke after.

  5. Now return to the Temple of Toamowhai and give the Crimson Crystal to the Pool of Memories at #11. Three new challenges become available which must be completed in The Crucible.

  6. Gul Trouble Endurance Trial

    This fight involves six different waves of Guls or Darguls or Alguls or any combination thereof. And sometimes a wave is led by an Ancient Fampyr Priest or Ancient Fampyr Sage. It's a matter of having enough healing resources or passive regeneration or buff-extension (e.g.,, Salvation of Time + Ancestor's Memory or Wall of Draining) to go the distance and outlast all six waves.

  7. Razorback Pack

    You'll initially be faced with a pack of six Razorback Piglets. Bringing a Piglet down to 0 Health means it gets back up and enlarges to a more powerful Razorback Sow. Bringing the Sow down to 0 Health means it gets back up and enlarges to a more powerful Grand Razorback. It is only after bringing the Grand form to 0 Health that you will have permanently killed it. If you struggle with this battle, you may want to minimize the danger by holding back on area-of-effect attacks, and focusing on one Piglet at a time. Go through each form from Piglet to Sow to Grand, leaving the rest of the pack as less powerful Piglets, until you kill one off for good. Rinse and repeat the process one at a time.

  8. The Animancer's Folly Endurance Trial

    This challenge involves several waves of Rusted Constructs, Ironclad Constructs and Steeclad Constructs. There will also be a Disruptor Coil in the middle of the arena, with several Disruptor Coil Fuel Cells lining the perimeter. You'll get an early hint when the Disruptor Coil damages and stuns the one Rusted Construct that starts the fight. The Disruptor Coil is actually a helpful presence for you. But it won't be either when it itself gets destroyed by the Constructs, or it runs out of Fuel Cells to draw power from. So it's a matter of outlasting the waves of Constructs, whether you can do it with the Disruptor's Coil help or not.

  9. Complete one of the Challenges, and two new Tasks become available. First is The Surviving Face's Hunt for the Matron's Skull, and then The Surviving Face's Hunt for the Uncut Gem.

  10. Furthermore, complete one of the Challenges, and a band of Druids and Rangers known as the Band of the Bear will show up after the battle. They naturally have a trio of Bears as their animal companions. Their leader, Greatbrother Ostgar, will speak rather boisterously with you before they take their turns in the arena.

    The spirit of Eruke will speak to you after completing another Challenge or one of the Tasks.

    Greatbrother Ostgar will have another brief conversation with you after completing another Challenge or Task.

  11. The Band of the BearCompleting two of the challenges means you now have the option to take on The Contest of the Survivor challenge. Accepting this challenge means choosing an exclusive alliance with the Survivor's Face, and precluding completion and/or continuation of either The Seeking Face or The Slaying Face Quests.

    The challenge itself is a battle against the Band of the Bear led by Greatbrother Ostgar. Be warned that the Rangers will aim for your spellcasters, and the Druids will make generous use of their spells.

  12. You'll be returned to the Temple of Toamowhai if you win. Go to the Pool of Memories at #11. The Quest will be completed when Humaire and Engari both congratulate you on becoming the Champion of the Survivor. You'll also get a Helm called Survivor's Tusks.

    The Crucible Quest is completed at the same time, and The Champion of the Hunt Quest begins.

Amazon.com
Amazon.ca
Amazon.co.uk
Sorcerer's Place is a project run entirely by fans and for fans. Maintaining Sorcerer's Place and a stable environment for all our hosted sites requires a substantial amount of our time and funds on a regular basis, so please consider supporting us to keep the site up & running smoothly. Thank you!

Disable all ads!