-

- Forums
- Chatrooms
- Gallery
- Gameplay Videos
- Upload
- Articles
- Mod Reviews
- Shop SP: Games, Movies, Books
|
|
| Pillars of Eternity 2 Video-Based Walkthrough by David Milward |
Beasts of the Slayer
*Evil* The Gods Are Fighting
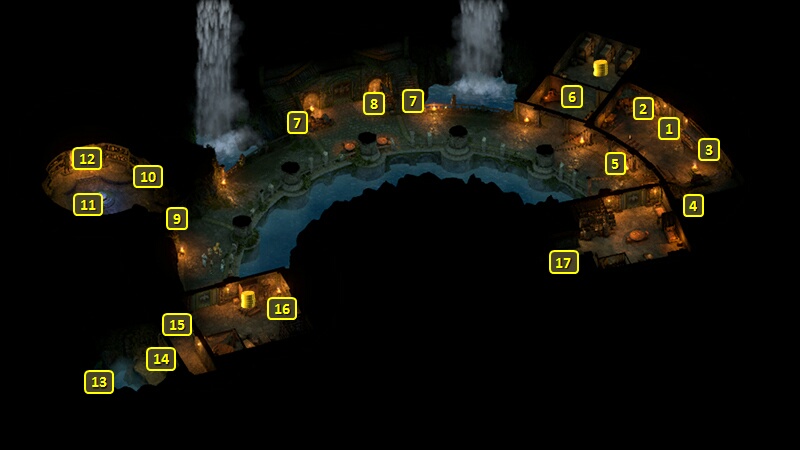
I speak to Engari at #10 in the Temple of Toamowhai. He informs me that the Slaying Face would appreciate the return of artifacts from abroad, beginning with the The Luckless Coin.
I go over to Domenga at #6, and bring in Serafen for Mirke.
Now I press a hidden button at #2 and open the door to #1, which leads to the outdoors.
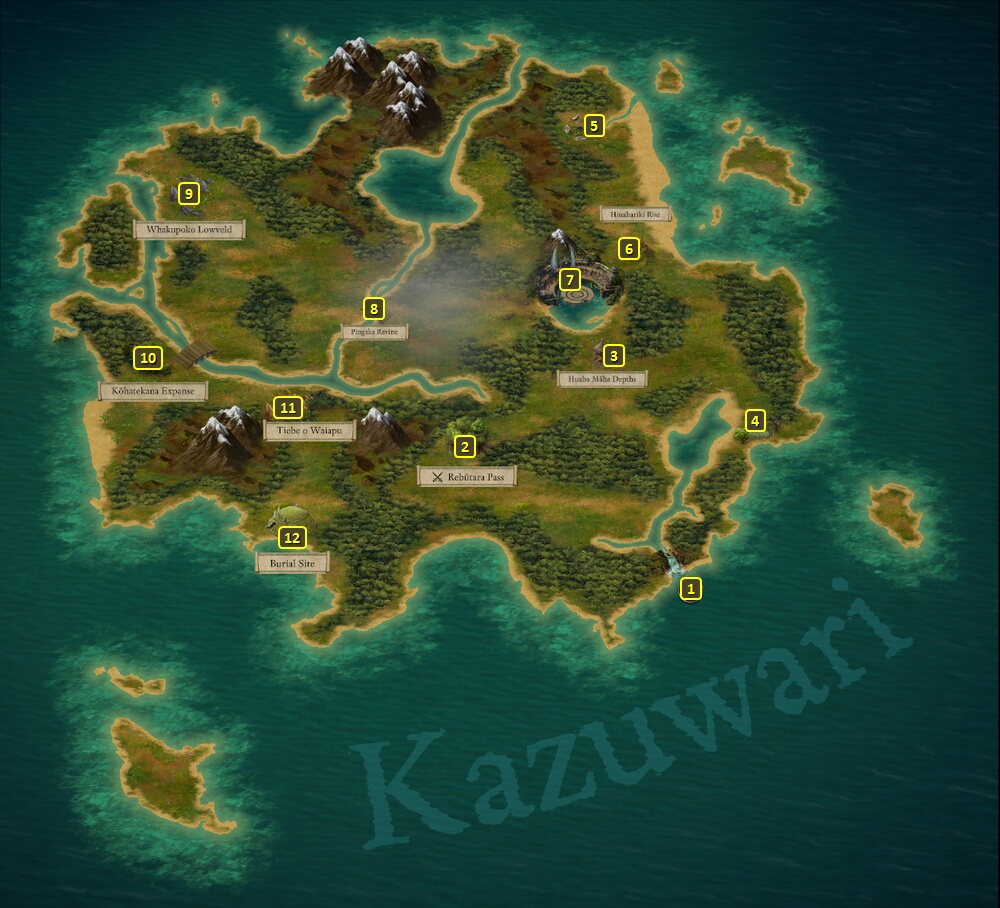
I emerge at #7 on the map of Kazuwari, and return to where I docked my ship at #1.
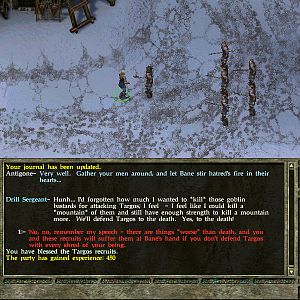
I sail in a southeast direction towards Port Maje. I am drawn into The Beyond about halfway through, and participate in a heated argument between several of the Gods. A lot of my replies were Aggressive, according to the main Quest called He Waits in Fire. That means my Awe of Death's Herald power gets upgraded so that it provides Tenacious (+5 Might, +2 Penetration) instead of Strong (+5 Might) in addition to Insightful (+5 Perception).
I board a Vailian Master Captain along the way. I conduct this fight a little different on account that I'm missing my usual tank, Mirke. Zarathos and Serafen go around the perimeter killing the Sailors and Priests. A lot of the Goldpact Knights and Fighters close in on Xoti, Tekehu and Ydwin. So I go straightaway to powers like Relentless Storm and Amplified Wave that will hold them up, and buy time for everyone else to themselves close in on the Knights and Fighters.
I sail south until I dock at Port Maje at #1 on the World Map.
*Evil* The Luckless Coin
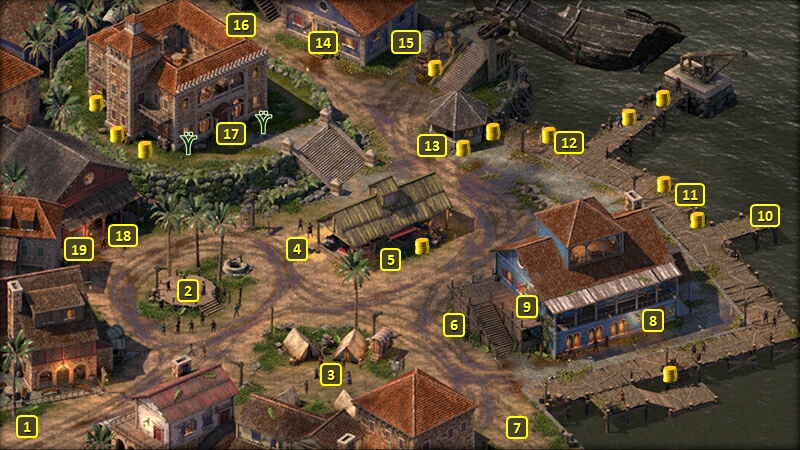
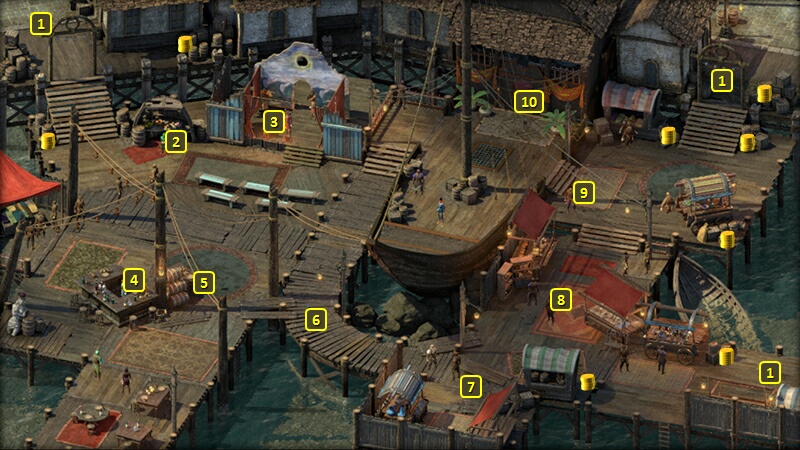
I dock at #10 on the map of Port Maje Harbor. The entrance to the Kraken's Eye is nearby at #8.
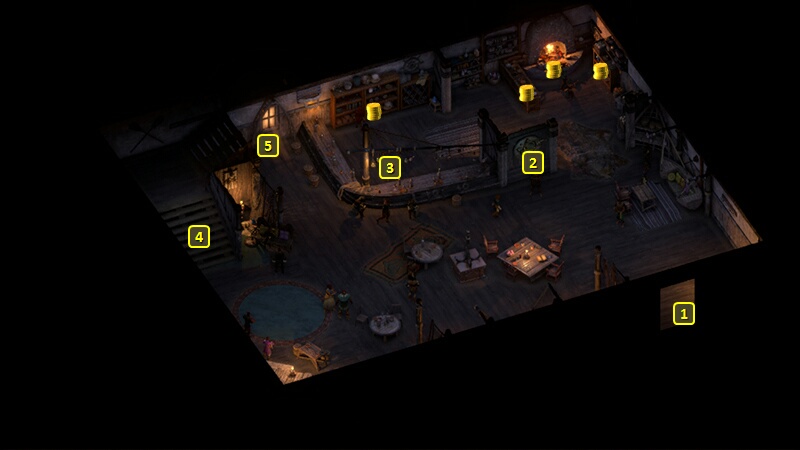
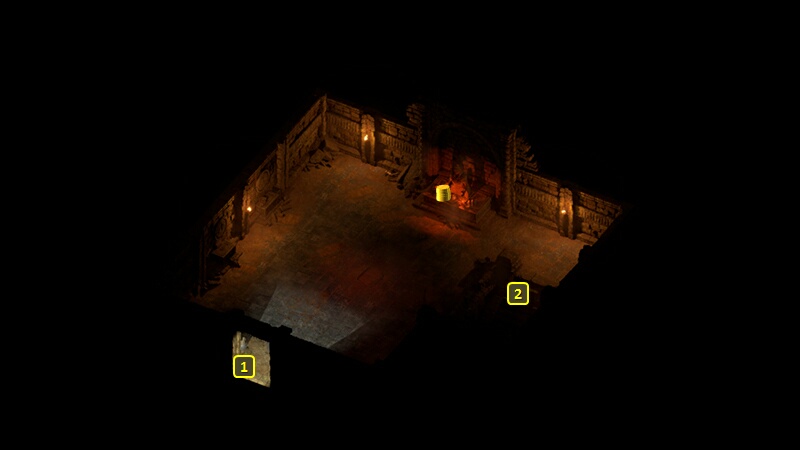
I enter at #1 on the map of the main floor of the Kraken's Eye. A man named Caedric will be sitting by himself at #5. He has The Luckless Coin, and there's multiple ways to get it from him. An offer to buy it from him, that makes a Streetwise check of 6 won't work. But an Arcana check of 18, or an Insight check of 12 followed by a Diplomacy check of 17 will convince him to part with it.
You can also pickpocket it from him. Keep in mind your pickpocketing character will need a really good Stealth score, given the large number of patrons moving around in a small space. And you'll need to make a Sleight of Hand check of 6 to steal it from him even if you can get close enough to him undetected.
Different possibilities open up when Zarathos offers to buy him Rum:
*Evil* Tactical Ogres
I go the Pool of Memories at #11 and give it The Luckless Coin. I accept the Tactical Ogres challenge.
The battle in The Crucible is against several Ogres, three of whom shoot cannons and the rest who pack over-sized anchors as clubs. This battle can be tough because the damage from each of them can really add up. That damage will outpace any buffs that I can try to put up. So I resort to cutting straight to get those Barring Death's Door on all my party members, and setting up the Salvation of Time-Ancestor's Memory loop set up right away. I also have Tekehu use Many Lives Pass By from the start to give the Ogres alternative targets and hold them up. That in turn buys me a little more time to get things set up. Even so, the early pounding I took brought things to the edge, but I managed to get set up in the nick of time. And once everything is set up, I can cut the Ogres down one by one.
I also get a Hide Armor called The Changeling's Mantle. But it's far too situational, which is to say that its powers are applicable only to Beasts, for me to find much use for it.
*Evil* Potions of Plenty
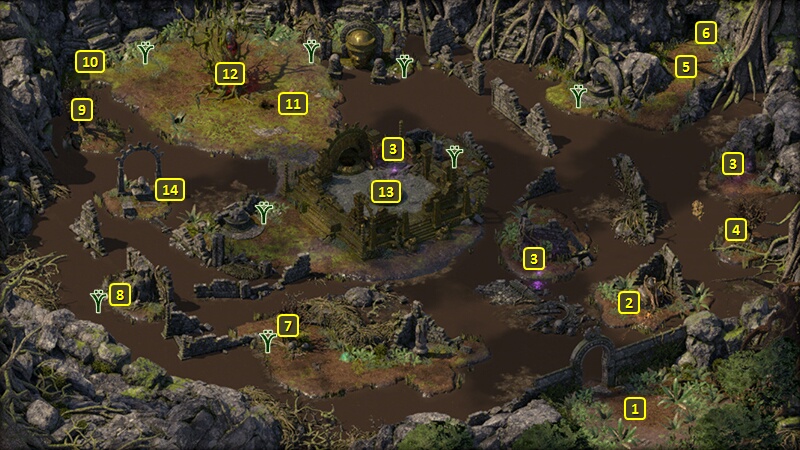
I emerge at #16 on the map of the Temple of Toamowhai. I speak to Engari at #10, and ask him for more rumors of artifacts. He gives me all of The Seeking Face's Hunt for the Haemneg's Handmaiden, The Surviving Face's Hunt for the Finger of the Exiled Queen and The Slaying Face's Hunt for the Hunter's Head.
Tekehu's Least Unstable Coil has now collected enough energy, so now I speak to Neale at #5. He rewards me with Liquid Adra and 3,000+ xp to conclude the Task called Potions of Plenty. I still get to keep the Least Unstable Coil too.
I leave through the door at #1 to return outdoors.
*Evil* The Hunter's Head
I sail for Motare Island at #40 on the World Map, boarding any ship that I find along the way.
I dock at #2 on the map of Motare Island. I travel to Motare O Kozi at #5.
I start off at #1 on the map of Motare O Kozi. I get The Hunter's Head at #14.
I sail back to Kazuwari at #49 on the World Map, and return to the Temple of Toamowhai.
*Evil* Xaurip Chronicles
I go to the Pool of Memories at #11 and give it The Hunter's Head. I accept the Xaurip Chronicles challenge.
The battle in The Crucible is against numerous Xaurips, two Drakes and an Elder Drake. The wall acts as a divider, so I go into Stealth mode and sneak up on the west side of it. That forces the Drakes to bend the corner before they can use their fiery breath on me. And that buys me a little more time to get set up with the Salvation of Time-Ancestor's Memory loop, along with the other buffs that it will keep going. It suffices to outlast them.
I also get a Sabre called Dire Talon. And again its focus on killing Beasts, or summoning a Drake or some Wurms once per Rest, means it doesn't have much appeal to me.
*Evil* Titan's Heart
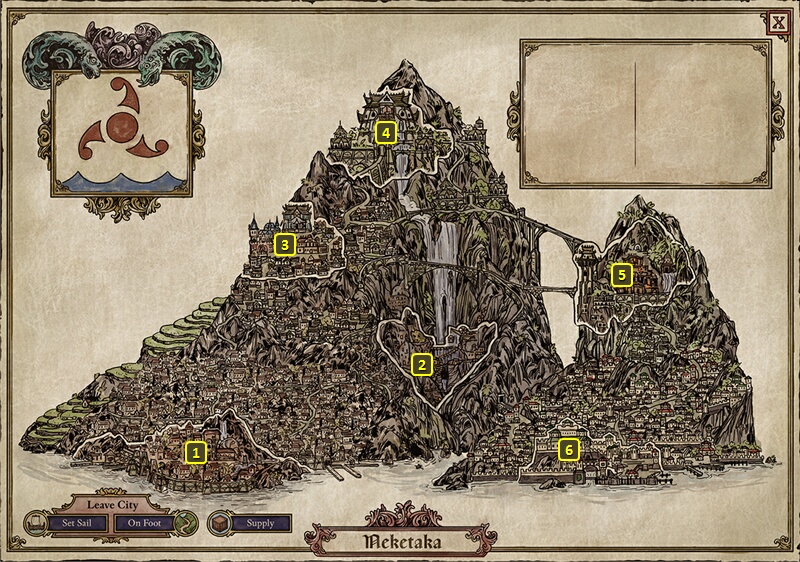
Now I sail to Neketaka at #17 on the World Map.
I go around buying crafting ingredients from Una in Serpent's Crown, as well as The Dark Cupboard and Cuitztli's in Periki's Overlook.
I click on the Brass Citadel and then travel directly to the Fleet Master's Office. The Titan's Heart will be in a chest just to the right of the front door. Ydwin goes into Stealth Mode to lift it. I then exit through the front door.
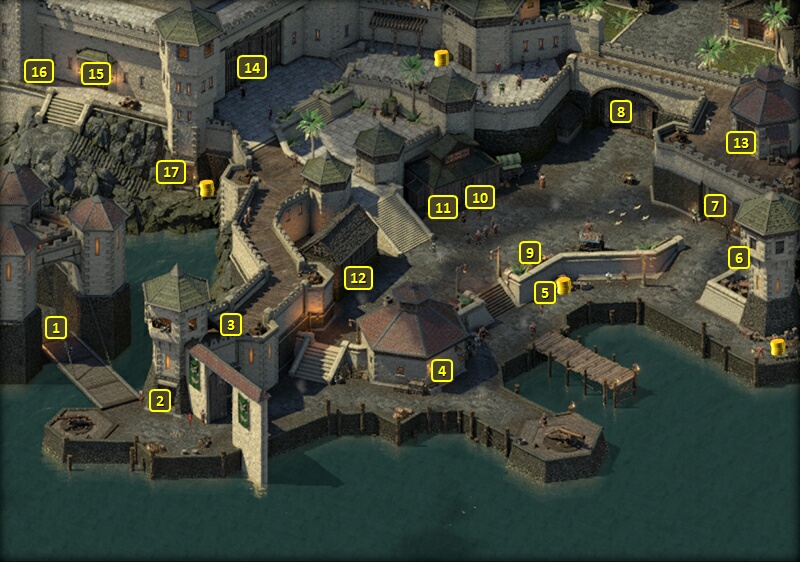
That brings me to #10 on the map of the Brass Citadel. I go to the exit at #8, and from there return to the ship.
I sail back to Kazuwari at #49 on the World Map, and return to the Temple of Toamowhai.
*Evil* Clash of the Fire Titan
I go the Pool of Memories at #11 and give it the Titan's Heart. I accept the Clash of the Fire Titan challenge.
The battle is against numerous Ashen Skeletons led by a Fire Titan. The Salvation of Time-Ancestor's Memory loop works as always. I include Within Ngati's Embrace from Tekehu in the extended buffs since the Fire Titan has a power that mimics the Delayed Blast Fireball spell.
I also get a Flail called the Keeper of the Flame. This weapon is actually a legitimate alternative to Xoti's Sickle, and I seriously considered having her use it instead. It will on Hit cause Burning Damage to everyone, friend and foe alike, with 2.5m. And that damage will scale with Xoti's Religion skill. And once everyone in the party is protected by endless Barring Death's Doors, I can take full advantage of the weapon without worrying about its other edge. Also, I could have chosen the enchantment that gives everyone +4 Accuracy, which would enhance the Monk powers like Swift Flurry and Heartbeat Drumming which several characters in the party have. In the end I stayed with the Sickle. Xoti is at the point where she still does attack occasionally, but in the end now does little else besides spit out Salvation of Time non-stop once the loop and the other buffs have been set up. And the Action Speed boost from Urgent Harvest will itself get prolonged by Salvation of Time. And that extra boost of speed can really come in handy when I want to insert something else, like a different Priest spell or Blade Turning, in between castings of Salvation of Time.
I also got an Adra Ban from the fight, so I'll hold onto that for a weapon upgrade.
I emerge at the door at #16 on the map of the Temple of Toamowhai. Serafen has completed the requirements for the second upgrade for his Slayer's Claw, those requirements being to have participated in the three previous battles collectively known as "Beasts of the Slayer" while wielding the weapon. The second upgrade is Stelgaer's Rage. It means he has a 10% chance to gain +1 Penetration for 8 sec whenever he's hit. And the Penetration boost can stack up to three times.
I leave out the door at #13 to return to the outdoors of Kazuwari.
Clash of the Fire Titan
The good party handles this fight differently for obvious reasons. Alliria switches to the Iron-Clasped Grimoire, Modwyr and The Eye of Wael. She also equips Concelhaut's Skull as her Pet for the time being.
I start the fight itself by sending Eder ahead. He activates his Shield Wall once the Flame Blights and Ashen Skeletons have closed in on him. The Shield Wall plus his other Damage Resistances ensures he takes little if any Damage from the Ashen Skeleton archers. That buys time for the rest of the party to set up.
Alliria renders the Fire Titan helpless and doomed with multiple castings of Concelhaut's Crushing Doom. The rest of the party goes to work on the Ashen Skeletons and Flame Blights. The good party conducts the other Beasts of the Slayer fights in similar fashion.
The Fire Titan himself leaves behind two Adra Ban in addition to the Keeper of the Flame.
I am now back at #16 on the map of the Temple of Toamowhai. I speak to Domenga at #6, and briefly switch in Xoti. I upgrade her Kitchen Stove from Superb to Legendary with the two Adra Ban.
I put my core party back together and go out the door at #1.
*Evil* The Hunt for Haemneg's Handmaiden
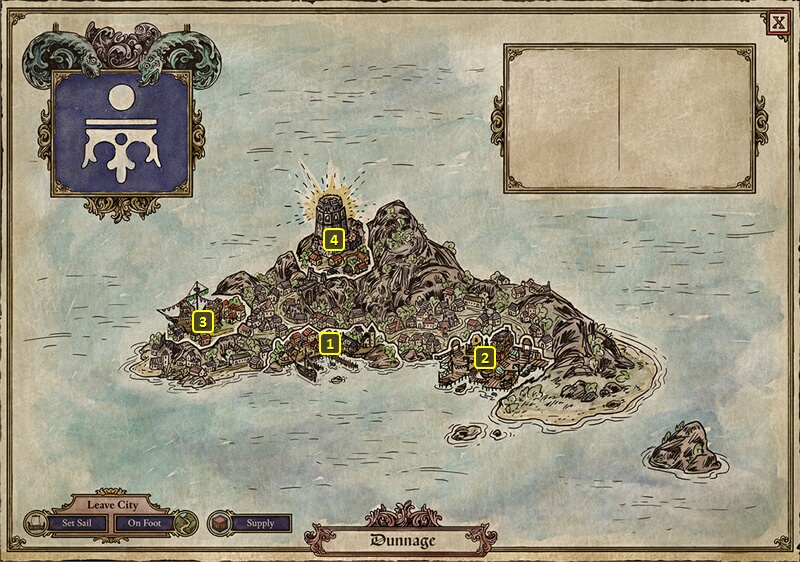
I board ship and sail a little southwest until I reach Dunnage at #9.
I go to both King's Coffin and Radiant Court, buying a few of the more expensive food ingredients as I go around.
Xoti at some point invites Serafen to look into her soul. He initially claims to see nothing. But he's afterwards troubled and relates to Zarathos that he saw Xoti's soul as fire and darkness consuming all before it. Zarathos chooses the Shady reply to have Serafen say nothing to her.
I enter the Treasure Trove through the door at #10 on the map of the Radiant Court. The Hunt for the Haemneg's Handmaiden is on the north wall of the Treasure Trove. Ydwin goes into Stealth mode to lift it undetected. I then buy some gems from Dimessa.
I return to ship, sail back to Kazuwari at #49 on the World Map, and return to the Temple of Toamowhai.
*Evil* The Tomb of Vathor Cadhu
I go the Pool of Memories at #11 and give it The Hunt for the Haemneg's Handmaiden. I accept The Tomb of Vathor Cadhu challenge.
Vathor Cadhu is an undead Thaumaturge at the top of the north platform. He also has several Royal Animats as his minions. None of them will attack until I click on the obelisk near the platform. But there's plenty of traps around it, so I have Ydwin disarm them. There will also be a few gouts ringing the arena that can replicate either a Rolling Flame or a Delayed Blast Fireball. I can't do anything about those, so I'll have to tough them out. Also, I turn off everyone's AI.
Once I do start the battle, I immediately set about to having everyone covered by Barring Death's Doors that will be infinitely extended through the Salvation of Time-Ancestor's Memory loop. Tekehu puts up Within Ngati's Embrace, Nature's Balm and Moonwell in order to lessen the damage of the initial onslaught, and therefore buy time to set things up.
The next upgrade for Slayer's Claw requires Serafen to score 1,000 points of Raw Damage. It doesn't matter how, only that it be Serafen who delivers the Raw Damage. So Blood Frenzy, the Bleeding Cut modal for using his axe, and the Retaliation attacks from his Ragged Cloak will all contribute when they connect.
The infinite Barring Death's Door on everyone allows me the luxury of having Serafen and only Serafen make any attacks after the initial set up. He eventually does wear everything down. And he gets 145 points of Raw Damage towards that last upgrade.
The loot includes a Small Shield called The Best Defense, but I have no use for it. Most bashing shields never scale in their Accuracy or Penetration and therefore have limited utility as off-hand weapons.
I leave through the door at #13 on the map of the Temple of Toamowhai.
*Evil* Finger of the Exiled Queen
I sail for the Sanctum Island at #15 on the World Map, and then enter the Oathbinder's Sanctum.
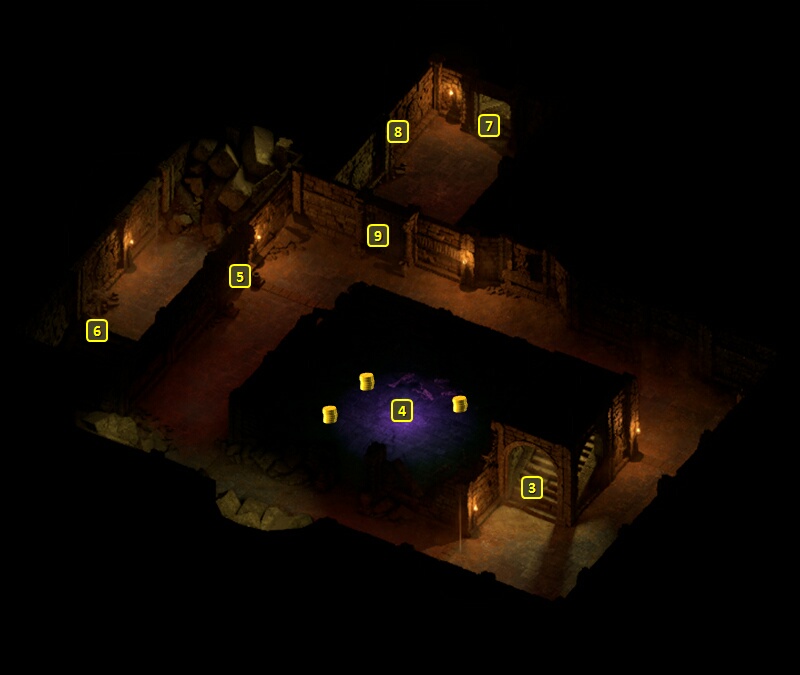
I enter at the stairs at #1 on the map of the first floor, and then go down the stairs at #2.
That brings me to the stairs at #3 on the map of the second level. I pass through the now open door at #9 and down the stairs at #7.
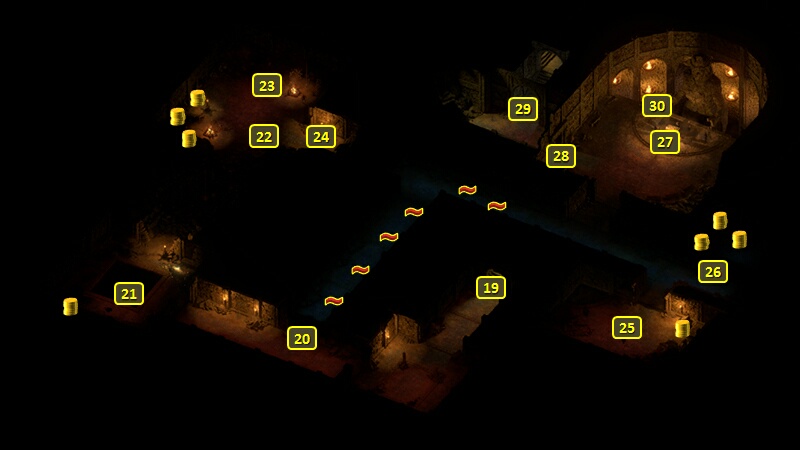
That brings me to the stairs at #29 on the map of the fourth level. I have Serafen equip the Animancer's Energy Blade in his off-hand, since it turns out that's an even better way to get Raw Damage.
The Cult of Woedica at #29 now attacks. They're not at all a threat now, and I simply have Serafen cut them down one at a time. He gets to 523 Raw Damage for purposes of the last upgrade.
The Finger of the Exiled Queen is now at #30. I take it, leave the Sanctum, sail back to Kazuwari at #29 on the World Map, and return to the Temple of Toamowhai.
*Evil* Tenebrous Tenacity
First, I upgrade the Animancer's Energy Blade to Superb. I have Pyrites and Ta Ondra Taras to spare.
Now I go the Pool of Memories at #11 and give it the Finger of the Exiled Queen. I accept the Tenebrous Tenacity challenge.
The battle is against several Nightmare Shades. These ones can use "Shadow Walk", which resembles the Fighter's Charge power but with Freezing Damage. They'll also go after your squishy spellcasters whenever they can. These ones also have a second life as Shades after you kill them the first time, and then a third life as Shadows after killing them the second time.
I set up the Salvation of Time-Ancestor's Memory loop as soon as I can. Tekehu again puts up Within Ngati's Embrace, Nature's Balm and Moonwell in order to lessen the damage of the initial onslaught, and therefore buy time to set things up. That initial onslaught is going to be very hard for the characters that they zero in on, so those characters have to be first in line for Barring Death's Door from Xoti in between her castings of Salvation of Time. First it's Serafen, then it's Tekehu. Xoti herself is taking some, but not as much, so she makes herself next. She then adds it for Zarathos and Ydwin when she can.
And again everybody else is a spectator while Serafen hacks away with the Slayer's Claw in one hand and the Animancer's Energy Blade in the other.
I gradually wear all the spirits down and am returned to the Temple of Toamowhai at #16. Serafen has obtained the third and last upgrade for Slayer's Claw, Aspect of the Stelgaer. It upgrades the weapon itself from Superb to Legendary. A killing blow from the weapon itself now restores 15 Health to the wielder, and causes Raw Damage to nearby enemies.
I go over to Domenga at #6 and briefly switch in Konstanten. I now have at least two Adra Ban and two Emeralds, so I upgrade his Lover's Embrace dagger from Superb to Legendary.
I assemble my core party, with the difference that Serafen is staying in for Mirke for the time being. There's another weapon I want to get for him soon. I leave out the door at #1.
Both parties will now conclude matters with the Principi.