He Waits in Fire

- The quest begins once you complete the Main Quest called A Distant Light.
The first step to completing it is to make your way to Ashen Maw,
which is at #60 on the World Map.
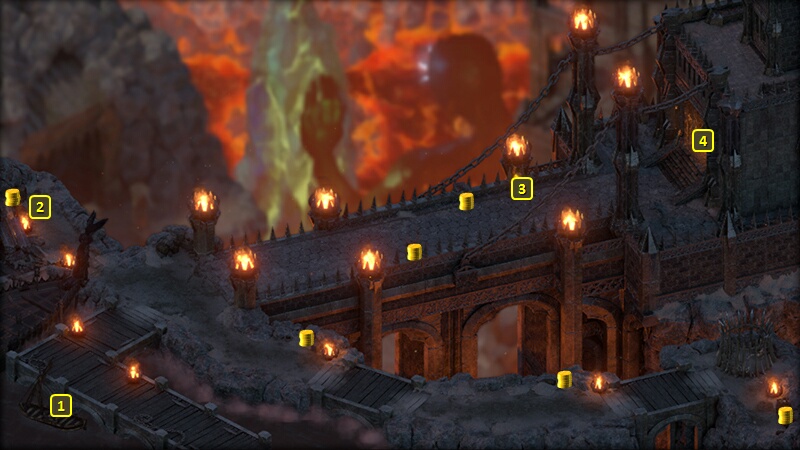
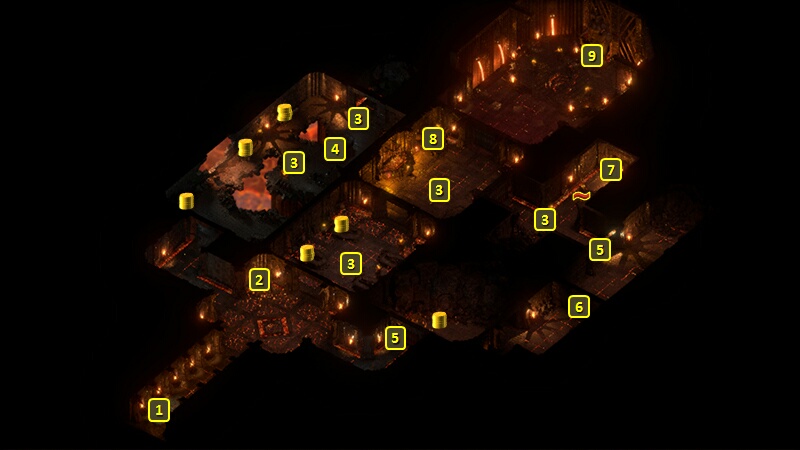
- You start off at #1 on the map of Ashen Maw.
A severely wounded Rathun Vanguard will be at #3. He can provide some background information. You can give him a mercy kill through poison that requires an Alchemy check of 4. That earns Benevolent disposition, but will also consume a Sapphire, in addition to other common crafting ingredients. You can also kill him with a Cruel option if you wish.
The entrance to the Sentinel Wall is at #4.
- You'll now be at #1 on the map of the Sentinel Wall. A corpse at #3 has the Ashen Key.
- The door at #4 can be opened with either a skill check of 10 or the Ashen Key.
- A group of Rathun will be at #5. You can either kill them, or talk them down with any one of an Insight check of 5, a Metaphysics check of 5, or a Religion check of 5.
The entrance to the Ashen Bridge is at #6.
- Now you'll be at #1 on the map of the Ashen Bridge at #1.
You'll have to fight a group of Drakes, Elder Flame Bats and Flame Blights at #2.
- The entrance to the Lair of the Ancient is at #3.
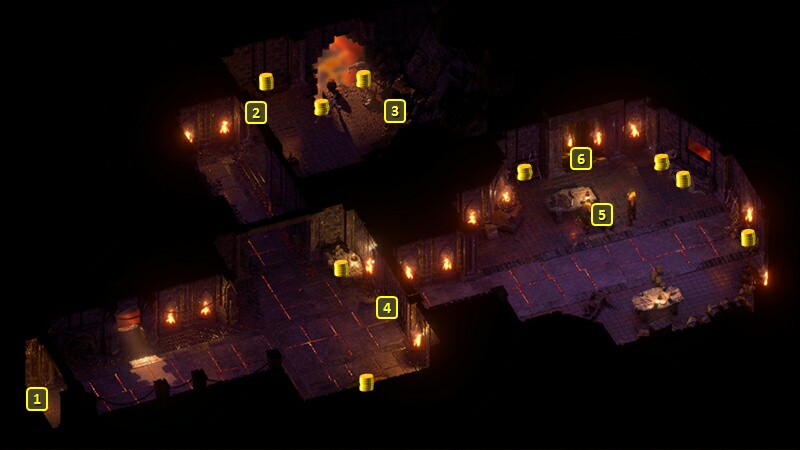
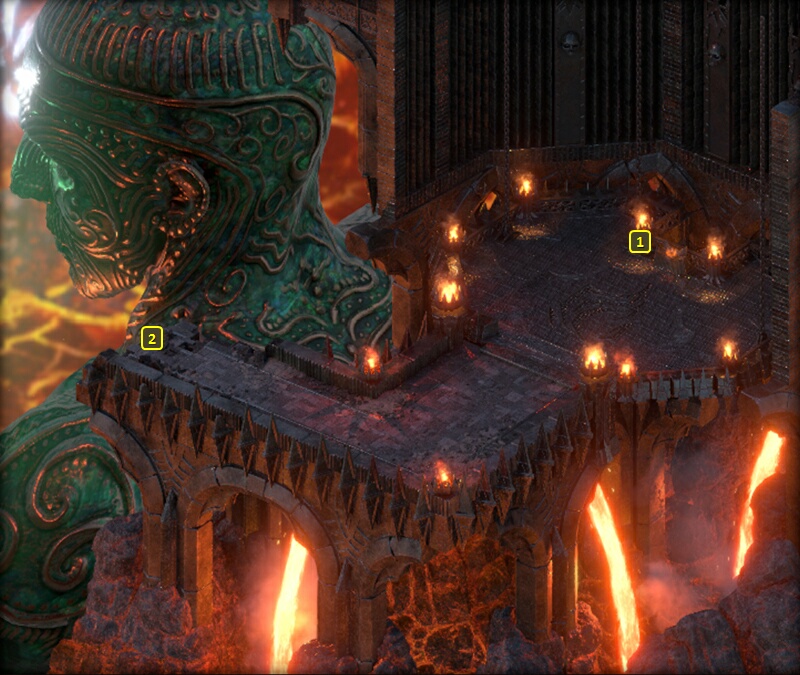
- Now you'll be at #1 on the map of the Lair of the Ancient.
- You'll have to fight several Magma Oozes, Xaurips and Elder Flame Bats at #2.
- A dead Rathun will be at #3. You can use your Watcher powers to communicate with its soul, and learn that there was an attempt to summon a dragon to fight against Eothas only for the dragon to kill her summoners.
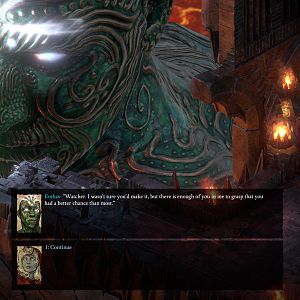
- The Magma Dragon known as Jadaferlas the Ancient will be at #4. You could attack her. She can be a tough opponent, even for 20th level parties. Her fiery breath can cause Injuries on the Path of the Damned setting. She also periodically summons Magma Oozes to help her. She'll leave behind a Magma Dragon Gizzard Stone if you kill her. It can be used to upgrade any item's enchantment level from Superb to Legendary.
You can also resolve matters peacefully. It begins with any one of a Resolve check of 11, a Bluff check of 8, or a Diplomacy check of 8. You can then follow up with any one of a Resolve check of 16, a Survival check of 14, a Religion check of 14, having 2 points of Honest disposition, or an Intimidate check of 8.
You'll have more than one option after making the two checks. One is to ask her to help you against Eothas. She'll remain in her lair, but let you loot the nearby items. The other option is to convince that Magran is about to cause the volcano to erupt, convincing her to fly and leave altogether.
- A dead Rathun Priestess will be at #5. You can use your Watcher powers to see its memories of her trying to summon Jadaferlas against Eothas, only for the dragon to slaughter her summoners.
You can also take the Torc of Bithakten from her corpse, which you'll need for the Quest.
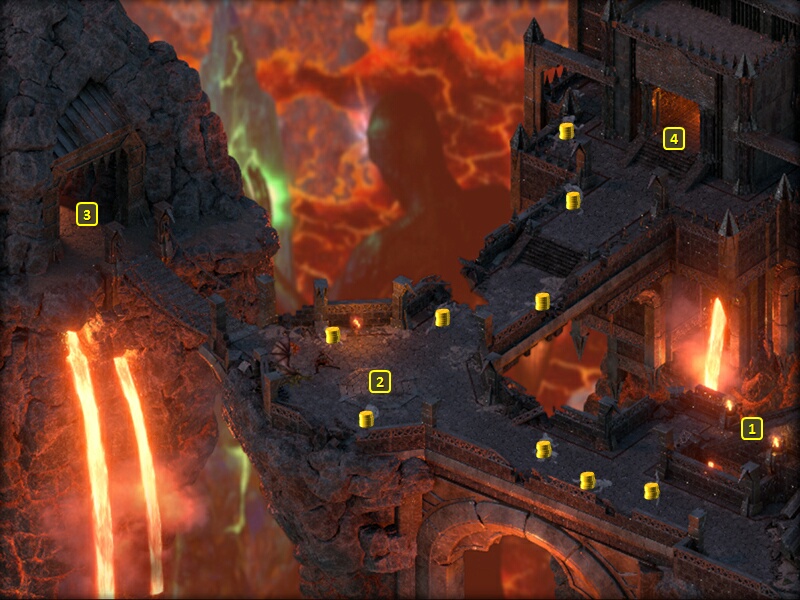
- Now return to the Ashen Bridge. The door at #4 leads to the Jagged Keep.
- Now you'll be at #1 on the map of the Jagged Keep at #1.
- There will be a Rathun Raider at #2. You could kill her, with the result that the Rathun at points marked #3 will also be hostile.
Or you can convince her to let you pass peacefully if you have previously obtained the Torc of Bithakten from the Lair of the Ancient. That means you'll have free run of the Keep without any Rathun attacking you. That is, at least until you encounter the Warlord who leads the Rathun at #9.
- The Shrine of Magran will be at #9. If you have the Torc of Bithakten in your possession, you can talk to him to come to an understanding. Making a start requires either a Diplomacy check of 5 or an Intellect check of 15.
The Aggressive option that you have a score to settle with Eothas, or that Eothas stole a piece of your soul will convince him to let you use the Shrine. The Cruel and Shady options can potentially lead to a fight, and will if you choose to attack afterwards. However, making either an Intimidate check of 9 or a Religion check of 9 can avoid a fight.
The subject turns to the absence of the Magma Dragon named Jadaferlas. Bathor wants her as an ally for his planned attack on Eothas. If you spared Jadaferlas so that she either remained in her lair or flew away, Bathor will resign himself to what amounts to an unfortunate turn.
There remains a real potential for a fight against him if you killed Jadaferlas. A Bluff check of 8, or a Bluff check of 12 that earns Shady reputation, can avoid his suspicions. Admitting you killed the dragon can lead to hostility, but you can avoid that by pointing out that Jadaferlas betrayed the Rathun by killing the Priestess.
Now interact with the Shrine. Magran herself will speak to you. She declares her intentions to cause the volcano to erupt to try and destroy Eothas' body. She also indicates that she created the Rathun to prevent Kith from reaching Ukaizo, and now considers them expendable.
If the Rathun led by Bathor are still alive, you can either let them remain in the Keep convinced they can make their final stand against Eothas, or convince them to leave the Keep and reveal that Magran is soon going to erupt the volcano. Convincing them requires either a Diplomacy check of 5 or a Metaphysics check of 5, followed by a Religion check of 10.
- However you resolved matters with the Rathun, you can now click on the Shrine of Magran to begin a scripted interaction. Place the Torc of Bithakten in the Shrine to open the way to the Foundations of the Ashen Maw.
 You'll now be at #1 on the map of the Foundations of the Ashen Maw. Speak to Eothas at #2. The particulars of the conversation won't matter, but he'll indicate his intentions to destroy the ancient Engwithan machines that sustain the cycle of The Wheel, in order to force a new age and a new understanding between gods and mortals.
Magran will at this point now cause the volcano to erupt. Ondra will try to smash Eothas with a tidal wave, and have Krakens try to hold him down. But he ignores all of it, while carrying you to safety.
You also get reunited with the part of your soul that had been inside of Eothas. The process leaves you comatose for several days, until you wake up in the throne room of the Kahanga Palace. That will start the Quest called The Coming Storm.
For the Lost
The Watcher power you obtained during the Stranded Quest will now be upgraded, depending on which one you obtained.
Sympathy for the Lost gets upgraded to Pity for the Lost - All foes Distracted (-5 Perception, Flanked) for 20 sec and +35 Health and Fit (+5 Constitution) for all allies in 2.5m radius, once per Rest.
No Pity for the Lost gets upgraded to No Time for the Lost - All foes Distracted (-5 Perception, Flanked) for 20 sec in 2.5m radius, duration of all hostile effects decreased by 10 sec and duration of all beneficial effects increased by 10 sec in 2.5m radius, Steadfast (+5 Resolve) for the Watcher for 20 sec, once per Rest.
Chorus of the Lost gets upgraded to Commandment of the Lost - All foes Distracted (-5 Perception, Flanked) and Immobilized (-5 Dexterity, cannot move) for 20 sec, once per Rest.
Death's Herald
Completing this Quest means the Gods will want to speak to you again. It
will occur if you sail on the World Map long enough after completing the Quest.
And again, many of the replies can be grouped into Aggressive, Sassy or
Diplomatic. And they affect what kind of Death's Herald power you receive
at the end of the conversation.
Woedica screws her mouth into a sneer. "You fool! If only we had attacked him when I first proposed it-!" Accusations drip bitter as bile from her tongue.
- "Shut up!" (Passionate disposition) Aggressive, negative with Woedica and positive with Ondra.
- "I'll just... wait until you're done." Sassy, negative with Woedica.
- "Eothas could be destroying the Wheel right now, and you're arguing?" Aggressive, negative with Woedica.
- "What's going on here?" Diplomatic, positive with
Berath.
"We try, but... agreement eludes us." Ondra's storm-dark eyes swivel to meet yours.:
- "We can no longer count on the gods for guidance. Kith will have to figure this out on our own." Diplomatic, positive with Magran, negative with Ondra.
Wael's many eyes alight on each god in turn. "We make little enough progress on our own."
- [Roll your eyes.] "That's obvious." (Clever Disposition) Sassy, negative with Hylea.
- "Progress? Are you planning something new?" Diplomatic, positive with Ondra.
...The Pallid Knight speaks with the chilly temperance possessed only by the god of death.:
- "That's horrible!" (Passionate disposition) Aggressive, negative with Berath.
- "Whose 'good?' Yours?" (Honest disposition) Sassy, negative with Berath.
- "A grim but honorable sacrifice." (Diplomatic disposition) Diplomatic, positive with Berath.
"But we get ahead of ourselves. First, the Watcher must get to Ukaizo, and that will be a trial all its own.":
- "Good. I could use a challenge." Aggressive, positive with Magran.
- "Another? Aren't you bored yet?" Sassy, positive with Magran.
- "Right, because I haven't had one of those lately." Sassy, positive with Magran.
"And the Watcher will be forced to reckon with it if he wishes to confront Eothas."
The birds at last linger too long, and Magran slaps them away. They burst into a cloud of essence, then reform, and fly in a screeching chorus back to Hylea:
- "Guardian of Ukaizo?" Diplomatic, positive with Magran.
- "This 'guardian' is but one more thing that will fall before me." Aggressive, positive with Magran.
"Go prepared, Watcher. The guardian will not stand aside, not even for the Herald of Berath." -OR-
"And Eothas will not fight the creature - it would prove little more than a distraction for him, especially as my tsunami and Magran's volcano couldn't stop him.":
- "Won't Eothas take care of it?" Diplomatic, positive with Ondra.
- "Why can't you just... get rid of it?" Sassy, negative with Galawain and Magran.
- "So I have to fight the Guardian of Ukaizo. Any suggestions?" Aggressive, positive with Magran.
"What do you think of Eothas' scheme to destroy the Wheel?":
- "It's a long time coming. Kith will finally know what a bunch of frauds you all are." (Aggressive disposition) Sassy, positive with Rymrgand, negative with Wael and Woedica.
- "With the gods' guidance we might survive what Eothas plans." Diplomatic, positive with Hylea and Ondra and Woedica.
- "This doesn't feel like the act of a caring god to me." Aggressive, negative with Magran, positive with Hylea and Ondra.
"Without sustenance, we starve as any mortal might. We die and leave a great silence behind - an eternal emptiness from which nothing is born.":
- "I prefer to think of it as a very long vacation." Sassy.
- [Nod.] Diplomatic.
- "Why do you waste time arguing, then?" Aggressive.
"He believes kith will rise to his challenge. I am not so sure, but I look forward to watching them try.":
- "How did Eothas fool you all? You're the most powerful beings in Eora." (Passionate disposition). Positive with Wael, negative with Berath and Hylea and Ondra and Woedica.
"What if Eothas is right, and kith succeed in rebuilding the Wheel? What then?":
- "We'll learn and grow, as Eothas intends." Diplomatic, positive with Hylea and Abydon.
- "Don't worry - there will always be a place for the gods in Eora." Diplomatic, positive with Magran and Woedica.
- "I don't know, but aren't you curious to find out?" (Clever disposition) Sassy, positive with Magran and Wael.
The Pallid Knight's eyes bore into yours. "An impassioned plea from the Hound of Eothas may still temper his actions. "Confront him at Ukaizo.":
- "I'll try." Diplomatic, positive with Berath.
- "I will make him heed my words." (Aggressive disposition) Aggressive, positive with Skaen and Woedica.
- "He's not going to listen to me, I'm just a kith." Diplomatic, positive with Hylea, negative with Rymyrgand.
- "I don't owe you anything anymore." (Aggressive disposition) Aggressive, positive with Berath and Wael.
- "I can't defy Eothas' will." Diplomatic, negative with Berath and Woedica.
"Does that not frighten you? You, kith, who are most vulnerable?":
- "Oh, I'm terrified!" Sassy, positive with Hylea and Ondra, negative with Magran and Woedica.
- "It does. But I will not let fear rule me." (Passionate disposition) Diplomatic, positive with Abydon and Berath and Galawain and Magran.
- "I trust Eothas. There is nothing to fear." Diplomatic, positive with Hylea.
- "Fatalism helps no one and solves nothing." Aggressive, positive with Berath and Magran and Ondra and Wael.
- "Only the weak know fear." (Cruel disposition) Aggressive, positive with Rymrgand and Woedica.
What Death's Herald power you get after this conversation depends on the one you had at the conclusion of the Quest called
A Distant Light, and your dialogue choices during this conversation. More specifically, the upgrade depends on whether you made 4 Aggressive replies, 4 Sassy replies or 4 Diplomatic replies. 4 Aggressive replies takes priority over 4 Sassy replies, and 4 Sassy replies takes priority over 4 Diplomatic replies.
If you had at least 4 Aggressive replies:
- Raiment of Death's Herald gets replaced with Majesty of Death's Herald - Insightful (+5 Perception), Smart (+5 Intellect) and Strong (+5 Might) for 30 sec.
- Awe of Death's Herald has its Might Inspiration upgraded by one tier.
- Cruelty of Death's Herald has its Might Inspiration upgraded by one tier.
- Mien of Death's Herald gets replaced with Awe of Death's Herald - Strong (+5 Might) is added to the Perception Inspiration (Insightful or Aware) that was provided by Mien of Death's Herald.
- Wit of Death's Herald gets replaced with Cruelty of Death's Herald - Strong (+5 Might) is added to the Intellect Inspiration (Smart or Acute) that was provided by Wit of Death's Herald.
- Ire of Death's Herald has its Might Inspiration upgraded by one tier.
- Visage of Death's Herald gets replaced by Ire of Death's Herald, which adds the Strong (+5 Might) Inspiration.
If you chose at least 4 Sassy replies AND less than 4 Aggressive replies:
- Raiment of Death's Herald has its Intellect Inspiration upgraded by one tier.
- Awe of Death's Herald gets replaced with Majesty of Death's Herald - Insightful (+5 Perception), Smart (+5 Intellect) and Strong (+5 Might) for 30 sec.
- Cruelty of Death's Herald has its Intellect Inspiration upgraded by one tier.
- Mien of Death's Herald gets replaced with Raiment of Death's Herald - Smart (+5 Intellect) is added to the Perception Inspiration (Insightful or Aware) that was provided by Mien of Death's Herald.
- Wit of Death's Herald has its Intellect Inspiration upgraded by one tier.
- Ire of Death's Herald gets replaced with Cruelty of Death's Herald - Smart (+5 Intellect) is added to the Might Inspiration (Strong or Tenacious) that was provided by Ire of Death's Herald.
- Visage of Death's Herald gets replaced by Wit of Death's Herald, which adds the Smart (+5 Inspiration) Inspiration.
If you chose at least 4 Diplomatic replies AND less than 4 Aggressive replies AND less than 4 Sassy replies:
- Raiment of Death's Herald has its Perception Inspiration upgraded by one tier.
- Awe of Death's Herald has its Perception Inspiration upgraded by one tier.
- Cruelty of Death's Herald gets replaced with Majesty of Death's Herald - Insightful (+5 Perception), Smart (+5 Intellect) and Strong (+5 Might) for 30 sec.
- Mien of Death's Herald has its Perception Inspiration upgraded by one tier.
- Wit of Death's Herald gets replaced with Raiment of Death's Herald - Insightful (+5 Perception) is added to the Intellect Inspiration (Smart of Acute) that was provided by Mien of Death's Herald.
- Ire of Death's Herald gets replaced with Awe of Death's Herald - Insightful (+5 Perception) is added to the Might Inspiration (Strong or Tenacious) that was provided by Ire of Death's Herald.
- Visage of Death's Herald gets replaced by Mien of Death's Herald, which adds the Insightful (+5 Perception) Inspiration.
| Sorcerer's
Place is a project run entirely by fans and for fans. Maintaining
Sorcerer's Place and a stable environment for all our hosted sites requires a substantial amount of our time and funds on a regular basis, so please consider supporting us to keep the site up & running smoothly. Thank you! |